Your television doesn’t have to be a black rectangle that dominates your space. Modern design approaches turn screens into integrated art pieces that enhance your room’s aesthetic.
Designers now use creative techniques like sliding panels, natural wood accents, and reflective surfaces. These elements create curated walls that blend technology with beautiful decor.
This guide explores practical solutions for both homeowners and renters. You’ll discover how to achieve a polished look without major construction work.
We’ll show you how strategic lighting and smart cable management can improve both viewing experience and room aesthetics. Get ready to reimagine your entertainment area!
1. Why Your Living Room TV Wall Deserves a Luxury Makeover
Modern homes deserve more than just a functional screen placement – they deserve an intentional design statement. This central area of your home has evolved far beyond its basic purpose, becoming the heart of daily life and entertainment.
Think about how much time your family spends in this space. It’s where memories are made during movie nights and where conversations flow during gatherings. This makes it worth investing in a design that serves both practical and emotional needs.
More Than Just a Screen: The Heart of Your Home
Your entertainment center has become the modern hearth. It’s where your family gathers to connect, relax, and share experiences. A well-designed media wall supports these precious moments.
Remember those bulky entertainment centers from the past? They’ve been replaced by integrated designs that serve multiple purposes. Today’s solutions blend storage, display, and technology into one cohesive unit.
The transformation from purely functional to aesthetically pleasing creates an emotionally comforting environment. You’ll feel the difference when your space looks intentional rather than accidental.
There are real psychological benefits to having a beautifully curated entertainment area. It makes your home feel more put together and welcoming to both family and guests.
Blending Technology with Seamless Aesthetics
Great design isn’t about hiding your screen – it’s about turning it into art. When technology blends seamlessly with your decor, the entire room feels more harmonious.
Proper media wall design enhances the overall flow of your living area. It creates a more inviting atmosphere that works for both entertainment and daily living.
This approach balances technology with comfort in the perfect way. You get all the modern conveniences without sacrificing style or coziness.
Investing in quality design increases your home’s perceived value and enjoyment. More importantly, it creates a space that supports family bonding and social gatherings for years to come.
2. Start with a Plan: Defining Your TV Wall’s Purpose and Vibe

Great design begins with intention, not just measurements and materials. Before you measure anything, take a moment to dream about how you want your space to feel.
Think about your room’s existing architecture and natural lighting. These elements will guide your design choices more than any trend.
Consider traffic patterns and seating arrangements early in your planning. This ensures your media area works for both viewing and daily life.
Ask Yourself: Gallery, Cinema, or Cozy Hearth?
Your entertainment area can serve different moods and purposes. Which feeling resonates most with your family’s lifestyle?
The gallery approach turns your wall into an art display when not in use. It’s perfect for those who appreciate clean lines and curated aesthetics.
Cinema style creates dramatic, theater-like excitement for movie night. This look often features darker colors and specialized lighting.
The cozy hearth design emphasizes warmth and family connection. It might incorporate natural materials and comfortable seating arrangements.
Listing Your Must-Have Functions Beyond Viewing
Your media space should handle more than just screen time. Make a list of additional functions that matter for your way of living.
Storage needs often include media components, games, or books. Display space might show artwork, family photos, or collections.
Sound enhancement becomes important for true cinema experiences. Some families prioritize hidden components for a cleaner look.
Consider creating a simple sketch of your ideal setup. This helps visualize how everything will work together in your room.
Prioritize features based on your budget and available space. Remember that good design serves your life, not just your eyes.
3. The Magic of Sliding Art Panel Walls
Imagine a wall that transforms with your mood and needs. Sliding panels offer this magical flexibility. They turn your media space into a dynamic feature.
This system gives you gallery elegance by day. It provides cinema excitement by night. The change happens with a simple, smooth glide.
Your Gallery-by-Day, Cinema-by-Night Solution
Sliding panels create a dual-purpose design. Your screen hides behind beautiful artwork when not in use. This keeps your room looking polished.
When entertainment time arrives, you reveal the display. The transition feels special every time. It makes movie nights more exciting.
You can change the artwork for seasons or moods. This keeps your space feeling fresh. No tools are needed for these swaps.
Choosing the Right Rail System for a Smooth Glide
The rail system makes everything work. Look for tracks with whisper-quiet wheels. They should handle the weight of your panel.
Consider ceiling-mounted or wall-mounted options. Each has different installation needs. Both provide that satisfying smooth movement.
Weight capacity matters for safety. Check the specifications before buying. Professional installation might be best for heavier setups.
How to Select a Canvas that Complements Your Room
Your panel’s finish affects the overall look. Choose materials that match your decor. Texture helps hide the screen outline.
Size matters for proper proportions. The artwork should cover the entire display area. Allow some extra margin around the edges.
Color schemes should harmonize with your room. Bold patterns work well for modern spaces. Softer tones suit traditional settings.
Think about storage for multiple panels. A dedicated space keeps them protected. This way you can rotate them easily.
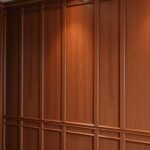
4. Creating a Warm and Textured Slatted Wood Wall

Thin wood slats act like a cozy sweater for your space. They bring natural beauty and multiple functions to your entertainment area. This approach combines organic materials with smart design solutions.
You get both visual appeal and practical benefits. The texture adds depth while serving acoustic and organizational purposes. It’s a complete package for modern homes.
Acoustic Benefits: Hushing Echoes for Better Sound
Wood slats naturally absorb sound waves in your room. They reduce annoying echoes during movie playback. This creates clearer audio without extra equipment.
Your viewing experience becomes more immersive. Dialogue sounds crisper and music feels richer. It’s like having built-in sound treatment.
The spacing between slats affects acoustic performance. Closer arrangements work better for sound control. You can adjust this based on your needs.
Using Vertical Lines to Make Your Ceiling Feel Taller
Vertical slats create an optical illusion of height. They draw the eye upward along their length. This makes standard ceilings appear more grand.
The effect works especially well in compact spaces. You gain perceived volume without construction. It’s a smart visual trick designers love.
Consider slat thickness for the best results. Thinner lines enhance the heightening effect. They create elegant rhythm across your wall.
The Genius of Hidden Cable Management Behind Slats
Those messy wires disappear completely behind the wood panels. You maintain access through clever channels. Everything stays organized and out of sight.
Installation options include removable sections for updates. This future-proofs your setup beautifully. You can add or change components easily.
Professional installers often create custom solutions. They build access points at logical locations. Your technology remains fully functional yet invisible.
Material choices range from real hardwood to composites. Each offers different maintenance needs and price points. Lighter options work well for rental homes.
Peel-and-stick panels provide temporary solutions. They give the same visual impact without permanent changes. Your landlord will appreciate this approach.
Finish options affect both look and care requirements. Matte finishes hide fingerprints better. Glossy surfaces reflect more light around the room.
Consider incorporating subtle lighting between slats. LED strips create gorgeous ambient glow. This enhances evening viewing while adding dimension.
Your final design should balance spacing and proportions. Test different layouts before final installation. This ensures the perfect result for your space.
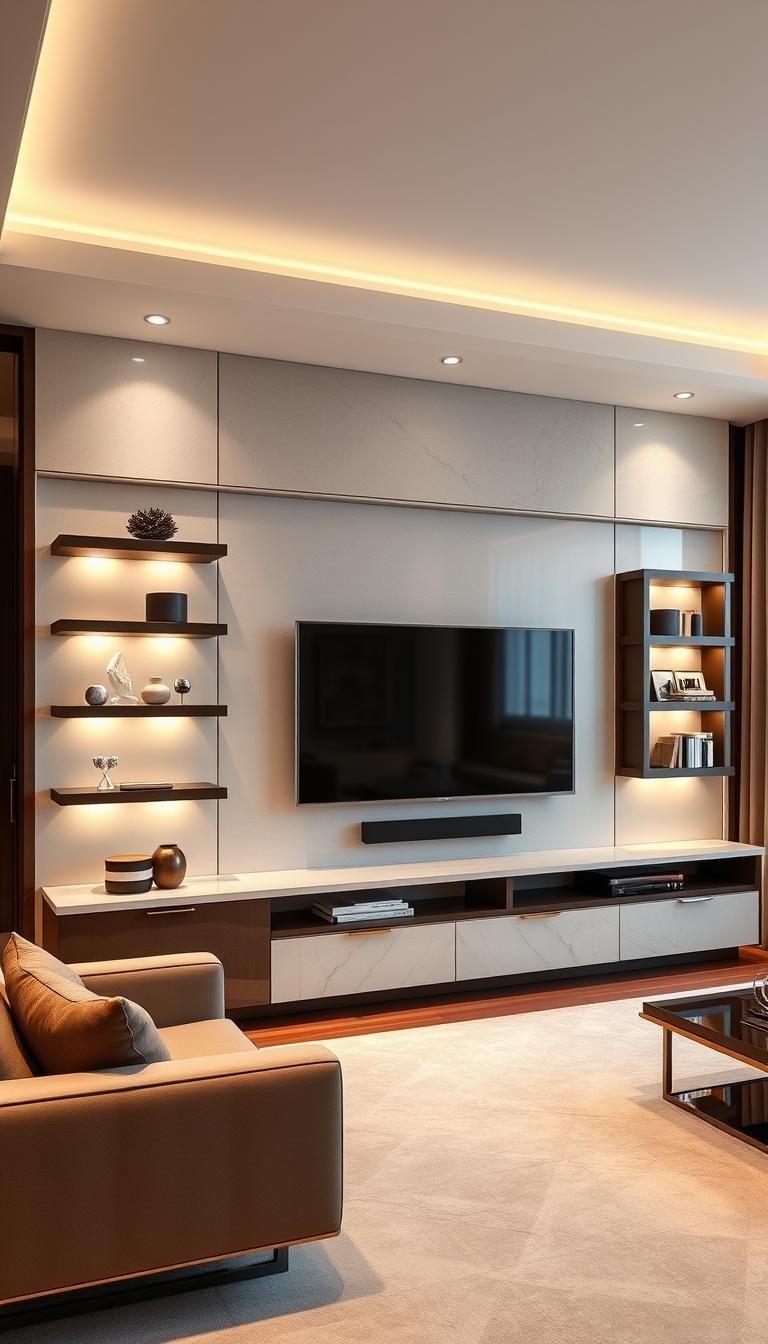
5. Incorporating Floating Shelves for Functional Display
Floating shelves create the illusion of weightless storage that seems to defy gravity. They offer both practical utility and visual appeal to your entertainment area.
These clever installations provide display space without bulky brackets. They keep your essentials accessible while maintaining clean lines.
Mixing Shelf Sizes for a Dynamic and Playful Look
Varying shelf dimensions creates visual interest across your wall. Combine different lengths and depths for a custom arrangement.
This approach allows for creative storage solutions. Smaller shelves hold remote controls while larger ones display art pieces.
Consider alternating placement heights for rhythm. This design technique guides the eye naturally around your space.
Installing Hidden Hardware for a “Magic” Floating Effect
The secret lies in concealed mounting systems. Keyhole hangers and metal cleats create that magical floating appearance.
Professional installers use heavy-duty brackets hidden within the shelf. These support substantial weight while remaining completely invisible.
Always check weight capacity before loading your shelves. Proper installation ensures safety and longevity for your display.
Adding LED Strips for Ambiance and Practical Lighting
Subtle lighting transforms functional shelves into atmospheric features. LED strips mounted underneath provide both illumination and mood.
This lighting solution helps reduce eye strain during evening viewing. It also highlights your displayed items beautifully.
Choose warm white LEDs for cozy ambiance. Cool white works better for modern, crisp interiors.
Coordinate shelf materials with your overall design scheme. Match wood tones or finish colors for cohesive appearance.
Implement smart cable management behind your installations. Use cord channels to keep wires organized and hidden.
Follow the three-object rule for styling success. This creates curated displays that feel intentional rather than cluttered.
Your floating shelves become functional art pieces. They hold media components, books, and personal treasures with elegant simplicity.
This approach maximizes your storage potential. It maintains clean sight lines while keeping essentials within reach.
6. Making a Statement with a Stone and Metal Feature Wall

Natural stone brings timeless elegance to any space. When paired with metal accents, it creates a sophisticated feature that transforms ordinary rooms into extraordinary spaces.
This combination delivers high-end hotel vibes right in your home. The blend of organic textures and metallic finishes creates visual interest that lasts for years.
Your entertainment area gains instant character with this approach. It becomes a focal point that balances modern technology with natural beauty.
Opting for Lightweight Porcelain Slabs Over Real Stone
Porcelain panels offer the beauty of natural stone without the weight. They’re easier to install and maintain than traditional materials.
These slabs provide consistent quality and color throughout. You get uniform appearance without natural stone’s variations.
Installation becomes simpler with lighter materials. They require less structural support than heavy natural stone.
The finish options range from polished to matte surfaces. Each offers different reflective qualities for your space.
The Importance of Vein Matching for a Cohesive Look
Vein matching creates seamless appearance across your installation. It makes multiple panels look like one continuous piece.
This technique requires careful planning during material selection. Professional installers often dry-lay pieces before permanent placement.
The pattern flow should feel natural to the eye. Proper matching enhances the organic feel of stone materials.
Your feature gains depth and movement through strategic vein alignment. It becomes a work of art rather than just a functional surface.
Framing Your Wall with Slim Brass or Matte Metal Trim
Metal framing adds refined detail to your stone feature. It creates definition and completes the high-end look.
Slim brass trim brings warm golden tones to your design. Matte black options offer contemporary contrast against light stone.
Other finishes include brushed nickel and dark bronze. Each provides different character to complement your color scheme.
The metal border helps integrate technology seamlessly. Your screen appears as part of the design rather than an addition.
Installation requires precision for perfect alignment. Professional help ensures clean lines and proper adhesion.
Maintenance varies by metal type and finish. Some require regular polishing while others need simple wiping.
Budget-friendly alternatives include metal-look laminates. They provide similar visual impact at lower cost.
7. Essential Lighting Techniques to Set the Mood
Light transforms your viewing experience from ordinary to extraordinary. The right illumination setup creates atmosphere while serving practical purposes.
Strategic placement enhances both aesthetics and functionality. You get better viewing comfort and room ambiance simultaneously.
Bias Lighting: Reducing Eye Strain with a Soft TV Halo
Bias lighting creates a gentle glow behind your screen. This technique reduces contrast between bright display and dark surroundings.
Your eyes work less hard during extended viewing sessions. This prevents fatigue and headaches during movie marathons.
Install LED strips around the screen’s back perimeter. Choose warm white tones between 2700K-3000K for comfortable viewing.
USB-powered options offer simple plug-and-play installation. Hardwired systems provide permanent, clean solutions.
Uplighting: Using Ceiling Washes to Create Height
Uplighting directs illumination upward along your feature wall. This technique creates the illusion of higher ceilings.
Place slim LED fixtures at the base of your installation. They cast soft light that emphasizes vertical elements.
This approach adds dimension to compact spaces. Your room feels more expansive and intentionally designed.
Coordinate light temperature with your wall materials. Warmer tones complement wood while cooler lights enhance stone.
Integrating Dimmers for Total Control Over Ambiance
Dimmer switches give you complete command over mood setting. Adjust intensity from bright functional light to soft ambiance.
Install dimmers for all your media area lighting layers. This creates seamless transitions between activities.
Smart home integration allows voice or app control. Program scenes for different viewing experiences.
Consider wireless dimming systems for rental homes. They provide flexibility without permanent electrical work.
Proper lighting design combines safety with style. Well-lit pathways prevent accidents while enhancing decor.
Your evening viewing becomes more immersive and comfortable. The right illumination makes every movie night special.
8. Disguising the Tech: Mirror TV Glass and Art-Mode Screens

Your entertainment area gains elegance when technology disappears into beautiful decor. Modern solutions transform your screen into something special when not in use.
These clever approaches maintain your room’s polished look. They blend function with style in surprising ways.
You can choose between reflective surfaces or digital artwork displays. Both options create a more intentional design statement.
How Mirror Glass Doubles Room Depth and Hides the Screen
Mirror glass overlays create magical transformations in your space. They turn off-hours into reflective surfaces that expand your room visually.
This special glass bounces natural light around your area. It makes spaces feel larger and brighter throughout the day.
The technology works through specialized semi-transparent coatings. These allow the display to show through when powered on.
Installation requires professional measurement and fitting. The glass must align perfectly with your screen’s dimensions.
Consider these technical aspects before choosing mirror glass:
| Feature | Benefit | Consideration |
|---|---|---|
| Reflective Coating | Enhances room light | May show fingerprints |
| Custom Sizing | Perfect screen fit | Requires precise measurements |
| Mounting System | Secure installation | Professional help recommended |
| Light Transmission | Clear viewing experience | Varies by glass quality |
Using Your TV’s Built-In Art Mode for Instant Curation
Many modern displays offer built-in art mode functionality. This feature turns your screen into a digital gallery when not streaming content.
You can display personal photos or curated artwork collections. The transformation happens with a simple remote click or voice command.
Optimize your art mode settings for the best results. Adjust brightness levels to match your room’s lighting conditions.
Choose artwork that complements your existing decor. Consider color schemes and artistic styles that enhance your space.
Rotate images seasonally or for special occasions. This keeps your display feeling fresh and intentional.
Framing Your Screen to Complete the Illusion
The right frame makes your display look like intentional artwork. It provides finished edges that blend with your wall design.
Choose frame materials that match your room’s aesthetic. Wood options bring warmth while metal frames offer modern crispness.
Consider depth requirements for your specific setup. Some frames accommodate soundbars or other components.
Installation varies from simple magnetic attachments to custom built solutions. Professional help ensures perfect alignment.
Maintenance involves regular dusting and occasional glass cleaning. Use appropriate cleaners to avoid damaging special coatings.
These disguise techniques work across various room styles and lighting conditions. They transform technology into beautiful design elements.
9. Integrating an Electric Linear Fireplace for Ultimate Coziness
An electric fireplace brings instant atmosphere to your entertainment area. It creates a welcoming glow that transforms ordinary evenings into special occasions.
This feature adds both visual appeal and functional comfort. You get the charm of flames without the maintenance of traditional options.
Modern units offer realistic flickering effects that mimic real fire. They provide warmth when needed and ambiance year-round.
Integration requires careful planning for both safety and aesthetics. Proper placement ensures optimal performance and viewing pleasure.
Safe Placement Guidelines: Distance Below the TV
Keep your fireplace unit at least 12-18 inches below the screen. This spacing prevents heat damage to electronic components.
Follow manufacturer specifications for your specific model. Different units have varying heat output and safety requirements.
Consider the overall proportions of your installation. The fireplace should complement rather than overwhelm your display.
Proper clearance allows for comfortable viewing from all seating positions. It maintains the perfect balance between form and function.
Choosing a Model with Flame-Only Mode for Year-Round Use
Flame-only operation lets you enjoy the visual effect without heat. This feature works beautifully during warmer months.
You maintain the cozy atmosphere regardless of season. The flickering light creates relaxing ambiance for any gathering.
Look for units with adjustable brightness settings. This allows you to match the intensity to your room’s lighting conditions.
Some models offer multiple flame color options. These can coordinate with your existing decor scheme.
Installation requires accessible electrical outlets nearby. Hardwired options provide cleaner looks but need professional help.
Framing considerations include matching surrounding materials. Your fireplace should appear integrated rather than added later.
Smart home integration allows voice or app control. Program scenes that combine lighting, audio, and fireplace settings.
Maintenance involves simple dusting and occasional bulb replacement. Electric units avoid the soot and ash of traditional fires.
Cost considerations range from basic models to premium options. Higher-end units often feature more realistic flame effects.
The value comes from enhanced enjoyment of your space. This addition creates memorable moments for your entire family.
Evening viewing becomes more immersive with gentle firelight. It turns movie night into a truly special experience.
10. The Impact of Color: Sophisticated Palettes that Read Expensive

Color choices create the first impression of your entertainment space. They set the mood before anyone even turns on the screen. Your palette selection speaks volumes about your design sensibility.
Sophisticated color schemes often work through subtlety rather than bold statements. They create harmony between your technology and decor. This approach makes everything feel intentional and curated.
Great color planning helps your display blend rather than dominate. It turns your entire wall into a cohesive backdrop for daily living. The right palette elevates ordinary moments into special experiences.
Earth Tones: Making Your TV Blend into the Background
Earth tones create natural harmony in your entertainment area. These colors mimic nature’s palette of stones, woods, and soils. They help technology feel organic rather than intrusive.
Your screen becomes part of the overall composition. It doesn’t fight for attention against bold wall colors. This creates a more relaxing environment for viewing.
Consider these earthy options for your space:
- Warm greige (gray-beige) for versatile neutrality
- Soft olive green for organic richness
- Muted terracotta for earthy warmth
- Deep charcoal for sophisticated depth
These hues work with various materials and lighting conditions. They provide excellent backdrops for both technology and decor elements.
Monochromatic Schemes: Using Texture to Add Interest
Single-color schemes create sleek, unified appearances. They rely on texture variation rather than color contrast. This approach feels both modern and timeless.
Your eye moves across surfaces rather than jumping between colors. Different materials create visual depth within one color family. The effect feels curated and expensive.
Try combining these textured elements:
- Matte finished walls with glossy trim details
- Smooth surfaces alongside ribbed or fluted panels
- Soft fabrics near hard metallic accents
- Natural wood grains against polished stone effects
This technique works across various color temperatures. Cool grays feel modern while warm taupes feel inviting.
Color psychology affects how people experience your space. Warm tones promote relaxation and conversation. Cooler shades create more focused, cinematic atmospheres.
Consider your room’s primary purpose when selecting hues. Entertaining spaces might use warmer palettes. Dedicated media rooms often benefit from cooler, darker shades.
Coordinate your wall colors with existing furnishings and flooring. Create flow between spaces through complementary tones. Your entertainment area should feel connected to adjacent rooms.
Sample different colors at various times of day. Natural light changes how colors appear throughout daylight hours. Evening lighting creates different effects after sunset.
Test your color choices before full commitment. Paint large sample boards rather than small swatches. View them in your actual space under normal lighting conditions.
Digital tools help visualize complete color schemes. Many paint companies offer room visualization apps. These show how colors work with your specific furniture and lighting.
Different materials interact uniquely with color choices. Glossy finishes reflect more light and appear brighter. Matte surfaces absorb light and show richer color depth.
Consider maintenance when selecting finishes and colors. Glossy surfaces show fingerprints more easily. Matte finishes hide imperfections but might require special cleaning.
Here’s how different color approaches affect your space:
| Color Strategy | Visual Effect | Best For | Maintenance Level |
|---|---|---|---|
| Earth Tone Palette | Natural blending | Multi-purpose rooms | Medium |
| Monochromatic Scheme | Sleek unity | Modern interiors | Low |
| Two-Color Plus Metallic | Curated luxury | Formal spaces | High |
| Dark Dramatic Hues | Theater atmosphere | Dedicated media rooms | Medium |
Your color selection impacts both daytime appearance and evening ambiance. Lighter colors reflect artificial lighting throughout the space. Darker shades create more intimate viewing environments.
The right palette makes technology feel integrated rather than added. It turns your entertainment area into a beautiful living space first, functional media center second.
11. Adding Depth and Interest with a Recessed Niche
A recessed niche transforms flat surfaces into dynamic focal points. It creates architectural interest while serving practical purposes in your entertainment area.
This feature adds dimension to your overall design. It breaks up large expanses with intentional depth and character.
Your niche becomes a mini-gallery for personal expression. It holds treasures that reflect your style and interests.
The recess also offers clever concealment options. You can hide components while maintaining easy access.
Creating a Mini-Stage for Plants, Art, and Sculptures
Your niche acts like a tiny proscenium for displayed items. It gives special attention to whatever you place inside.
Consider depth for proper item proportions. Deeper recesses work for sculptures while shallower ones suit artwork.
Rotate displays with seasons or moods. This keeps your space feeling fresh and personally curated.
Background colors affect how items appear. Darker shades make objects pop forward. Lighter tones create airy openness.
Designing a Niche that Can Also Hide Tech Components
The same recess that displays art can conceal electronics. This dual functionality maximizes your space efficiency.
Plan access points for component management. Removable panels or doors maintain clean lines.
Ventilation becomes crucial for hidden electronics. Incorporate discreet grilles or passive airflow channels.
Consider these technical aspects for component concealment:
| Feature | Benefit | Consideration |
|---|---|---|
| Access Doors | Easy component reach | Hidden hinge design |
| Cable Ports | Wire management | Size for connector clearance |
| Ventilation | Heat dissipation | Integrated with design |
| Depth Planning | Component clearance | Measure largest item |
Your niche setup should balance beauty and function. It serves both display and practical needs equally well.
Coordinate materials with your overall wall treatment. The recess should feel intentional rather than added later.
Lighting enhances both display and viewing experiences. LED strips create beautiful illumination for artwork.
Consider subtle lighting at the niche’s top or bottom. This casts dramatic shadows that emphasize depth.
Your recess becomes a functional art piece. It organizes components while adding visual interest to your space.
12. Exploring Popular Wall Panel Styles: Fluted and Acoustic
Modern panel options transform ordinary surfaces into design statements. These specialized treatments add both visual interest and practical benefits to your space.
You can choose between decorative fluted patterns or sound-absorbing acoustic solutions. Both approaches elevate your room’s appearance while serving specific purposes.
Fluted Panels: Adding Subtle Rhythm and Modern Texture
Fluted panels create elegant vertical grooves across your surface. This pattern brings sophisticated texture without overwhelming your space.
The rhythmic lines add depth and dimension to flat walls. They work beautifully behind your entertainment setup as a textured backdrop.
These panels are gaining popularity for their versatile aesthetic appeal. They complement various design styles from modern to transitional.
Consider these material options for fluted treatments:
- Wood panels for natural warmth and grain variations
- Composite materials for consistent patterns and durability
- Medium-density fiberboard for painted finish options
- Metal versions for industrial or contemporary spaces
Acoustic Panels: Prioritizing Sound Clarity in Your Design
Acoustic panels absorb excess noise and reduce echo in your room. They create clearer audio for your media experiences.
Your viewing becomes more immersive with better sound quality. Dialogue sounds crisper and music feels more vibrant.
These specialized panels come in various styles beyond basic foam squares. Many options blend seamlessly with decorative wall treatments.
Installation methods vary based on your wall conditions and panel choice:
- Adhesive mounting for temporary or rental situations
- Framing systems for permanent, professional installations
- Interlocking panels for easy DIY assembly
- Custom-cut options for unique space requirements
Integration with other features requires careful planning. Your panels should complement lighting, shelving, and display elements.
Spacing and orientation affect both appearance and function. Vertical patterns heighten spaces while horizontal arrangements widen them.
Finish options range from paintable surfaces to natural material looks. Your selection impacts maintenance needs and overall durability.
Beyond aesthetics, these panels offer functional advantages. They improve sound quality while adding thermal insulation properties.
Cost considerations include material quality and installation complexity. Higher-end options often provide better acoustic performance.
Your investment enhances both daily enjoyment and home value. The right panel design creates a more comfortable entertainment environment.
13. Future-Proofing Your Luxury TV Wall Design
Technology evolves faster than home decor trends. Your entertainment setup deserves smart planning that accommodates tomorrow’s innovations. Thoughtful preparation saves you from costly renovations down the road.
Future-proofing blends practical foresight with beautiful design. It ensures your space remains functional and stylish for years. You invest once but enjoy the benefits repeatedly.
Installing a Conduit for Easy Future Cable Upgrades
Conduits provide protected pathways for new cables. They allow easy upgrades without damaging your beautiful walls. This simple addition offers tremendous long-term value.
Choose conduit size based on potential future needs. Larger diameters accommodate unexpected technology changes. Leave some extra space for unforeseen developments.
Install access points at logical locations. These should align with potential component placement areas. Strategic planning makes future updates much simpler.
Consider these conduit specifications for different needs:
| Cable Type | Minimum Conduit Size | Recommended Margin | Access Point Frequency |
|---|---|---|---|
| HDMI/Video | 1 inch | 25% extra space | Every 4 feet |
| Ethernet/Data | 0.75 inch | 15% extra space | Every 6 feet |
| Power Cables | 1.5 inches | 30% extra space | Every 3 feet |
| Fiber Optics | 1.25 inches | 20% extra space | Every 5 feet |
Considering Modular Panel Systems for Easy Updates
Modular panels offer incredible flexibility for changing tastes. Magnetic or cleat-mounted systems allow quick swaps. You can update finishes without major construction work.
These systems accommodate evolving technology standards. They make component upgrades surprisingly straightforward. Your setup remains current with minimal effort.
Leave a service gap behind fixed cladding. A 0.5 to 1-inch space allows cable routing and access. This prevents demolition during future improvements.
Document your cable routes and component locations. Keep a simple diagram for reference during updates. This practice saves time and prevents mistakes.
Balance current aesthetics with future flexibility needs. Beautiful design shouldn’t sacrifice practical functionality. The best solutions honor both priorities equally.
Your investment in future-proofing pays multiple dividends. It enhances daily enjoyment while protecting your home’s value. Well-planned spaces appeal to future buyers too.
Smart planning today prevents headaches tomorrow. You create a space that grows with your family’s needs. This approach represents true design wisdom.
14. Styling Secrets: The Three-Object Rule for a Clutter-Free Look
Beautiful spaces breathe through intentional simplicity. Your entertainment area deserves the same thoughtful approach that makes high-end interiors feel so inviting. The secret lies in knowing when to stop adding elements.
Less truly becomes more in well-curated rooms. This disciplined approach creates visual calm that enhances your daily experience. You’ll notice how peaceful your space feels with purposeful styling.
Following a simple guideline prevents overcrowded surfaces. It keeps your focus on enjoying the space rather than managing clutter. This method works for any shelf or console in your room.
Curating Shelves with a Vessel, Books, and One Art Piece
Start with one sculptural vessel that shows your personal taste. Choose a piece with interesting shape or texture. This becomes your foundation item.
Add a tight stack of art or design books beside it. Keep the selection small and meaningful. These should reflect your interests and aesthetic.
Complete the grouping with one framed photograph or small artwork. This final piece adds personal connection to your arrangement. Together, these three elements create a balanced composition.
The psychological benefits of this approach are significant. Your eye moves easily across the curated items without distraction. This creates mental relaxation in your living environment.
Incorporating a Tall Plant for Life and Vertical Interest
Introduce one tall, slim plant to your arrangement. This adds natural life and vertical movement to your design. Choose varieties that thrive in indoor conditions.
Placement matters for both plant health and visual impact. Position it where it can receive appropriate light. Ensure it doesn’t block important views or pathways.
The plant’s height draws the eye upward beautifully. This creates rhythm across your wall space. It makes the entire arrangement feel more dynamic.
Scale and proportion keep everything in harmony. Your objects should relate well to shelf size and surrounding space. Avoid items that overwhelm or disappear in their setting.
Visual balance comes from strategic placement. Create relationships between different heights and shapes. Allow some breathing room between items.
Seasonal changes keep your space feeling fresh. Rotate artwork or swap plant varieties occasionally. This maintains interest without adding clutter.
Select objects that reflect your personal style while maintaining cohesion. Choose a consistent color palette or material family. This creates unity across your selections.
Your styled surfaces contribute significantly to the overall luxury feel. They show intentionality and care in your space. This attention to detail makes everyday moments more special.
Maintenance involves regular dusting and plant care. Use appropriate cleaning methods for different materials and finish options. Keep your beautiful items looking their best.
This disciplined approach to styling transforms your entertainment area. It creates calm, curated spaces that feel both personal and polished. You’ll love how peaceful your room becomes.
| Styling Element | Purpose | Scale Consideration | Maintenance Level |
|---|---|---|---|
| Sculptural Vessel | Foundation piece | 1/3 shelf width | Weekly dusting |
| Book Stack | Vertical interest | 2-3 books maximum | Occasional rotation |
| Art Piece | Personal connection | Fits grouping scale | Glass cleaning |
| Tall Plant | Natural element | Appropriate height | Regular watering |
The three-object rule gives you a clear way to achieve beautiful results. It takes the guesswork out of creating stylish storage displays. Your shelves will always have that perfectly curated look.
15. Common Luxury TV Wall Mistakes and How to Avoid Them
Even the most beautiful designs can face challenges during execution. Knowing potential pitfalls helps you create a flawless final result. Smart planning prevents common errors that compromise both function and style.
Your entertainment area deserves careful attention to detail. These solutions keep your space looking polished and professional. You’ll enjoy a seamless experience from planning to daily use.
Dangling Cables and How to Plan for Perfect Hidden Wires
Visible cables create visual chaos in your beautiful setup. They distract from your carefully curated design elements. Proper planning keeps everything organized and out of sight.
Use in-wall raceways or conduit systems for permanent solutions. These protected pathways allow future upgrades without damage. They maintain your wall’s integrity while providing access.
Terminate cables with brush plates or dedicated AV wall plates. These finishing touches create professional-looking results. Your components connect seamlessly behind the scenes.
Consider these cable management solutions:
- In-wall conduit for easy future cable replacements
- Brush plates for flexible access points
- Dedicated AV plates for organized connections
- Cable channels for surface-mounted options
Ensuring Your TV is Proportionate to Its Feature Wall
Proper proportions create visual harmony in your space. Your screen should relate well to its surrounding features. This balance makes everything feel intentional and integrated.
Extend the feature wall finish beyond your display edges. Allow 6-12 inches on each side for balanced appearance. This framing technique creates a cohesive look.
Consider choosing a slightly smaller screen if needed. The right size fits your existing design beautifully. Your viewing experience remains excellent with proper placement.
Viewing distance affects ideal screen dimensions. Larger rooms accommodate bigger displays comfortably. Smaller spaces benefit from more modest proportions.
Lighting Placement and Intensity Considerations
Improper lighting can undermine your beautiful design. Harsh glare or insufficient illumination affects enjoyment. Strategic placement enhances both function and mood.
Avoid placing lights directly opposite your screen surface. This creates distracting reflections during viewing. Position fixtures to complement rather than compete.
Use dimmers to control intensity throughout the day. Adjust settings for different activities and times. This flexibility improves both ambiance and practicality.
Material Selection for Your Room Conditions
Choose materials that suit your specific environment. Consider sunlight exposure, humidity, and usage patterns. Appropriate selections ensure longevity and beauty.
High-gloss finishes show fingerprints in busy households. Matte options hide smudges and maintain cleaner appearance. Your choice affects both look and maintenance.
Durable materials withstand daily family activities. They maintain their beauty through years of enjoyment. Quality investments pay off in long-term satisfaction.
Installation Timing and Trade Coordination
Proper sequencing prevents costly rework and delays. Coordinate electricians, carpenters, and AV specialists carefully. This planning ensures smooth progress from start to finish.
Complete structural work before finishing details. Run cables and install conduits before wall treatments. This methodical approach saves time and money.
Budget Planning and Cost Management
Unexpected expenses can derail your project timeline. Build a 15-20% contingency into your initial budget. This cushion handles surprises without compromising quality.
Prioritize elements that matter most for your enjoyment. Invest in permanent features that add long-term value. Save on items you can upgrade later.
Functionality and Storage Considerations
Inadequate storage creates clutter in your beautiful space. Plan for all components, accessories, and media needs. Smart solutions keep everything organized yet accessible.
Consider future technology upgrades during planning. Leave space for new components or larger screens. Your setup evolves with changing needs and innovations.
Measure twice, cut once—especially with media walls. Proper planning prevents most common mistakes and ensures a stunning final result that you’ll enjoy for years.
Use this simple checklist during your project:
- Verify all measurements before cutting materials
- Test cable routes before final installation
- Check sight lines from all seating positions
- Confirm component clearance and ventilation
- Review lighting placement with screens active
Your attention to detail creates a flawless entertainment area. These precautions ensure beautiful, functional results that exceed expectations. You’ll enjoy a space that works perfectly for daily life and special moments.
16. Bringing Your Vision to Life: Your Next Steps
Your blank wall transformation journey begins with simple, actionable steps. Start by gathering inspiration from design platforms and magazines. Create a digital mood board to visualize your perfect space.
Budget planning helps you prioritize elements wisely. Consider phasing your project if needed. Some tasks work well for DIY, while others need professional help.
Measure twice and test materials before committing. Build your dream setup gradually over time. Start with one element that makes the biggest impact.
Your beautiful new space will enhance daily life for your entire family. The right design blends comfort and technology seamlessly. Enjoy creating a room that reflects your personal style!