Imagine transforming your plain sleeping area into a personalized retreat. Wall treatments add character and style that elevate your entire space.
These decorative elements create visual depth and texture. They turn a basic room into a sanctuary that reflects your unique taste.
The beauty lies in versatility. You can create an accent feature or cover entire surfaces. This approach works beautifully in spaces of all sizes.
Many projects are surprisingly DIY-friendly. Homeowners can achieve stunning results with some planning and creativity.
A well-designed environment impacts your daily mood and relaxation. Your sleeping quarters should feel like a true escape from the world.
This guide will walk you through everything from planning to maintenance. Let’s help you create the dream retreat you’ve always wanted.
Why Bedroom Wall Panelling Elevates Your Space
Have you ever walked into a room and felt instantly captivated? That’s the power of thoughtful design. Adding decorative treatments transforms ordinary spaces into extraordinary ones.
These elements bring life to your personal sanctuary. They create depth and personality where flat surfaces once stood.
Adding Character and Dimension to Plain Walls
Flat surfaces can feel uninspired over time. Decorative treatments break this visual monotony beautifully.
They introduce architectural interest where none existed before. Your room gains a custom-built feel without major construction.
The tactile quality of these additions matters too. Running your hand across the surface adds sensory pleasure to your daily routine.
Historically, these elements served practical purposes like insulation. Today we cherish them for their decorative value and unique character.
Creating a Focal Point in Your Sleeping Area
Every well-designed space needs an anchor. A treated surface behind your bed creates an instant focal point.
This approach draws attention to your room’s best feature. It might highlight your headboard or architectural elements like a fireplace.
Your choice of materials and patterns expresses personal style. This customization makes your space truly yours.
You’ll enjoy waking up to a room that reflects your taste. These design elements turn daily routines into special moments.
Planning Your Bedroom Wall Panelling Project

Before making your first cut, thoughtful planning ensures success. This preparation phase saves time, money, and frustration down the line.
A methodical approach transforms your vision into reality. You’ll create a space that feels both intentional and beautifully executed.
Measuring Your Space Accurately
Grab your tape measure and notepad. Start by measuring the total height and width of each surface.
Record these numbers clearly. Many diy enthusiasts find creating a simple sketch helpful.
This visual reference prevents confusion later. Always measure twice to confirm your numbers.
Accounting for Windows, Doors, and Outlets
Obstacles require special attention. Measure each window, door, and electrical outlet carefully.
Subtract these areas from your total square footage. This calculation prevents material waste and unnecessary expenses.
Consider how your wood panels will frame these features. Proper planning creates a harmonious final look.
Calculating the 10% Extra Material Rule
Always purchase extra material for your project. The standard rule adds 10% to your total calculations.
This buffer covers measuring mistakes, cutting errors, and future repairs. It’s better to have leftovers than run short mid-project.
As one expert notes,
You should always purchase about 10 percent more wall paneling than you think you’ll need.
Consider your layout symmetry during planning. Visual balance creates a more pleasing result.
Spacing matters too. Many professionals recommend maintaining consistent gaps between elements.
This attention to detail separates amateur attempts from professional-looking finishes. Your sleeping area deserves this careful consideration.
Finally, create a comprehensive material list. This organized way of working keeps your project on track.
Your preparation work lays the foundation for beautiful results. Every successful wall treatment begins with this crucial step.
Choosing the Right Paneling Materials
Your material selection makes all the difference in your project’s outcome. The right choice brings your vision to life while staying within budget.
Different materials offer unique benefits and characteristics. Understanding these differences helps you make informed decisions.
Wood Types and Their Characteristics
Natural wood brings authentic beauty to your space. Different species offer varying grain patterns and durability levels.
Oak stands out for its strength and prominent grain. It handles stains beautifully and lasts for generations.
Pine offers a softer, more affordable option. Its lighter color accepts paint exceptionally well.
MDF (medium-density fiberboard) provides a smooth, uniform surface. It lacks natural grain but paints perfectly for a clean look.
| Material | Durability | Cost | Best Finish |
|---|---|---|---|
| Oak | High | $$$ | Stain or clear coat |
| Pine | Medium | $$ | Paint or light stain |
| MDF | Medium | $ | Paint only |
| Reclaimed Wood | Variable | $$-$$$ | Natural weathered look |
Alternative Materials for Different Budgets
Not every project requires solid wood. Many alternatives deliver beautiful results at lower costs.
Beadboard offers classic charm without the premium price. These pre-made panels install quickly and paint beautifully.
Panel effect wallpaper creates visual interest without construction. Modern prints mimic real wood grain surprisingly well.
Pre-cut molding systems simplify complex patterns. They help achieve custom looks with standard materials.
Understanding Tongue-and-Groove vs. Shiplap
These two installation methods create different visual effects. Shiplap features overlapping boards with visible gaps between them.
This style creates shadow lines that add depth and character. Boards typically measure about six inches wide.
Tongue-and-groove systems interlock completely. They create seamless surfaces without visible gaps.
As one source explains,
Shiplap is a popular choice with boards about 6 inches wide, but varying widths refresh the look. Tongue-and-groove paneling interlock for a seamless design.
Your material choice should reflect your overall design style. Rustic spaces might use reclaimed wood for character.
Modern interiors often prefer clean MDF lines. Traditional homes might select oak for its timeless appeal.
Consider how materials contribute to room warmth. Natural wood grains add organic texture and comfort.
Smooth surfaces create more contemporary feelings. Your choices should align with your desired atmosphere.
Essential Tools and Preparation Steps

Proper preparation separates amateur attempts from professional-looking results in your DIY endeavors. Taking time to organize your approach creates a smoother installation process.
This careful groundwork ensures your final project looks intentional and beautifully executed. Every successful home transformation begins with these crucial steps.
Gathering Your DIY Toolkit
Start by collecting all necessary equipment before beginning your project. Having everything within reach saves time and reduces frustration.
Your essential toolkit should include:
- A reliable level for straight installations
- Quality saw for precise cuts
- Strong adhesive and appropriate nails
- Safety goggles for eye protection
- Accurate measuring tape for perfect fits
This organized way of working keeps your project moving forward efficiently. You’ll appreciate having the right tool for each task.
Preparing Your Surfaces for Installation
Begin with a thorough cleaning of your installation area. Remove dust, dirt, and any existing debris for better adhesion.
Repair any cracks or imperfections in the surface. A smooth foundation creates the perfect canvas for your new treatment.
If you plan to paint your installation, priming is essential. This step ensures better paint adhesion and a more uniform finish.
Running your hand across the prepared surface gives you confidence in your groundwork. This attention to touch creates professional results.
Safety Considerations for Your Project
Always prioritize safety throughout your DIY project. Proper tool handling prevents accidents and injuries.
Ensure good ventilation when working with adhesives or paints. Open windows or use fans to maintain fresh air circulation.
Wear appropriate protective gear including safety goggles and gloves. Keep your workspace organized to avoid tripping hazards.
These precautions create a safe environment for your creative work. Your careful approach ensures an enjoyable and accident-free experience.
Taking time with preparation leads to stunning visual effect in your final space. This methodical way of working brings professional quality to your home improvement project.
Step-by-Step Guide to Installing Bedroom Wall Panelling
Now comes the exciting part – bringing your design vision to life with hands-on installation. This process might seem daunting, but taking it step by step ensures beautiful results.
Your careful planning makes the actual work much smoother. Remember that patience and precision create the professional finish you want.
Starting With Your First Panel
Begin in the least visible corner for asymmetrical layouts. This approach hides any imperfect cuts in less noticeable areas.
For symmetrical designs, start from the center point and work outward. This creates balanced visual interest on both sides.
Use your level to ensure perfect vertical alignment. A strong adhesive combined with nails provides secure attachment.
Maintaining Proper Spacing (600mm Recommendation)
Proper spacing prevents future issues with material movement. The 600mm recommendation accommodates natural expansion and contraction.
As experts note,
Spacing between paneling sheets should be about 600mm to allow for wood expansion or retraction.
Use spacers between each element to maintain consistent gaps. This attention to detail ensures long-lasting durability.
Working Around Obstacles and Corners
Measure openings carefully before making any cuts. Create paper templates for complex shapes around outlets and windows.
For inside corners, use coping techniques for tight fits. Outside corners benefit from mitered joints for clean finishes.
This DIY project becomes easier with each section you complete. Your beautiful new feature will become your favorite design idea in the space.
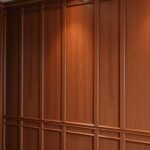
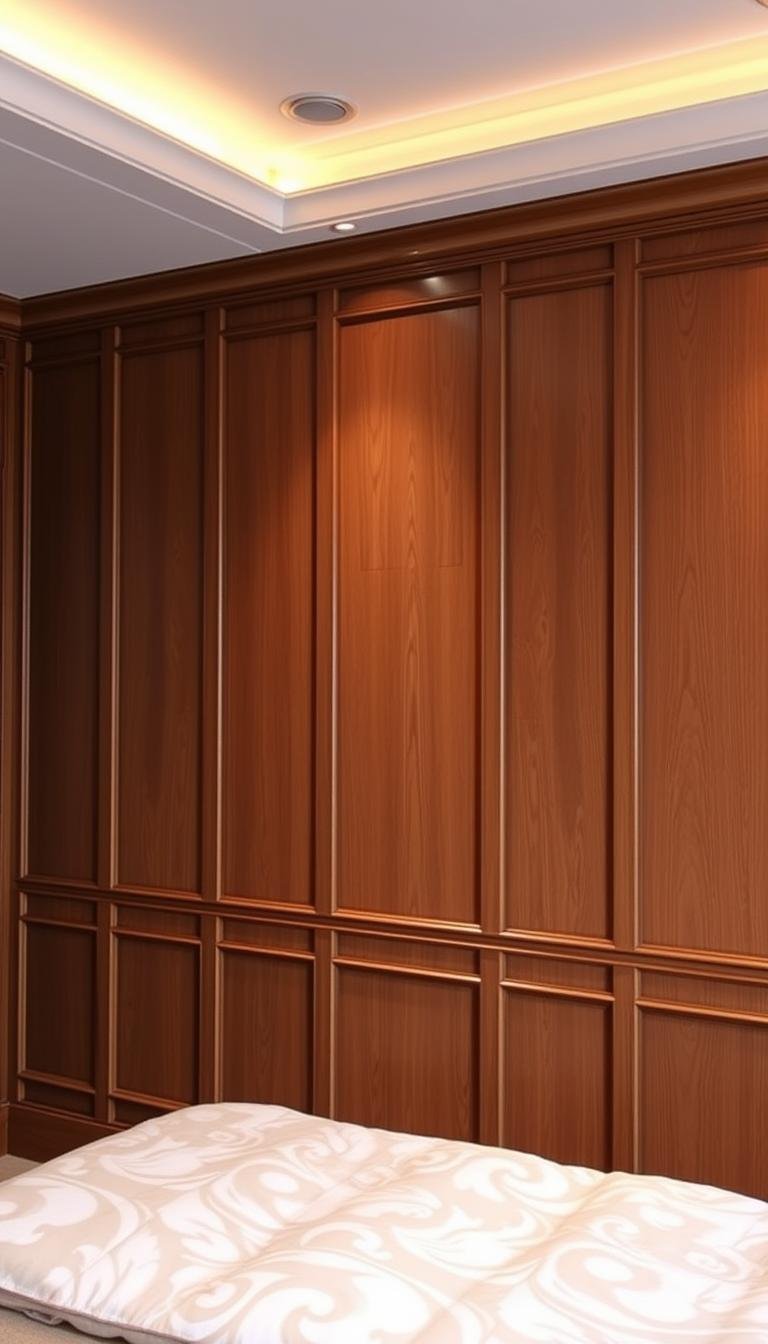
Classic Board-and-Batten for Timeless Elegance

Few design elements offer such perfect balance of rustic charm and refined beauty. This traditional technique creates instant architectural interest in any space.
Board-and-batten brings beautiful texture and dimension to your room. It works wonderfully in both Craftsman and farmhouse inspired spaces.
You can choose between partial or full coverage installations. Each approach creates a distinct visual effect and atmosphere.
Traditional Half-Wall Application
The classic wainscoting height adds protective charm to your space. This approach typically covers the lower portion of your surface.
It creates a lovely visual break that makes rooms feel cozy. The raised detail protects against everyday wear and tear.
Many homeowners love this look for its traditional character. It brings historical charm to contemporary living spaces.
Floor-to-Ceiling Modern Variations
Full-height installations create dramatic, eye-catching statements. This approach makes ceilings appear higher and rooms more spacious.
The vertical lines draw the eye upward, enhancing room proportions. You achieve a clean, intentional look that feels both modern and timeless.
This variation works particularly well behind beds as a striking focal point. It transforms ordinary spaces into extraordinary retreats.
Material choices significantly impact your final result. Narrow battens over wider boards create beautiful shadow play.
As design experts note, this style offers wonderful versatility:
Board-and-batten is common in Craftsman and farmhouse styles, typically installed halfway up walls or floor to ceiling for visual interest.
Consider painting everything crisp white for a clean, elegant look. Bold colors make a dramatic style statement too.
Your choice between half or full height depends on room proportions. Smaller spaces often benefit from the height-enhancing effect of full coverage.
This design approach adds warmth and character to your personal sanctuary. It creates that cozy, intentional feeling you love coming home to.
The beauty of board-and-batten lies in its adaptability. It complements both classic and contemporary decors beautifully.
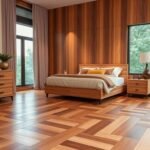
Shiplap Styles for Farmhouse and Contemporary Looks
This timeless design element offers remarkable versatility. It adapts beautifully to both traditional and modern aesthetics in your personal space.
The overlapping boards create subtle shadow lines that add depth. This texture enhances the overall atmosphere of your retreat.
Standard 6-Inch vs. Extra-Wide Boards
Traditional shiplap typically features six-inch widths. This classic approach delivers authentic farmhouse charm that feels cozy and inviting.
Extra-wide boards create a contemporary twist on this traditional style. They offer a more minimalist look that works well in modern spaces.
As design experts note:
Shiplap boards are traditionally 6 inches wide, but extra-wide boards offer a contemporary twist.
The width you choose significantly impacts the final appearance. Narrow boards create more lines and visual interest.
Wider options provide a cleaner, more streamlined effect. Consider your overall vision when making this decision.
Horizontal vs. Vertical Installation Techniques
Horizontal installation remains the most traditional approach. It creates a widening effect that can make spaces feel more expansive.
Vertical orientation offers a fresh perspective. It draws the eye upward, enhancing the perception of height in your room.
Installation can be horizontal or vertical, depending on your desired impact. Each direction creates a distinct visual rhythm.
For smaller spaces, vertical installation often works best. It emphasizes height rather than width, creating a more balanced feel.
Larger areas can handle horizontal runs beautifully. This traditional approach adds cozy character to spacious rooms.
White shiplap paired with colorful accents creates wonderful vibrancy. This combination brings energy to your personal sanctuary.
The subtle shadow lines between boards add dimensional interest. They catch light differently throughout the day, creating dynamic effects.
This treatment works with various home aesthetics beyond farmhouse style. It brings warmth to contemporary spaces too.
Consider your room’s proportions when choosing orientation. The right direction enhances rather than fights your space’s natural attributes.
Your finished project will reflect thoughtful consideration of all these elements. The result will be a space that truly feels like your own.
Creating Feature Walls with Geometric Patterns

Geometric patterns transform ordinary surfaces into extraordinary works of art. These creative treatments add movement and energy to your personal space.
You can achieve stunning visual effects with thoughtful pattern selection. The right design creates depth and personality where flat surfaces once stood.
Herringbone Designs for Visual Interest
Herringbone patterns create dynamic movement across your surface. The zigzag arrangement catches light beautifully throughout the day.
This classic pattern works wonderfully behind beds as a striking focal point. It draws attention while adding architectural character.
As design experts note:
Herringbone patterns with gaps add definition and modern artistic touch to any space.
The angled arrangement makes rooms feel larger and more expansive. It’s perfect for creating that wow factor you’ve been wanting.
Picture Frame Molding for Artistic Flair
Picture frame molding creates elegant grid patterns across your surface. These framed sections highlight architectural features beautifully.
You can use these frames to showcase artwork or create visual rhythm. The symmetrical arrangement feels both classic and contemporary.
This approach works particularly well for emphasizing headboard areas. It creates intentional interest where your eye naturally rests.
The clean lines add sophistication without overwhelming your space. You achieve a custom-built look that reflects personal style.
3D Wall Effects with Narrow Wood Boards
Narrow boards create tangible depth and shadow play across your surface. This dimensional treatment adds remarkable texture to your environment.
The three-dimensional effect changes throughout the day as light shifts. It creates a living, dynamic feature that never feels static.
Glossy paint enhances the reflective quality of these arrangements. The finish catches light differently across each raised element.
As one source explains:
3D effects use narrow boards with glossy paint for added dimension and visual depth.
This approach makes a bold statement in contemporary spaces. It brings artistic sensibility to functional surface treatments.
| Pattern Type | Visual Impact | Best For | DIY Difficulty |
|---|---|---|---|
| Herringbone | High movement | Modern spaces | Medium |
| Picture Frame | Structured elegance | Traditional rooms | Easy |
| 3D Effects | Dimensional depth | Contemporary looks | Advanced |
| Hexagonal | Organic interest | Eclectic styles | Medium |
Pre-cut materials make these patterns accessible for DIY enthusiasts. You can achieve professional results with careful planning and execution.
Contrasting paint colors emphasize the geometric shapes beautifully. Dark patterns on light backgrounds create dramatic definition.
Your feature wall becomes the centerpiece of your entire space. It transforms daily routines into special moments of appreciation.
These creative treatments offer endless possibilities for personal expression. They turn functional surfaces into artistic statements.
Color and Finish Selection Strategies
The perfect color scheme transforms your project from good to breathtaking. Your choices here create the final mood and personality for your entire space.
Color selection balances personal preference with design principles. It’s where your vision truly comes to life with emotional impact.
Painting Techniques for Different Panel Types
Different materials require specific painting approaches for best results. Proper technique ensures a flawless finish that lasts for years.
Always start with a quality primer for better adhesion. This step creates a uniform surface that makes your top coat look professional.
Brush painting works well for detailed molding and textured surfaces. Spraying creates smoother finishes on large, flat areas.
Consider your finish type carefully. Matte finishes hide imperfections beautifully.
Glossy options reflect light and highlight architectural details. Semi-gloss offers a practical balance for most installations.
Bold Color Combinations for Maximum Impact
Dramatic color pairs create unforgettable visual statements. These combinations make your design elements truly stand out.
Teal and black deliver modern elegance with striking contrast. This pairing works wonderfully in contemporary spaces.
As design experts note:
Bold color combinations make paneling pop. Natural wood finishes bring warmth and texture.
Monochromatic schemes offer timeless sophistication. Different shades of the same color create depth without overwhelming your space.
Always test samples in your actual lighting conditions. Colors change dramatically throughout the day.
Natural Wood Finishes for Warmth and Texture
Sometimes the best finish is no finish at all. Natural wood showcases beautiful grain patterns and organic texture.
Clear coats protect while allowing the wood’s character to shine through. They enhance rather than cover the material’s natural beauty.
These finishes add incredible warmth to your environment. The organic feeling creates a cozy, inviting atmosphere.
Consider your existing decor when making finish decisions. Harmonious choices create a cohesive look throughout your space.
Contrasting finishes make bold style statements. Either approach can work beautifully depending on your overall vision.
Dark colors tend to create intimate, cozy environments. Lighter tones make spaces feel airy and more expansive.
Your finish selection completes your design journey. It’s the final touch that makes everything come together perfectly.
Incorporating Paneling with Bedroom Elements

Your decorative treatments should work in harmony with your existing furnishings. This thoughtful integration creates a cohesive and intentional look throughout your personal space.
When you coordinate these elements properly, everything feels custom-designed. The result is a polished environment that reflects your unique style.
Creating a Panelled Headboard Feature
Build a custom headboard that complements your wall treatment. This approach creates a unified look that feels professionally designed.
Your sleeping area gains a beautiful focal point behind your bed. The coordinated design makes your entire space feel intentional and polished.
As design experts note,
Panelled headboards tie into decor and create a custom feature that complements wall treatments.
You can match materials and finishes for perfect harmony. This attention to detail elevates your entire room’s aesthetic.
Integrating with Existing Built-Ins and Furniture
Coordinate your treatment with shelves, closets, or other furniture pieces. This integration creates visual flow throughout your space.
Built-in elements become part of the overall design story. Everything works together rather than competing for attention.
A popular application involves creating an accent wall behind the which anchors the sleeping zone beautifully. This approach defines your resting area while adding architectural character.
The unified look enhances both functionality and visual appeal. Your space feels thoughtfully designed from every angle.
Combining with Mirrors for Enhanced Space
Incorporate mirrors within your treated sections for added dimension. These reflective surfaces bounce light around your room.
This clever trick creates the illusion of more space without physical expansion. Your area feels brighter and more open immediately.
Frame mirrors with matching molding for added elegance. This treatment turns functional items into design statements.
As one source explains,
Mirrors with paneling create depth and illusion of space while adding elegant framing.
Strategic placement maximizes both light reflection and visual interest. You create a more inviting atmosphere through smart design choices.
These integrations demonstrate how form and function can work together beautifully. Your personal retreat becomes both stylish and practical.
Maintenance and Care for Your Wall Panelling
Your beautiful installation deserves proper attention to stay stunning for years. Regular care preserves that fresh, intentional appearance you worked so hard to achieve.
Simple routines protect your investment and maintain visual appeal. This thoughtful approach ensures lasting enjoyment of your enhanced space.
Cleaning Different Surface Types
Different materials require specific cleaning approaches. Always start with the gentlest method first.
Dust wood surfaces weekly with a soft, dry cloth. This prevents buildup that can scratch finishes over time.
For painted treatments, use mild soap and water sparingly. Wipe gently and dry immediately to prevent moisture damage.
Avoid harsh chemicals that might degrade seals or finishes. Natural solutions often work best for routine cleaning.
Touch-up Techniques for Painted Surfaces
Small imperfections happen with daily living. Quick fixes keep your installation looking its best.
Keep leftover paint for perfect color matching. Lightly sand affected areas before applying fresh coats.
Feather edges gently for seamless blending. This technique makes repairs virtually invisible to the eye.
Reseal touched-up areas to maintain protection. Your careful work preserves that like-new appearance.
Long-term Preservation Tips
Control humidity levels to prevent warping or cracking. Consistent conditions help materials maintain their shape.
Conduct seasonal inspections for early problem detection. Address minor issues before they become major concerns.
For natural wood, periodic oiling maintains richness and protection. Choose products specifically formulated for your material type.
This proactive approach extends your installation’s lifespan significantly. You’ll enjoy beautiful results for many years.
| Maintenance Task | Frequency | Best Method | Key Benefit |
|---|---|---|---|
| Dusting | Weekly | Soft microfiber cloth | Prevents scratch damage |
| Deep Cleaning | Quarterly | Mild soap solution | Removes embedded dirt |
| Finish Inspection | Seasonal | Visual examination | Early problem detection |
| Humidity Check | Monthly | Hygrometer reading | Prevents material movement |
Regular care becomes part of your home maintenance rhythm. This consistent approach protects your beautiful treatment effectively.
Your attention to detail ensures lasting satisfaction with your enhanced space. Proper maintenance keeps everything looking fresh and intentional.
Bringing Your Dream Bedroom to Life with Panelling
You now have all the tools to transform your personal space. Thoughtful planning, material choice, and creative installation make success achievable.
This design approach turns any room into a reflection of your unique style. The DIY-friendly nature means you can create a truly personalized retreat.
Share your results online to inspire others in their home projects. Overcoming challenges brings immense satisfaction and pride in your accomplishment.
Your new knowledge opens doors to endless creative possibilities. Enjoy every moment of making your space uniquely yours.