Have you ever looked up and thought about the potential above you? Your ceiling is a vast canvas waiting to be transformed. It can become the star of your personal space.
A well-planned overhead look adds incredible character to your room. It can make the entire area feel larger and more inviting. This is your chance to create a truly unique atmosphere.
You don’t need to be a professional to achieve amazing results. Many stunning looks are perfect for a do-it-yourself project. They can fit various styles and budgets beautifully.
We will explore creative approaches that inspire. From simple paint techniques to adding architectural interest, get ready to look up and see the possibilities.
Why Your Bedroom Ceiling is Your Next Design Project
Most people focus their decorating energy on walls and floors. They completely ignore the surface overhead. This blank canvas above you holds incredible potential for transformation.
Even experienced decorators often overlook this major area. As one source notes,
“Even the most seasoned design lovers will admit to passing over their ceilings… But, this major area of your home is a blank canvas for creativity and a chance to show off your personality.”
Moving Beyond the “Fifth Wall” Mentality
Think of your overhead surface as more than just a “fifth wall.” This shift in perspective opens up new possibilities. Your personal space becomes more complete and intentional.
Treating this area as a design element adds depth and character. It makes your room more inviting and uniquely yours. The result is a space that truly reflects your style.
Many projects won’t break the bank. Simple changes can create dramatic results. You can achieve professional-looking outcomes with basic DIY skills.
How a Ceiling Design Can Make Your Room Feel Larger
Strategic overhead treatments create optical illusions. They can make your interior feel more spacious and airy. This is especially valuable in smaller rooms.
Light-colored finishes reflect natural and artificial light. This brightens the entire space below. The effect is both practical and visually appealing.
Adding texture creates coziness without shrinking the room. Vertical elements draw the eye upward. This enhances the perception of height.
Your overhead treatment should complement other features. Consider how it works with your lighting and wall colors. A cohesive look ties the whole room together.
Start by assessing your current situation. Look at the height, texture, and condition. Identify what changes would have the most impact.
This investment transforms your personal retreat. It adds both style and functionality. Your overlooked canvas becomes your favorite design feature.
Embrace the Drama with a Painted Ceiling
Your overhead space offers more than just structural support – it’s a canvas for emotional expression. A simple coat of paint transforms this often-ignored surface into a stunning focal point. This approach delivers incredible visual impact without major renovation work.
Martina from The Lived In Look demonstrates this power beautifully. She created dramatic impact in her dining room by painting the entire overhead surface in a darker color. The white walls pop against the black paint, creating an unforgettable look.
“Even the most seasoned design lovers will admit to passing over their ceilings… But, this major area of your home is a blank canvas for creativity.”
Choosing a Bold Color for Maximum Impact
Selecting the right shade makes all the difference. Deep blues and rich greens create calming environments perfect for relaxation. These colors work wonderfully in any sleeping space.
Always test samples on your actual surface before committing. Lighting conditions dramatically affect how colors appear throughout the day. Natural and artificial light change the mood constantly.
Using Dark Tones to Create a Cozy, Intimate Feel
Dark overhead treatments psychologically make spaces feel more enclosed and comforting. Navy blue or charcoal gray creates intimate atmospheres ideal for unwinding. These shades work particularly well in larger rooms.
Forest green infuses sophistication while maintaining tranquility. According to experts in bold decorating ideas, shades of purple and blue evoke luxury and drama. Teal combines blue’s calmness with green’s freshness for stylish results.
The Power of Contrast Between Walls and Ceiling
Strategic contrast highlights architectural features beautifully. Light walls against a dark overhead surface draw eyes upward dramatically. This technique adds dimension and visual interest.
The painting ceiling process requires proper preparation for best results. Use high-quality paint designed for overhead applications. Multiple thin coats achieve smoother finishes than one thick application.
This budget-friendly project transforms your personal retreat completely. You add personality and drama without structural changes. Your sleeping space becomes truly unique and reflective of your style.
Add Architectural Interest with Wood Beams
Wood beams bring instant character to any room. They create visual depth and add warmth through natural materials. This approach works with many styles from rustic to contemporary.
Your overhead space gains dimension and personality. Beams draw the eye upward, making the room feel taller. They complement other elements like lighting and wall colors beautifully.
Installing Real Wood for an Authentic Look
Real wood beams offer unmatched authenticity. They bring natural grain patterns and durability to your space. Popular choices include oak, pine, and reclaimed timber.
Installation requires careful planning. You need proper support for these heavy elements. Professional help ensures safety and perfect placement.
These beams become permanent features of your home. They age gracefully, developing richer character over time. The investment adds value to your living space.
The Budget-Friendly Magic of Faux Beams
Faux beams provide the same visual impact without the cost. They mimic real wood perfectly while being lightweight. Installation becomes much simpler for DIY enthusiasts.
“Adding faux rustic wood beams is a great opportunity to get the look of a beam ceiling at a fraction of the cost. This works well with a vaulted ceiling or any type of interior space.”
These wood beams work wonderfully in vaulted spaces. They enhance the grandeur without structural concerns. You achieve dramatic results on a reasonable budget.
Beam Styles to Match Your Bedroom’s Personality
Choose beams that reflect your personal style. Rustic rough-sawn beams suit farmhouse design. Painted beams offer a cleaner, more modern look.
Sleek, dark beams create industrial appeal. Whitewashed options brighten the space while adding texture. Your choice should complement existing decor elements.
Consider these popular styles:
- Rustic beams for cozy, traditional spaces
- Painted beams for contemporary ideas
- Sleek beams for industrial design
- Reclaimed wood for eco-friendly charm
Proper spacing creates balanced visual interest. Measure carefully before installation. Typically, beams look best spaced 2-4 feet apart.
Secure beams firmly using appropriate hardware. For faux beams, adhesive and screws work well. Real beams may require specialized mounting brackets.
This versatile approach transforms your bedroom ceiling dramatically. Whether real or faux, beams add character and depth. They turn ordinary overhead spaces into extraordinary design features.
Create a Statement with a Wood Plank Ceiling

Natural materials overhead create instant character in your personal space. Wood planks transform ordinary surfaces into extraordinary features. They bring organic beauty and personality to your retreat.
This approach works beautifully in various settings. It adds both visual interest and practical benefits. Your overhead treatment becomes a conversation starter.
Warmth and Texture from Reclaimed Wood
Reclaimed timber tells a story through its unique markings. Each plank carries history and character from previous uses. This eco-friendly choice reduces waste while adding charm.
Weathered surfaces show natural aging and patina. Knots, nail holes, and color variations create visual depth. Your space gains authentic rustic appeal.
Source creatively from old barns or factories. Local salvage yards often offer affordable options. You might discover hidden treasures with incredible character.
The Modern Farmhouse Appeal of Shiplap
Shiplap offers clean lines and consistent spacing. This interlocking panel system creates seamless visual flow. It works wonderfully in contemporary rustic spaces.
White-painted shiplap brightens the entire room. It reflects light beautifully while adding subtle texture. The result feels both fresh and timeless.
Horizontal patterns make spaces appear wider. They draw the eye across the room gracefully. This technique enhances your room feel dramatically.
DIY Tips for Installing Wood Paneling Overhead
Proper preparation ensures successful results. Measure your space carefully before purchasing materials. Account for lighting fixtures and ventilation openings.
Use these essential tools for your project:
- Measuring tape and level for accurate placement
- Circular saw for clean cuts
- Nail gun for secure attachment
- Safety goggles and sturdy ladder
Start installation from the room’s perimeter. Work toward the center systematically. Check alignment frequently to maintain straight lines.
Consider these wood options for different styles:
| Wood Type | Best For | Maintenance Level | Cost Range |
|---|---|---|---|
| Reclaimed Barnwood | Rustic, Vintage | Low | $$ |
| Pine Shiplap | Farmhouse, Contemporary | Medium | $ |
| Oak Planks | Traditional, Luxury | High | $$$ |
| Cedar Tongue-and-Groove | Cabin, Coastal | Medium | $$ |
Finish with appropriate sealant or stain. This protects against moisture and wear. Your investment lasts for years with proper care.
Wood overhead treatments create stunning visual impact. They add natural warmth and texture to your space. This approach transforms your personal retreat completely.
Incorporate Pattern and Whimsy with Wallpaper
Your overhead space deserves the same attention as your walls. Wallpaper transforms this surface into a stunning feature. It adds personality and charm to your personal retreat.
Heather from Heathered Nest demonstrated this beautifully. She added wallpaper to her bathroom ceiling for a modern touch. The airy look created by the pattern made the space feel larger.
This approach brings incredible visual interest without major renovation. You can achieve professional results with basic DIY skills. The transformation happens quickly and affordably.
Selecting the Perfect Pattern for an Airy Look
Choose patterns that create openness rather than confinement. Light colors and open designs work best overhead. They prevent the room from feeling cramped or closed in.
Consider the scale of your pattern carefully. Large patterns might overwhelm smaller spaces. Smaller repeats often work better for creating balance.
Floral designs bring softness and romance to your space. Geometric patterns add energy and modern appeal. Your choice should reflect your personal style.
Coordinate the color scheme with your walls and furniture. Harmonious combinations create a cohesive look. Contrasting colors make a bold statement.
Removable wallpaper offers flexibility for renters. You can change designs as your tastes evolve. This temporary solution still delivers big impact.
Step-by-Step: How to Hang Wallpaper on a Ceiling
Proper preparation ensures successful installation. Clean the surface thoroughly before starting. Repair any cracks or imperfections for smooth results.
Measure your space accurately before cutting paper. Add extra inches for trimming and pattern matching. This prevents waste and ensures proper coverage.
Use these essential tools for your project:
- Measuring tape and utility knife
- Wallpaper adhesive and smoothing brush
- Ladder and helper for safety
- Sponge for cleaning excess paste
Apply adhesive evenly across the back. Book the paper by folding it adhesive-side in. This allows the paste to activate properly.
Start from the center and work outward. Smooth bubbles with a plastic smoother tool. Work systematically across the entire surface.
Trim edges carefully with a sharp blade. Wipe away excess paste immediately. Allow proper drying time before moving furniture back.
Creating a Focal Point with a Ceiling Mural
Murals make dramatic statements overhead. They become instant conversation starters. Your personal space gains unique character.
Floral designs create breathtaking visual impact. They bring nature’s beauty indoors. The effect feels both luxurious and inviting.
Consider these popular mural styles:
- Botanical prints for natural elegance
- Sky scenes for open, airy feelings
- Abstract patterns for modern appeal
- Tropical motifs for vacation vibes
Position murals above your bed for maximum impact. They become the first thing you see upon waking. This creates a joyful morning experience.
Humidity affects wallpaper durability in sleeping spaces. Choose vinyl-coated options for better moisture resistance. They clean easily and last longer.
This project showcases your creativity beautifully. It transforms ordinary overhead surfaces into extraordinary features. Your space becomes truly personalized and memorable.
Achieve a Modern Look with a High Gloss Finish

Imagine stepping into your personal retreat and seeing light dance across a shimmering surface above. A glossy overhead treatment offers more than just shine—it creates an illusion of expanded space and luminous elegance. This sleek approach transforms your room into a bright, airy sanctuary.
The Mirror Effect: Bouncing Light for a Brighter Space
Glossy surfaces act like mirrors for both natural and artificial illumination. They catch sunlight from windows and reflect ambient lighting beautifully. This creates a radiant atmosphere that feels both open and inviting.
Your room gains extra brightness without additional fixtures. Dark corners disappear as light spreads evenly throughout. The effect is particularly valuable in smaller areas where every bit of light counts.
“A high-gloss stretch ceiling is a shiny, reflective ceiling made from PVC fabric that is stretched across a frame. The glossy finish creates a mirror-like effect, bouncing light around and making spaces appear bigger and brighter.”
Why Glossy Stretch Ceilings are a Practical Choice
These specialized installations offer remarkable durability and convenience. Made from PVC fabric, they resist moisture and humidity effectively. This makes them ideal for various climates and room conditions.
Maintenance becomes incredibly simple. You can clean them with just a damp cloth—no repainting or special treatments needed. They maintain their shine for years without fading or yellowing.
Installation requires professional expertise but delivers long-term benefits. The initial investment pays off through reduced upkeep costs and lasting beauty. You enjoy a flawless surface that always looks fresh.
Pairing Gloss with Statement Light Fixtures
Glossy overhead surfaces amplify the impact of your lighting choices. A stunning chandelier gains double presence through reflection. Pendant lights create captivating patterns across the shimmering canvas.
Consider these perfect pairings:
- Crystal chandeliers for glamorous reflections
- Minimalist pendants for contemporary appeal
- Recessed lighting for subtle illumination enhancement
- LED strips for modern accent lighting effects
Color selection dramatically affects the final result. Light tones enhance brightness and airiness. Darker shades create dramatic, intimate atmospheres while still reflecting light beautifully.
This innovative approach combines aesthetics with functionality perfectly. You create a visually stunning space that feels larger and more luxurious. Your personal retreat becomes a showcase of light and elegance.
Define Your Space with a Tray Ceiling Design
Imagine stepping into a space that feels instantly more sophisticated and defined. Tray ceilings create this elegant effect through their recessed center panel. This architectural feature adds depth and dimension to your personal retreat.
The stepped layers draw the eye upward beautifully. They make standard-height rooms feel more grand and customized. Your overhead space gains character without major construction.
Using Paint to Highlight Tray Ceiling Architecture
Color transforms your tray ceiling into a stunning focal point. Painting different levels contrasting shades emphasizes the architectural details. The recessed center becomes a framed masterpiece.
Consider painting the inner panel a deeper tone than the outer edges. This creates dramatic shadow effects and visual interest. Light colors on higher surfaces enhance the feeling of height.
Test your color choices at different times of day. Natural light changes how shades appear throughout daylight hours. Evening lighting creates entirely different moods.
Adding Trim and Molding for a Custom Look
Crown molding elevates your tray ceiling to luxury status. It adds refinement that complements your room’s style perfectly. The right trim turns basic construction into custom craftsmanship.
Choose profiles that match your existing decor elements. Simple lines suit contemporary spaces. Ornate patterns enhance traditional interiors beautifully.
Installation requires careful measurement and cutting. Use these essential tools:
- Miter saw for precise angle cuts
- Laser level for perfect alignment
- Construction adhesive and finishing nails
- Wood filler for seamless joints
Ideas for Decorating the Center of a Tray Ceiling
The recessed center panel offers wonderful creative opportunities. Install a decorative medallion around your light fixture. This adds elegance while hiding electrical hardware.
Wallpaper creates an unexpected focal point overhead. Choose patterns that coordinate with your bedding or curtains. The effect feels both luxurious and personalized.
Consider these center panel treatments:
- Metallic finishes for subtle shimmer
- Fretwork panels for dimensional interest
- Stenciled patterns for custom artwork
- Mirrored tiles for light reflection
Your tray ceiling becomes a true expression of personal style. It adds architectural interest that transforms ordinary rooms. This feature creates a sophisticated retreat you’ll love spending time in.
Explore the Classic Charm of a Beadboard Ceiling

Sometimes the most charming solutions are the ones that have stood the test of time. Beadboard brings a cozy, classic appeal to any space overhead. It instantly adds character and warmth to your personal retreat.
This timeless option works beautifully in various settings. It offers both visual appeal and practical benefits. Your overhead surface becomes a feature rather than just a finish.
“An easy fix for an outdated textured ceiling is to cover it with beadboard. It’s a classic look that will modernize a space in no time!”
A Perfect Solution for Cottage or Coastal Styles
Beadboard naturally complements relaxed, comfortable aesthetics. Its vertical lines evoke seaside cottages and country homes. The look feels both nostalgic and fresh.
White-painted beadboard brightens your space beautifully. It reflects light while adding subtle texture. The result feels airy and inviting.
You can leave it natural for a rustic feel. Stained wood shows off beautiful grain patterns. This approach adds organic warmth to your room.
How Beadboard Modernizes an Outdated Textured Ceiling
Many older homes feature textured overhead surfaces. These dated finishes can make spaces feel dark and closed in. Beadboard provides a clean, uniform solution.
It covers popcorn textures and other imperfections seamlessly. The smooth surface updates your space instantly. Your room feels brighter and more current.
Installation is straightforward for DIY enthusiasts. You can tackle this project over a weekend. The transformation happens quickly and affordably.
Combining Beadboard with Faux Beams for Depth
Amber from Amber-Oliver created a stunning layered look. She knew her 8-foot ceilings weren’t tall enough for real beams. Her solution combined beadboard with faux beams beautifully.
This approach adds dimension without overwhelming the space. The beams create visual interest across the smooth surface. Your overhead treatment gains architectural character.
Consider these popular combinations:
- White beadboard with dark stained beams
- Painted beadboard matching your wall color
- Natural wood with complementary faux beams
Proper installation ensures professional results. Measure your space carefully before cutting panels. Account for lighting fixtures and room proportions.
Use these essential tools:
| Tool | Purpose | Importance Level |
|---|---|---|
| Measuring Tape | Accurate panel sizing | High |
| Level | Straight installation | High |
| Adhesive | Secure attachment | Medium |
| Finishing Nails | Additional security | Medium |
Beadboard offers wonderful versatility in your color choices. Paint it to match your existing palette. Or create contrast for dramatic effect.
This material hides imperfections while adding insulation value. It creates a more comfortable environment in your space. The practical benefits complement the visual appeal.
Pair beadboard with wainscoting on walls for a cohesive theme. This creates a unified look throughout your room. The result feels intentional and well-designed.
Cost considerations make beadboard an attractive option. It’s generally affordable and readily available. Home improvement stores carry various styles and materials.
This timeless choice adds texture and charm beautifully. It transforms ordinary overhead surfaces into extraordinary features. Your space gains character and personality that lasts for years.
Make a Luxurious Statement with Metallic Accents
What if your overhead surface could shimmer with sophistication? Metallic accents bring glamour and luxury to your personal space. They create an eye-catching feature that elevates your entire room.
Kim from Salvaged Living demonstrates this beautifully. She chose a bold metallic paint for her dining room overhead. The risk paid off with elegant results.
“Kim from Salvaged Living went bold with a metallic bold paint on her dining room ceiling. The risk paid off! It gives that elegant touch she was looking for.”
Gold and Silver Tones for a Touch of Elegance
Gold tones add warmth and traditional luxury. They create rich, inviting atmospheres perfect for relaxation. Silver offers cooler, contemporary elegance.
These finishes reflect light beautifully throughout your space. They create shimmering effects that change with daylight. Your room gains dynamic visual interest.
Consider metallic tiles for dimensional appeal. They install easily over existing surfaces. The result feels both opulent and personalized.
Using Metallic Paint for a Bold and Beautiful Finish
Metallic paint offers a DIY-friendly path to luxury. It achieves high-end looks without major renovation. Proper application ensures professional results.
Start with a perfectly smooth primed surface. Use a high-quality roller for even coverage. Multiple thin layers create the best reflective finish.
Consider these application tips:
- Stir paint thoroughly before and during use
- Maintain wet edges to avoid lap marks
- Use natural light to check for consistency
- Allow proper drying time between coats
Pairing Metallic Ceilings with Your Existing Decor
Coordinate metallic finishes with your room’s metal fixtures. Match gold overhead with brass lamp bases. Silver pairs beautifully with chrome or nickel details.
Consider your wall colors and bedding patterns. Warm metallics complement earthy tones. Cool shades work with grays and blues.
Metallic elements work across various styles. Subtle sheens suit minimalist spaces. Dramatic finishes enhance art deco themes.
These surfaces require regular dusting. They show fingerprints more than matte finishes. Gentle cleaning maintains their luxurious appearance.
| Metallic Type | Best Room Style | Light Reflection | Maintenance Level |
|---|---|---|---|
| Gold Leaf | Traditional, Luxe | High | Medium |
| Silver Metallic | Contemporary, Modern | Medium-High | Low |
| Copper Tones | Industrial, Warm | Medium | Medium |
| Rose Gold | Romantic, Soft | Low-Medium | Low |
Metallic accents add energy and opulence psychologically. They make spaces feel special and intentionally designed. Your personal retreat becomes truly luxurious.
Take the risk with metallic elements overhead. They create maximum impact with minimal effort. Your space transforms into a sophisticated sanctuary.
Install Elegant Fretwork for a Unique Look

Have you considered turning your overhead surface into a work of art? Fretwork introduces intricate patterns that transform ordinary spaces into extraordinary showcases. This decorative approach blends craftsmanship with contemporary flair beautifully.
One designer took a bold step that paid off wonderfully. They shared their experience with this innovative project.
“I recently took a major risk and added something to my bathroom ceiling I’ve never seen done before… I added oak decorative fretwork panels across the entire ceiling. I know this modern look might not be for everyone, but I love the unique look it gives to this small bathroom.”
This personal story shows how fretwork creates memorable spaces. Your sleeping area deserves the same artistic attention.
Adding Dimension with Decorative Wood Panels
Wood panels bring depth and texture to your overhead space. Oak fretwork offers natural warmth and durability. These elements create shadows that change throughout the day.
Patterns range from geometric to floral designs. They add visual complexity without overwhelming your room. Your choice should complement existing decor.
Consider these popular materials:
- Oak for traditional strength
- Basswood for intricate carving
- MDF for painted finishes
- Reclaimed wood for eco-friendly charm
How Fretwork Creates Modern Visual Interest
Traditional techniques meet current aesthetics in fretwork. The interplay of light and shadow adds dynamic movement. Your overhead surface becomes a living art piece.
This approach works particularly well in smaller rooms. It draws the eye upward without closing in the space. The result feels both expansive and intimate.
Pattern selection impacts the overall effect. Larger repeats make bold statements. Smaller patterns create subtle background texture.
A Step-Outside-Your-Comfort-Zone Project
Fretwork installation requires courage but offers great rewards. Start with a small section if you’re unsure. The bathroom example proves even compact spaces benefit.
Proper measurement ensures pattern continuity. Account for lighting fixtures and room proportions. Dry fitting panels prevents costly mistakes.
Finishing options personalize your project:
- Natural stain shows wood grain
- Paint matches your color scheme
- Metallic accents add glamour
- Two-tone effects highlight patterns
This project showcases your creativity wonderfully. It transforms basic overhead surfaces into conversation pieces. Your space becomes truly unique and reflective of personal style.
Transform Your Space with Faux Tin Tiles
Have you ever considered adding instant architectural charm without breaking the bank? Faux tin tiles offer an affordable solution that transforms ordinary overhead surfaces into stunning features. They bring vintage elegance to your personal space with minimal effort.
Wanda’s experience shows how effective these tiles can be. She chose this option for her project and achieved remarkable results.
“The good news is she used faux tin ceiling tiles! They are inexpensive and easy to install, yet they still create an architectural feature to the ceiling that we all love.”
This approach works beautifully in various settings. It adds both visual interest and historical character.
Inexpensive and Easy-to-Install Architectural Features
These tiles offer incredible value for your money. Most options cost significantly less than real metal tiles. You achieve the same elegant look without the high price tag.
Installation couldn’t be simpler for DIY enthusiasts. Many systems use adhesive backing for easy application. You can complete this project over a weekend.
Consider these installation tools:
- Measuring tape for accurate placement
- Utility knife for precise cutting
- Adhesive recommended by manufacturer
- Level for straight alignment
The lightweight nature makes handling easy. You won’t need special support structures. This simplifies the entire process dramatically.
The Vintage Appeal of Tin Ceiling Designs
Tin tiles evoke early 20th-century aesthetics beautifully. They bring historical character to contemporary spaces. Your room gains timeless appeal through these intricate patterns.
Pattern selection ranges from classic to modern options. Traditional designs feature floral and geometric motifs. Contemporary patterns offer cleaner lines for updated spaces.
These elements create wonderful shadow play throughout the day. Natural light highlights the dimensional quality. Artificial lighting enhances the texture after dark.
Consider these popular pattern styles:
| Pattern Type | Best For | Visual Impact | Period Style |
|---|---|---|---|
| Floral Scroll | Traditional Spaces | High | Victorian |
| Geometric | Contemporary Rooms | Medium | Art Deco |
| Medallion | Formal Settings | High | Edwardian |
| Linear | Modern Interiors | Low-Medium | Industrial |
Painting Tiles for a Custom Color Match
Customization makes these tiles truly yours. Painting allows perfect color coordination with your existing decor. You maintain the beautiful patterns while achieving your desired hue.
Start with proper surface preparation. Clean tiles thoroughly before painting. Use a primer designed for metal surfaces.
Spray painting often yields the best results. It covers intricate patterns evenly without brush marks. Multiple light coats work better than one heavy application.
Consider these painting tips:
- Work in a well-ventilated area
- Use drop cloths to protect surfaces
- Allow proper drying time between coats
- Apply clear sealant for protection
Metallic paints create stunning effects. They enhance the vintage feel while adding contemporary shine. Your creativity shines through these personalized touches.
Faux tin tiles offer wonderful versatility for your home. Use them across the entire overhead surface for maximum impact. Or create borders and accents for subtle character.
They provide practical benefits beyond aesthetics. These tiles resist moisture and clean easily. Their durability ensures years of beautiful service.
Shop sales and clearance sections for best prices. Leftover tiles work perfectly for small accent areas. This budget-friendly approach delivers big results.
Transform your space with these elegant features. They add architectural interest without major renovation. Your personal retreat gains character and charm that lasts over time.
Design a Coffered Ceiling for Grand Character

What if your overhead surface could offer architectural elegance that transforms your entire space? Coffered ceilings bring a sense of luxury and depth to any room. They create a structured, polished look that feels both timeless and impressive.
These features divide your overhead area into recessed panels. The geometric pattern adds visual interest and sophistication. Your personal space gains a custom-built feel without major construction.
Replacing a Popcorn Ceiling with a DIY Coffered Design
Outdated textured surfaces can make your room feel dated. Morgan and Sean from Charleston Crafted tackled this challenge beautifully. They replaced a popcorn surface in a nursery with a stunning DIY coffered look.
Their step-by-step tutorial shows how achievable this project can be. You start by removing the old texture carefully. Then build a grid framework to create the recessed panels.
Proper measurement ensures symmetrical results. Use a laser level for perfect alignment. The transformation happens through careful planning and execution.
How Coffered Ceilings Create a Dramatic Focal Point
The recessed panels draw eyes upward dramatically. They create shadows that change throughout the day. This dynamic effect adds constant visual interest.
You can enhance the impact with strategic lighting. Install fixtures within the panels for subtle illumination. Paint different depths contrasting colors for added dimension.
This approach makes your overhead surface the room’s star feature. It elevates the entire interior design scheme. Your space feels more intentional and polished.
Modern Twists on the Traditional Coffered Look
Traditional coffered design often features intricate moldings. Contemporary versions offer cleaner lines and minimalist profiles. Painted finishes in unexpected colors create fresh statements.
Consider these modern variations:
- Wider spacing between beams for airy feel
- Monochromatic color schemes for seamless look
- Integrated LED lighting for ambient glow
- Asymmetric patterns for artistic appeal
These updates maintain the architectural interest while feeling current. They work beautifully in various bedroom sizes and styles.
Planning your coffered project requires careful consideration. Measure your room’s proportions accurately. Choose a panel size that complements your space dimensions.
Frame construction forms the foundation of your design. Use quality lumber for stability and durability. Finish with trim that matches your room’s character.
This investment adds value to your home over time. The luxurious appearance impresses guests and comforts residents. Your personal retreat becomes truly special.
Budget-conscious approaches deliver high-end results. DIY methods save significantly on labor costs. Smart material choices keep expenses reasonable while maintaining quality.
Coffered ceilings offer optical illusions that enhance spaciousness. The structured pattern makes rooms feel taller and more grand. This benefit works particularly well in standard-height spaces.
Integrate decorative elements like medallions or subtle trim. These details add personality without overwhelming the design. Your overhead treatment becomes a cohesive part of your room’s story.
Consider this architectural feature for your next project. It creates a timeless addition that you’ll enjoy for years. Your space transforms into a sophisticated sanctuary that reflects your taste beautifully.
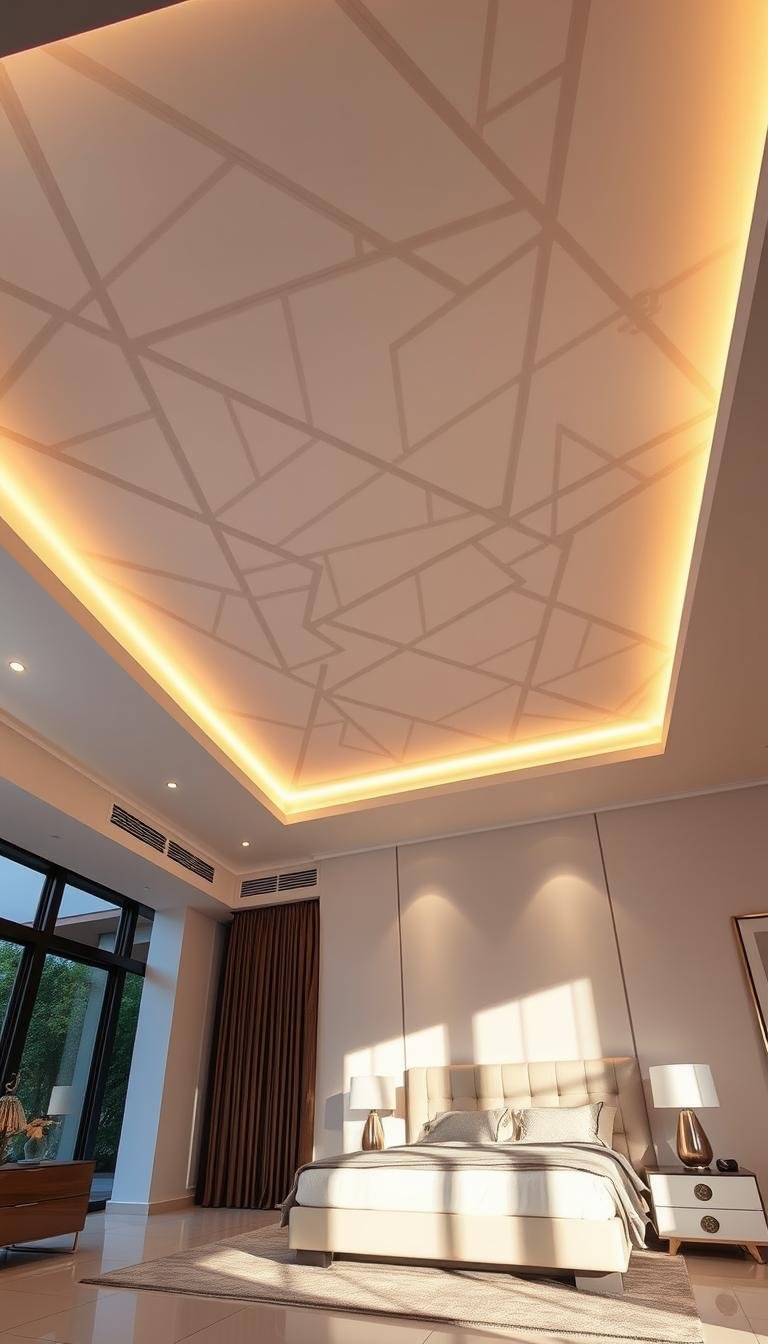
Integrate Lighting to Enhance Your Ceiling Design
Lighting transforms your overhead treatment from beautiful to breathtaking. It adds both function and flair to your personal retreat. The right illumination makes your ceiling the star of the show.
As one expert notes, these features can integrate with lighting systems. This combination creates beauty and function together. Your overhead space becomes more than just decoration.
“They can also be integrated with lighting systems, making them both beautiful and functional.”
Using Pendant Lights as a Decorative Element
Pendant lights draw eyes upward beautifully. They become focal points that add style and personality. Choose fixtures that match your room’s character.
Modern pendants offer clean lines for contemporary spaces. Rustic options bring warmth and charm. Vintage designs add historical character.
Consider these popular pendant styles:
- Drum shades for diffused light
- Glass globes for clear illumination
- Metal cages for industrial appeal
- Multi-light clusters for dramatic effect
Hang pendants at proper height for best results. They should clear headroom while making visual impact. Your lighting becomes both practical and artistic.
Creating Ambiance with Hidden LED Strip Lighting
LED strips create magical hidden illumination. They outline architectural features with soft glows. This approach adds depth and dimension overhead.
Install strips along tray ceiling edges for elegant framing. Place them in coffered designs for subtle highlights. The effect feels both luxurious and inviting.
Choose warm white tones for cozy atmospheres. Cool white offers energizing brightness. Color-changing options create dynamic moods.
These energy-efficient options reduce electricity costs. They provide versatile lighting effects for years. Your space gains both beauty and savings.
How Light Fixtures Can Amplify Your Ceiling’s Impact
Fixtures highlight textures, colors, and architectural details. They enhance your ceiling’s visual impact dramatically. The right lighting completes your design vision.
Pair statement fixtures with reflective surfaces. Chandeliers gain double presence through glossy finishes. The reflection amplifies their beauty beautifully.
Consider these perfect pairings:
| Ceiling Type | Ideal Fixture | Lighting Effect | Installation Level |
|---|---|---|---|
| High Gloss | Crystal Chandelier | Dramatic Reflection | Professional |
| Wood Beams | Track Lighting | Directional Highlights | DIY-Friendly |
| Tray Design | Recessed Lights | Subtle Illumination | Intermediate |
| Beadboard | Flush Mount | Even Distribution | Beginner |
Wiring requires careful planning for safety. Simple fixtures work well for DIY projects. Complex systems need professional installation.
Lighting affects your mood psychologically. Warm tones create relaxing environments for sleep. Bright lights offer energizing morning experiences.
Your illumination choices complete the overhead treatment. They transform functional elements into decorative features. Your personal retreat becomes truly cohesive and intentional.
Modern Bedroom Ceiling Design Ideas That WOW on a Budget
Great overhead transformations don’t require huge investments. You can achieve stunning results with smart planning and clever choices. Your personal space gains incredible character without draining your wallet.
As Source 3 suggests, you can turn your attention upwards and get ready to try clever tricks—without breaking the bank, we promise. This approach lets you create dramatic visual impact while staying within your means.
DIY Projects That Deliver Maximum Impact
Simple paint techniques transform your overhead space dramatically. A fresh coat of color creates immediate visual interest. You achieve professional-looking results with basic tools.
Faux wood beams offer architectural charm at a fraction of the cost. They install easily and look remarkably authentic. Your room gains depth and character quickly.
Wallpaper adds pattern and personality overhead. Removable options work perfectly for rental spaces. You can change designs as your tastes evolve.
Consider these high-impact DIY projects:
- Metallic paint for luxurious shimmer
- Fretwork panels for artistic patterns
- Stenciled designs for custom artwork
- Beadboard installation for classic texture
Choosing Materials That Offer the Best Value
Faux materials often outperform real ones for budget projects. They provide the same visual appeal with lower cost. Your investment goes further without sacrificing style.
Reclaimed wood brings unique character affordably. Local salvage yards offer wonderful finds. Each piece tells a story through its natural markings.
Paint remains your most versatile tool. It transforms surfaces instantly with minimal expense. Quality products ensure long-lasting results.
Shop sales and clearance sections regularly. Leftover materials work perfectly for small projects. You might discover hidden treasures at amazing prices.
Where to Splurge and Where to Save
Invest in quality lighting fixtures for longevity. Good illumination enhances your entire design. These pieces become focal points that last for years.
Save on decorative elements you can create yourself. Paint treatments and simple installations offer big returns. Your creativity becomes your greatest asset.
Consider this spending strategy:
| Area to Splurge | Area to Save | Reasoning |
|---|---|---|
| Lighting Fixtures | Paint Supplies | Long-term durability vs. frequent refresh |
| Installation Tools | Decorative Trim | Reusable investment vs. stylistic changes |
| Primer & Sealant | Wallpaper | Protection foundation vs. design updates |
Some projects require more time than money. DIY approaches save significantly on labor costs. Your patience delivers beautiful, budget-friendly results.
Prioritize projects based on desired visual impact. Focus on changes that make the biggest difference first. This approach maximizes your investment beautifully.
Your home becomes more beautiful through smart choices. You create a personalized retreat that reflects your style. The result proves amazing transformations don’t require huge budgets.
How to Choose the Right Ceiling Idea for Your Bedroom
Selecting the perfect overhead treatment involves balancing your vision with practical considerations. Your choice should enhance both the function and feel of your personal space.
Think about how you want the area to serve you daily. Consider maintenance needs and long-term satisfaction. The right decision creates harmony throughout your interior.
Considering Your Room’s Height and Size
Measure your space carefully before making decisions. Low overhead surfaces benefit from light colors and simple designs. These choices prevent the area from feeling cramped.
Taller rooms handle more complex treatments beautifully. You can add beams or coffered details without overwhelming the space. Always maintain clear headroom for comfort and safety.
Glossy or mirrored surfaces make compact areas feel larger. They reflect light and create airy atmospheres. This approach works wonderfully in smaller sleeping spaces.
Matching the Ceiling Design to Your Overall Style
Your overhead treatment should complement existing decor elements. Modern spaces often suit sleek lines and minimalist approaches. Traditional rooms benefit from classic details like beadboard or medallions.
Farmhouse styles embrace natural materials and rustic charm. Industrial looks work with metallic accents and exposed elements. Your personal taste guides the final selection.
Geometric patterns enhance contemporary aesthetics beautifully. They add visual interest without overwhelming other features. Wood paneling brings warmth and texture to various settings.
Consider how the treatment works with your color scheme. Harmonious combinations create cohesive environments. Bold statements should still feel integrated with your overall vision.
Balancing Bold Statements with Timeless Appeal
Dramatic choices make unforgettable impressions. They showcase your personality and creativity beautifully. However, consider how these decisions will feel over time.
Classic elements provide enduring satisfaction. They withstand changing trends and personal evolution. Mixing bold accents with timeless foundations offers the best of both worlds.
Removable options like wallpaper allow for style experimentation. You can refresh your space without permanent commitment. This flexibility suits those who enjoy frequent updates.
Test your ideas through samples and mock-ups first. View colors and materials in your actual lighting conditions. Mobile visualization tools help preview complete looks before installation.
Your overhead treatment influences the room’s mood significantly. Dark colors create intimate, cozy atmospheres. Light finishes produce bright, energizing environments.
Practical considerations ensure lasting enjoyment. Choose low-maintenance options for busy lifestyles. The right balance between drama and durability creates spaces you’ll love for years.
Start Planning Your Dream Bedroom Ceiling Today
Your overhead area holds amazing potential to transform your personal space. Now is the perfect time to begin your project.
From bold paint to wood beams, there are many inspiring ideas to explore. Each option adds unique character and charm.
Your choice should reflect your personal style and skill level. Many projects are DIY-friendly and budget-conscious.
Start by measuring your space and gathering inspiration. Online communities offer great support and creative tips.
This investment enhances your home‘s value and your daily comfort. Embrace your creativity and make that vision a reality.