Do you dream of a fresh look for your sleeping space but feel overwhelmed by big renovations? You’re not alone. Many people want to revitalize their personal retreat without spending weeks or breaking the bank.
The good news? Amazing transformations are possible in just two days. These friendly diy projects are designed for real life. They fit perfectly into busy schedules and limited budgets.
Small changes create big impact in your home. We’ll guide you through refreshing walls, furniture, bedding, and lighting. Each idea helps build a room that truly reflects your style and brings comfort.
Get ready to explore exciting projects like wood accent walls and creative headboards. Let’s begin your journey to a space you’ll love coming home to!
Welcome to Your Weekend Bedroom Refresh
Your journey to creating a more inviting personal retreat begins right here. We’ll explore simple projects that transform your space in just two days.
Starting with a clear vision makes all the difference. Set realistic goals so your makeover stays enjoyable from start to finish.
Refreshing your room enhances daily life in wonderful ways. You’ll create a calming sanctuary that improves sleep and boosts well-being.
Planning is key to success. Gather inspiration from sources like Pinterest or create a mood board to stay focused on your vision.
This refresh works beautifully with your existing items. Add new touches gradually to avoid feeling overwhelmed.
Make it a fun experience by involving family or friends. A collaborative approach brings joy to the process.
Even small changes create significant impact. Rearranging furniture or adding a pop of color transforms the ambiance instantly.
As seen in this guest room transformation plan, starting with clear vision makes the process smooth and rewarding.
You have everything needed to begin this exciting makeover. Let’s create a space that truly reflects your unique style!
Craft a Striking Wood Accent Wall

Transform any blank wall into a captivating centerpiece with natural materials. This approach brings instant character and warmth to your space.
Wood accent walls create visual interest without structural changes. They work beautifully behind your bed or as a statement piece on any wall.
Choose Your Wood Style: Slats, Panels, or Tiles
Different wood styles create distinct atmospheres. Each option offers unique benefits for your design vision.
Wood slats provide clean lines and contemporary appeal. They create rhythm and movement across your surface.
Panels deliver seamless elegance with larger pieces. They work wonderfully for creating a unified, sophisticated look.
Tiles offer patterned, dynamic effects through geometric arrangements. They add playful energy to your space.
Matching the Wood Tone to Your Desired Aesthetic
Selecting the right wood tone enhances your overall design. Consider these options for different styles:
| Wood Tone | Best For | Atmosphere Created |
|---|---|---|
| Light tones (birch, maple) | Modern, minimal spaces | Airy, bright feeling |
| Medium tones (oak, walnut) | Transitional styles | Warm, balanced mood |
| Dark tones (ebony, mahogany) | Rustic, cozy vibes | Intimate, dramatic effect |
| Reclaimed wood | Eclectic, character-filled spaces | Authentic, storied appeal |
Brown Studio and Sven Simon of dasMOD used warm modern wood beautifully. Their approach shows how texture adds depth to any room.
Installation requires basic tools and careful planning. You’ll need:
- A level for straight alignment
- Quality adhesive for secure placement
- Possibly a saw for custom cuts
Professional tip: Always test your layout before permanent installation. This ensures perfect alignment and avoids mistakes.
Complement your new focal point with thoughtful decor choices. Neutral bedding lets the wood shine as the main attraction.
Metallic accents like brass lamps or silver frames create lovely contrast. They highlight the natural beauty of your wood feature.
This project transforms ordinary walls into extraordinary statements. It brings curated sophistication without full renovation.
Your personal retreat gains character and warmth through this simple upgrade. Enjoy the transformative power of natural materials!
Free Up Floor Space with a Floating Nightstand
Are you tired of bulky furniture crowding your space? A floating nightstand offers a smart solution. It attaches directly to your wall, freeing up valuable floor area.
This creates a more open and airy feeling in your room. Your space instantly feels larger and less cluttered.
Interior designer Kirsten Grove of We Three Design recommends aligning the top of your nightstand with your mattress height. This creates a sleek, streamlined look that feels both intentional and ergonomic.
Everything you need will be within easy reach from your bed.
Building Your Own DIY Floating Nightstand
This project is perfect for a budget-friendly upgrade. You can build it with a few basic tools and materials.
Start with a simple wooden frame. A pocket-hole jig makes assembly strong and clean.
Here are the basic steps to follow:
- Cut your wood pieces to the desired size.
- Use the pocket-hole jig to join the frame securely.
- Attach a painted plywood backing for a colorful surprise.
- Sand all surfaces for a smooth finish.
This approach keeps your shopping list short and affordable. Consider plywood or reclaimed wood for a cost-effective build.
Smart Customization Ideas
Make your nightstand work perfectly for your needs. Add a small built-in compartment to store your phone or a favorite book.
Drill a discreet hole in the back for charging cords. This keeps cables organized and out of sight.
Think about your lighting needs too. You can mount a small wall sconce or lamp above your new table.
This provides perfect task light for reading without taking up any surface space.
| Feature | Benefit | DIY Tip |
|---|---|---|
| Wall-mounted design | Maximizes floor space | Use sturdy wall anchors |
| Cord management hole | Reduces clutter | Drill before final assembly |
| Painted back panel | Adds personal style | Prime before painting |
| Built-in storage nook | Keeps essentials handy | Size it for your phone |
This project beautifully combines function and style. It’s a perfect solution for smaller rooms or a minimalist aesthetic.
Floating nightstands are a game-changer for small spaces. They provide necessary function without visual weight.
You can complete this transformation in just a weekend. Enjoy your new, clutter-free space that feels both modern and practical!
Design and Build Your Own DIY Headboard

Your bed deserves to be the stunning centerpiece of your room with a headboard that reflects your unique style. This weekend project lets you create something truly special for your sleeping area.
Custom headboards add personality and comfort to your space. They transform an ordinary bed into a focal point that expresses your design aesthetic.
Using Reclaimed Wood for a Rustic Look
Reclaimed barn wood brings authentic character to your diy project. Start by cutting plywood to your desired size as a sturdy backing.
Gently clean the reclaimed boards to preserve their natural patina. Nail them securely to the plywood base for a rustic appearance.
Apply a whitewash finish for a soft, weathered look. Mix one-third cup of white paint with half a cup of water for the perfect consistency.
Consider painted color blocks for a modern twist. A single coat of bold paint creates striking geometric patterns against the wood grain.
Upholstering a Headboard for a Plush Feel
Create luxurious comfort with an upholstered design. Cut plywood and high-density foam to your preferred dimensions.
Cover everything with sumptuous fabric like blue velvet. This adds a rich touch of texture and color to your space.
Add button blanks for elegant tufting details. This technique creates depth and visual interest across the surface.
Visit salvage yards for affordable reclaimed materials. Fabric stores offer beautiful options for upholstery projects.
Secure your finished headboard safely to wall studs. Alternatively, use wood cleats for sturdy hanging support.
This custom piece instantly elevates your room’s aesthetic. It brings sophistication and warmth to your personal retreat.
Choose a style that complements your existing decor. Whether farmhouse, modern, or traditional, your headboard will create a cohesive look.
Infuse Energy by Mixing Patterns and Colors
Have you ever walked into a room that instantly lifted your mood? That’s the magic of thoughtful pattern and color mixing. This approach transforms neutral spaces into vibrant expressions of your unique style.
Interior designer Sarah Stacey shows how this technique works. She combines abstract, geometric, and floral prints in rugs, pillows, and artwork. The result is a space bursting with energy and character.
Start with a neutral foundation for your walls and larger furniture. Then add bold accents through accessories. This creates visual interest without overwhelming the space.
Follow these simple guidelines for harmonious mixing:
- Choose one dominant pattern as your starting point
- Select complementary prints in similar scale or color family
- Mix geometric shapes with organic florals for balance
- Use stripes as a neutral that pairs with anything
The color selection process should consider your desired atmosphere. Warm tones like red and orange create energy and coziness. Cool blues and greens promote calm and relaxation.
Think about how different colors make you feel. Do you want your space to energize you in the morning? Or help you unwind in the evening?
Designers often use area rugs as colorful focal points. A bold patterned rug can tie together various elements in the room. Throw pillows in coordinating colors reinforce the theme.
Pattern mixing is like telling a visual story. Each piece contributes to the overall narrative of your space.
Artwork provides another opportunity for color expression. Choose pieces that reflect your personal taste while complementing your color scheme.
This approach offers wonderful flexibility. You can easily swap accessories when you want a fresh look. Seasonal updates become simple and affordable.
Your space should feel like a true reflection of you. Don’t be afraid to experiment with combinations that make you happy. The best rooms are those that tell your unique story.
This low-commitment method lets you refresh your space anytime. Start with small changes and build confidence as you go. You’ll create a place that truly feels like home.
Apply Removable Wallpaper for an Instant Impact

Want to transform your walls without permanent commitment? Removable wallpaper offers the perfect solution. This innovative material creates dramatic changes in your personal space.
Peel-and-stick options provide incredible flexibility. You can experiment with bold patterns that reflect your current style. The best part? Everything removes cleanly when you’re ready for a change.
Peel-and-Stick Application Tips for a Perfect Finish
Proper preparation ensures flawless results. Always start with completely clean, dry walls. Smooth surfaces work best for adhesion.
Begin at the ceiling and work downward. Use a straightedge to maintain perfect alignment. Smooth each section gradually to avoid air bubbles.
Trim excess material with a sharp utility knife. Take your time with corners and edges. Precision here makes all the difference.
For furniture applications, remove hardware first. Clean surfaces thoroughly before applying. Use a credit card as your smoothing tool.
| Application Surface | Preparation Needed | Best Pattern Types |
|---|---|---|
| Accent walls | Light cleaning | Large-scale designs |
| Behind bed area | Thorough drying | Calming patterns |
| Dresser fronts | Hardware removal | Small-scale prints |
| Closet interiors | Simple wiping | Bright colors |
This approach works wonderfully for rental homes. You get personalization without violating lease agreements. It’s the ideal diy project for temporary spaces.
Coordinate your new patterns with existing elements. Match bedding colors to your wallpaper selection. Add throw pillows that complement the design.
Complete your transformation in just a few hours. The instant results make this perfect for weekend projects. You’ll enjoy immediate visual impact.
Experiment with different pattern families. Try geometric shapes for modern appeal. Floral designs bring natural warmth to your room.
This method lets you refresh your space seasonally. Change patterns as your tastes evolve. It’s the most flexible way to keep your environment current.
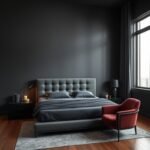
Create a Calming Atmosphere with Muted Tones
Imagine stepping into a space that instantly lowers your stress and wraps you in peace. That’s the power of a carefully chosen color palette. Muted tones work wonders for creating this serene environment.
These soft shades connect you to nature’s calming influence. Think of sage green’s gentle whisper or dusty rose’s quiet warmth. They bring tranquility without overwhelming your senses.
Your choice of color directly impacts relaxation and sleep quality. Softer hues signal your brain to unwind and rest. They create visual comfort that bright shades sometimes disrupt.
Popular muted colors include earthy greens and cool blues. Warm terracotta and soft lavender also work beautifully. Each shade brings its own peaceful personality to your room.
Start with a neutral base for walls and larger furniture. Then introduce your muted tones through bedding and accessories. This approach maintains balance while adding character.
Texture plays a crucial role in muted schemes. Layered bedding with different fabrics adds depth. Woven throws and tactile rugs prevent the space from feeling flat.
Designer Linda Hayslett of LH.Designs sees current trends leaning toward plums and mustards. These deeper natural tones offer modern elegance. They feel both stylish and soothing.
Choose colors that resonate with your personal personality. Your space should reflect what makes you feel most at peace. This creates a true retreat that’s uniquely yours.
Small changes make big differences in your room’s mood. Swap bright pillows for muted alternatives. Add a softly colored throw blanket for instant coziness.
This approach offers an easy way to transform your atmosphere. A simple touch of muted color can shift the entire feel of your space. You’ll create a sanctuary that welcomes relaxation every day.
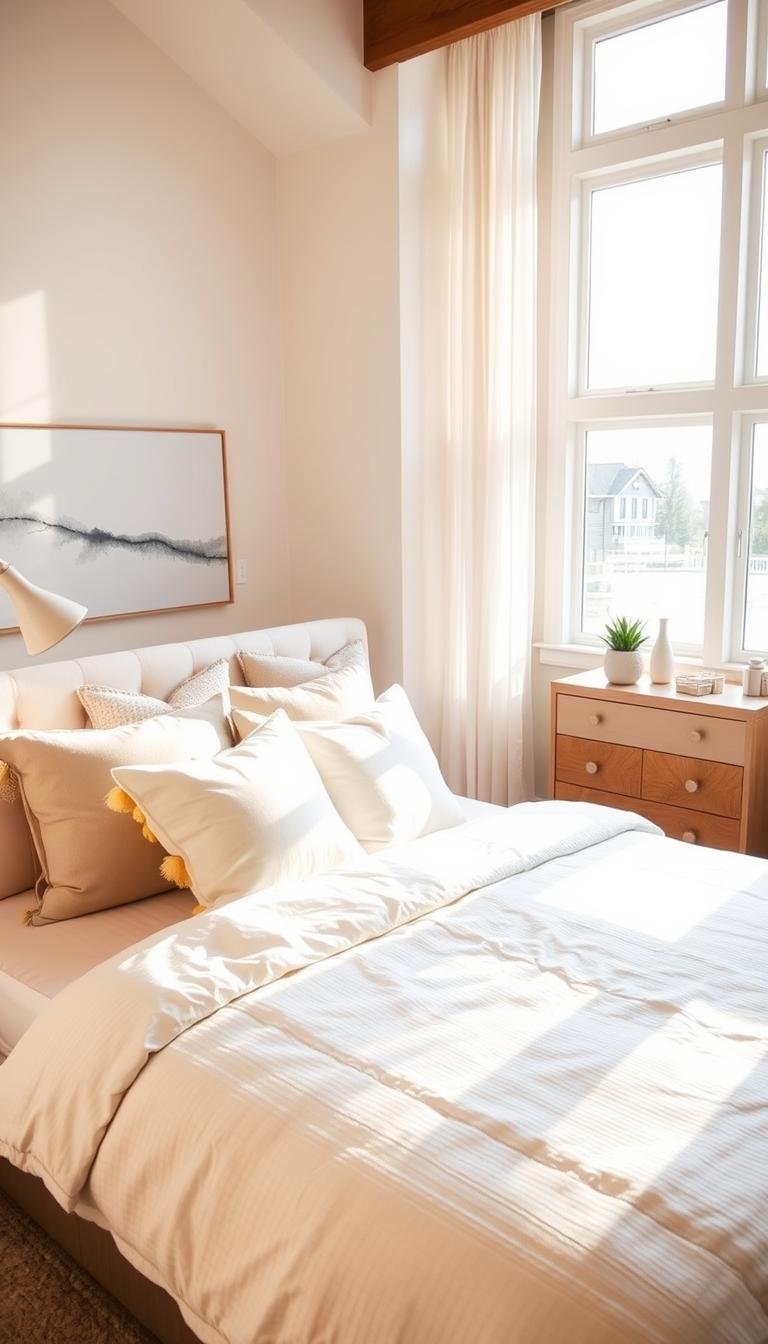
Elevate Your Bedding for Ultimate Comfort

Nothing transforms your personal retreat like luxurious, personalized bedding. It’s the centerpiece of comfort and style in your space.
Simple diy projects can create a high-end look without the cost. You’ll add color, texture, and personality to your bed.
These techniques bring a custom touch to plain linens. They’re perfect for weekend projects with stunning results.
The Easy DIY Dip-Dye Duvet Cover Technique
Create a beautiful ombre effect with simple dye techniques. Start with a white cotton duvet cover for best results.
Choose Rit dye in complementary shades like Royal Blue and Navy Blue. Mix three intensities from light to dark for gradient effects.
Follow these steps for perfect results:
- Prepare separate dye baths in different intensities
- Bunch fabric and dip repeatedly for organic patterns
- Allow proper drying time between dips
- Heat-set according to manufacturer instructions
This method creates a soft, watercolor-like appearance. Each piece becomes a unique work of art.
Adding Colorful Embroidery to Plain Pillowcases
Transform basic shams with simple stitching techniques. Embroidery adds a handmade touch that feels special.
Use colorful floss to create sun-ray patterns or geometric shapes. The split stitch works beautifully for clean lines.
Consider these coordination tips:
| Element | Coordination Tip | Visual Impact |
|---|---|---|
| Duvet color | Match floss to dominant dye shade | Creates harmony |
| Pillow edges | Dip-dye to complement main piece | Adds layered effect |
| Room palette | Choose colors from existing decor | Enhances cohesion |
| Thread weight | Use thicker floss for bold statements | Increases visibility |
Always use 100% cotton for best dye absorption. The natural fibers hold color beautifully through washing.
These projects offer affordable customization. You create designer-looking bedding at a fraction of the cost.
Your sleep experience improves with soft, personalized linens. The bed becomes your favorite retreat within your retreat.
Complete both projects in a single weekend. You’ll wake up to a transformed space that truly reflects your style.
Install Strategic Lighting to Set the Mood
Lighting shapes how you experience your personal space every day. It moves beyond simple function to create atmosphere and emotion. The right approach makes your room feel welcoming and perfectly suited to your needs.
Think about how different lights serve different purposes. Some provide general illumination while others create cozy corners. A thoughtful plan brings all these elements together beautifully.
Your lighting choices should work with your existing decor. They highlight favorite pieces and create visual interest. This approach makes your space feel complete and intentionally designed.
Space-Saving Wall Sconces Above the Bed
Wall-mounted lights free up valuable surface area on your nightstands. They provide perfect reading light without clutter. Their placement creates a stylish focal point above your sleeping area.
Choose fixtures that complement your room’s style. White sconces balance beautifully with wood furniture. They add modern flair while keeping the look clean and uncluttered.
Installation requires basic electrical knowledge. Always follow manufacturer instructions for safety. Consider hiring an electrician if you’re unsure about the process.
Position sconces at eye level when sitting up in bed. This provides ideal task lighting for reading. Their directed light creates a cozy pool of illumination just where you need it.
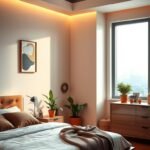
Maximizing Natural Light for a Brighter Room
Sunlight brings energy and warmth into your space every day. Simple adjustments maximize this free light source. Your room feels larger and more inviting with abundant natural illumination.
Start with window treatments that filter light beautifully. Sheer curtains soften sunlight while maintaining brightness. They provide privacy without blocking valuable rays.
Strategic mirror placement reflects light throughout the room. Position them opposite windows for maximum effect. This technique literally doubles the amount of natural light.
Keep windowsills clear of obstructions. Move plants or decor items that block sunlight. Even small changes make a significant difference in brightness.
Layering different light types creates depth and flexibility. Combine overhead fixtures with task and accent lighting. This approach allows you to set the perfect mood for any time of day.
Consider these lighting elements for a balanced scheme:
- Ambient lighting from ceiling fixtures for general illumination
- Task lighting like sconces or lamps for specific activities
- Accent lighting to highlight architectural features or artwork
Dimmer switches offer wonderful control over brightness levels. They let you adjust lighting based on time of day or activity. This simple addition provides incredible flexibility for mood setting.
DIY lighting projects add personal touches to your space. Update thrifted lamps with spray paint for a fresh look. Add embroidery floss details to shades for custom texture.
Consider these creative ideas:
| Project | Materials Needed | Time Required |
|---|---|---|
| Lamp base refresh | Spray paint, sandpaper | 2 hours |
| Shade customization | Embroidery floss, needle | 1 hour |
| String light installation | String lights, command hooks | 30 minutes |
| Bulb replacement | New bulbs with preferred temperature | 15 minutes |
Bulb color temperature significantly affects room atmosphere. Warm white bulbs (2700K-3000K) create relaxing vibes. Cool white options (3500K-4100K) provide clarity for morning routines.
View lighting as both practical and decorative. Strategic choices enhance functionality while elevating style. Your space becomes more beautiful and more usable with thoughtful illumination.
Experiment with different arrangements until you find what works best. Small changes create big impact in how your room feels. Enjoy transforming your atmosphere through the power of light!
Furniture Makeovers: Paint and New Hardware

Have you ever looked at an old dresser or nightstand and wished it had more personality? Giving your existing furniture a fresh look is easier than you think. With some creativity and basic supplies, you can transform tired pieces into stylish focal points.
These diy projects offer amazing results without the cost of new furniture. You’ll save money while creating a custom look that reflects your unique style. The process is both rewarding and environmentally friendly.
Start by selecting one piece to transform first. This makes the project manageable and lets you build confidence. You’ll be amazed at what a difference some paint and updated hardware can make.
Using Wallpaper on Dresser Drawers for a Pop of Pattern
Adding wallpaper to drawer fronts creates instant visual interest. This technique brings pattern and texture to your space in a unique way. It’s perfect for adding personality without overwhelming the room.
Begin by removing all drawers from your dresser. Take off the existing hardware and set it aside. Clean each surface thoroughly to ensure proper adhesion.
Measure each drawer front carefully before cutting your paper. Allow a small overlap that you can trim later. Use a credit card to smooth the paper and remove air bubbles.
Consider these pattern placement ideas:
- Alternate directions for a dynamic, modern look
- Use the same pattern on all drawers for consistency
- Mix complementary patterns for eclectic charm
- Create a focal point with one patterned drawer
Reattach your hardware once the paper is securely in place. New knobs or pulls can complete the transformation beautifully.
The painting process begins with proper preparation. Sand surfaces lightly to help the paint adhere better. Apply a primer coat for even coverage and durability.
Choose your color scheme based on your room’s existing palette. Trending colors like sage green or soft blue work wonderfully. You can also create geometric patterns using painter’s tape.
Apply two thin coats of paint rather than one thick coat. This prevents drips and ensures professional-looking results. Allow proper drying time between coats.
Selecting new hardware is like choosing jewelry for your furniture. Home improvement stores offer numerous styles to match any decor. Consider these popular options:
| Hardware Style | Best For | Visual Effect |
|---|---|---|
| Modern brushed nickel | Contemporary spaces | Sleek, clean lines |
| Vintage brass | Traditional settings | Warm, classic appeal |
| Ceramic knobs | Farmhouse aesthetic | Charming, rustic touch |
| Leather pulls | Industrial looks | Textured, masculine feel |
This approach reduces waste by giving existing pieces new life. You create high-end looking furniture without the expense of replacement. Each transformed piece becomes a conversation starter.
Take your time and enjoy the creative process. The satisfaction of completing these diy projects makes the effort worthwhile. You’ll love seeing your vision come to life piece by piece.
Incorporate Personality with Artwork and Collections
Your personal space should tell your unique story. Adding meaningful artwork and cherished collections transforms any room into a true reflection of who you are. This approach creates an environment that feels authentically yours.
These personal touches make your space more inviting. They spark joy and create emotional connections to your surroundings. Your room becomes a gallery of your life’s experiences and passions.
Creating DIY Pressed Botanical Art
Bring nature’s beauty indoors with simple pressed botanical creations. This diy project adds organic elegance to your wall decor. It’s an affordable way to incorporate natural elements into your home.
Start by collecting interesting leaves from plants like monstera or croton. Choose specimens with interesting shapes and vibrant colors. Press them between paper towels inside a heavy book for several days.
Once completely flat and dry, arrange your leaves on art paper. Use double-sided tape for secure placement without visible adhesives. Frame your composition under glass for protection and polish.
Consider these creative variations:
- Create symmetrical arrangements for formal appeal
- Make random scatter patterns for organic feeling
- Combine different leaf types for textural interest
- Add pressed flowers for colorful accents
This natural artwork brings calming organic energy to your space. It connects your interior environment to the beauty of nature outside.
Exploring Abstract and Personal Art Options
Abstract creations offer another exciting diy opportunity. Spray paint on canvases creates dynamic, colorful statements. This approach lets you experiment with colors that complement your existing decor.
Family photos and children’s artwork add deeply personal touches. Create gallery walls that tell your family’s story. Rotate pieces seasonally to keep your display fresh and engaging.
Collections become decorative features when displayed thoughtfully. Books, ceramics, or travel souvenirs showcase your interests. Shelves and wall displays turn these items into curated exhibitions.
Consider these arrangement tips for maximum impact:
| Arrangement Style | Best For | Visual Effect |
|---|---|---|
| Grouped by color | Cohesive look | Creates color blocks |
| Mixed sizes | Eclectic spaces | Adds dynamic energy |
| Thematic grouping | Personal stories | Tells visual narrative |
| Grid pattern | Modern aesthetics | Offers clean organization |
As demonstrated in this collection of personality-driven diy ideas, rotating displays keep your space feeling current. You can easily swap pieces as your tastes evolve or new memories accumulate.
This approach makes your room an ever-changing expression of yourself. Each piece contributes to an environment that truly feels like your special place. The result is a space that welcomes you with familiar, meaningful touches every day.
These Decor Bedroom Quick Wins Are Your Starting Point
You’ve discovered wonderful ways to refresh your personal space through creative projects. Each idea brings new energy to your room without major renovations.
Start with one project that excites you most. This builds confidence for future transformations. Small changes create big impact over time.
Remember to measure carefully before cutting materials. Shop sales for supplies to stay within budget. Invite friends to join the fun!
Your makeover journey can continue gradually. Add new elements as your schedule allows. This way keeps your space feeling fresh and personal.
Share your results and keep exploring DIY ideas. Your home should reflect your unique style through every color and detail.