Your personal space deserves to feel special without draining your wallet. With smart planning and creative thinking, you can transform your room into a beautiful retreat.
Think about it – you spend nearly one-third of your life in this room. That makes it worth creating a cozy, welcoming environment that reflects your personality.
This guide offers practical solutions for any skill level. Whether starting fresh or updating your current setup, you’ll find inspiration here.
We’ve included designer tips to help you achieve professional results while staying budget-conscious. Simple changes can make a huge difference in how your space feels.
Get ready to discover high-impact transformations like accent walls, bedding upgrades, and thrifted treasures. Your dream room awaits!
Why Your Bedroom Deserves a Budget-Friendly Makeover

Your personal retreat should be a sanctuary where you recharge each day. This space deserves attention because it’s where you begin and end your journey daily. Making it cozy doesn’t require a fortune.
Many people focus on guest areas but neglect their own room. This leads to a less enjoyable living experience. You use this area every day, so it should reflect your personality.
An unfinished room can feel sparse and temporary. Small updates add a sense of permanence and care. They transform it from transitional to truly yours.
Your home is your haven. Investing in your personal space pays dividends in daily comfort and peace.
Even affordable changes boost tranquility and coziness. They improve sleep and relaxation significantly. You’ll notice the difference immediately.
Avoiding high costs doesn’t mean sacrificing style. With the right approach, you achieve a high-end look for less. Smart choices make all the difference.
A well-decorated room supports mental well-being. It creates a peaceful retreat from daily stressors. This is an investment in your happiness and health.
Makeovers can be done over time. Spreading out expenses lets you see progress gradually. There’s no need to do everything at once.
Everyone deserves a beautiful personal retreat. Budget constraints shouldn’t hold you back. Start your transformation with the practical tips ahead.
| Benefit | Impact | Cost Level |
|---|---|---|
| Enhanced Comfort | High | Low |
| Mental Well-being | Significant | Minimal |
| Personal Expression | Custom | Variable |
| Sleep Quality | Improved | Affordable |
Remember, this isn’t just about decoration. It’s about creating a environment that supports your daily life. Your efforts will reward you every time you enter the room.
Ready to begin? The following sections provide step-by-step guidance to transform your space without straining your wallet.
Set a Clear Budget and Plan for Your Bedroom Transformation
Smart financial planning turns your vision into reality without financial stress. A thoughtful approach ensures every dollar creates maximum impact in your personal retreat.
Start by looking at your finances honestly. Decide what total amount feels comfortable for this project. This prevents overspending and keeps things manageable.
Break that total into specific categories. Allocate funds for paint, textiles, furniture, and DIY supplies. This organized approach helps track expenses accurately.
A goal without a plan is just a wish. Your budget is the roadmap to your dream space.
Determine Your Spending Limits
Research prices before shopping. Know what paint, lighting, and materials actually cost. This knowledge creates realistic expectations from the beginning.
Always set aside 10-15% for unexpected costs. Extra paint or tools might be needed. This buffer keeps surprises from derailing your entire project.
Avoid impulse purchases that don’t fit your vision. Every purchase should contribute meaningfully to your overall design. Stay focused on your priorities.
Research Prices and Prioritize High-Impact Changes
Focus first on changes that deliver big visual results. Fresh paint and new bedding transform a space instantly. These updates offer excellent return for your money.
DIY projects save significantly on labor costs. Painting or simple furniture assembly can be done yourself. Personalization becomes more affordable through hands-on work.
Shop sales and use coupons whenever possible. Consider repurposing items you already own. These strategies stretch your budget further than you might expect.
| Budget Category | Recommended Allocation | Money-Saving Tips |
|---|---|---|
| Paint & Wall Treatments | 20-25% | Buy mistints, use samples |
| Bedding & Textiles | 25-30% | Shop off-season sales |
| Furniture & Decor | 30-35% | Thrift, refurbish, DIY |
| Contingency Fund | 10-15% | Unexpected needs |
Create a step-by-step plan listing tasks in order. This keeps you organized throughout the process. You’ll see progress while maintaining focus.
Remember that transformations can happen over time. There’s no need to do everything at once. Spreading out expenses makes the project more affordable.
Your well-planned budget becomes the foundation for success. It guides your choices and ensures financial peace of mind. The result will be a space you love that didn’t break the bank.
Refresh Your Walls with Paint and Peel-and-Stick Wallpaper

Your walls are the largest canvas in your room. They offer incredible potential for transformation without major expense. Simple updates create dramatic visual impact instantly.
Focus on changes that deliver maximum results. Both paint and temporary wallpaper work wonders. They redefine your space with personality and charm.
These projects require minimal investment. They deliver professional-looking results. You’ll love your refreshed room immediately.
Create an Accent Wall for Bold Contrast
Painting one wall creates instant focus. This technique adds depth and character. It transforms the room’s atmosphere completely.
Choose a bold color that contrasts with other walls. This creates a modern, eye-catching feature. Alternatively, select a complementary shade for serene harmony.
Place your accent wall strategically. Behind the bed creates a natural focal point. Opposite windows maximizes light reflection.
Use removable paint if you rent your home. This allows personalization without permanent changes. It’s perfect for temporary living situations.
Gather these essential tools before starting:
- Paint roller and tray
- Angled brush for edges
- Painter’s tape for clean lines
- Drop cloth to protect floors
Complete this project over a weekend. You’ll enjoy immediate, satisfying results. The change feels both fresh and intentional.
Use Removable Wallpaper for Rental-Friendly Updates
Peel-and-stick wallpaper offers incredible versatility. It’s completely removable when you move out. This makes it ideal for rented spaces.
Choose patterns that match your personal style. Geometric designs create modern energy. Floral prints add soft, romantic charm.
Texture options include grasscloth and faux finishes. These add dimension without construction. Your walls gain character instantly.
Proper application ensures professional results. Follow these steps for perfect installation:
- Clean the wall surface thoroughly
- Measure and cut pieces carefully
- Use a level to ensure straight alignment
- Smooth out bubbles as you apply
Combine paint and wallpaper for creative effects. Use wallpaper on the ceiling for surprise. Apply it inside niches for subtle detail.
| Update Type | Cost Level | Skill Required | Time Investment |
|---|---|---|---|
| Accent Wall Painting | Low | Beginner | Weekend |
| Full Room Paint | Medium | Intermediate | 2-3 Days |
| Peel-and-Stick Wallpaper | Medium | Beginner | Weekend |
| Combination Approach | Variable | Intermediate | 2-4 Days |
Wall refreshes offer exceptional value. They create customized looks affordably. Your space will feel completely renewed.
These changes work for any design style. They provide foundation for further decoration. Start with walls for maximum impact.
Upgrade Your Bedding and Textiles for a Cozy Feel

Nothing transforms your space faster than fresh textiles. They bring instant comfort and style without major effort.
Your bed is the heart of the room. Make it inviting with thoughtful updates. These changes create a welcoming atmosphere immediately.
Layer Throw Pillows and Blankets for Depth
Start with a solid foundation for your bedding. Add layers for visual interest and warmth. Mix different sizes and shapes of pillows.
Vary fabrics like cotton, linen, or faux fur. This adds texture and tactile appeal. Your bed becomes a cozy retreat instantly.
Choose a quilt or cover in a contrasting color. This makes the bed a focal point. It draws the eye and adds personality.
Even small additions make a difference. A knitted throw or decorative cushion adds charm. These touches create an inviting look.
Coordinate Bedding and Curtains for a Luxurious Look
Match your window treatments with your bed linens. This creates a cohesive, high-end feel. The room appears thoughtfully designed.
Select complementary shades and patterns. Soft neutrals promote relaxation. Add bold prints for personal flair.
Mix textures for designer appeal. Combine smooth cotton with nubby weaves. This adds depth and visual richness.
Shop smart for quality fabrics. Wait for seasonal sales at department stores. Check discount outlets for hidden gems.
Textiles are the soul of a room—they soften surfaces, add warmth, and make spaces feel lived-in and loved.
Choose machine-washable fabrics for easy care. This ensures longevity and practicality. Your beautiful bedroom stays fresh with minimal effort.
Even basic rooms feel luxurious with the right textiles. They require no renovation work. Your investment delivers immediate comfort.
| Textile Type | Best For | Care Level | Budget Tip |
|---|---|---|---|
| Cotton Sheets | Everyday Comfort | Easy Wash | Buy off-season |
| Faux Fur Throw | Luxury Feel | Spot Clean | Discount stores |
| Linen Curtains | Light Filtering | Machine Wash | Secondhand finds |
| Decorative Pillows | Style Accents | Removable Covers | DIY covers |
Your textiles work together to create harmony. They make the space feel complete and intentional. Enjoy your new cozy sanctuary!
DIY Projects: Craft a Custom Headboard and More

Creating your own decor adds personality and saves money. These hands-on projects let you express your unique style while staying budget-friendly.
You gain complete control over materials and finishes. This ensures everything matches your vision perfectly. The results feel truly special because you made them yourself.
Build a Headboard from Scratch with Affordable Materials
Constructing your own headboard transforms your sleeping area dramatically. Use plywood, pallets, or reclaimed wood for character. These materials cost little but deliver big impact.
Measure your bed size first. Cut your chosen material to fit perfectly. Sand edges smooth for safety and professional finish.
For a plush look, wrap foam with your favorite fabric. Staple it securely to the back. This creates luxurious comfort without high cost.
Paint offers another great option. Use bold colors or subtle neutrals. Geometric patterns add modern flair to your design.
Gather these essential tools before starting:
- Drill and screws for assembly
- Staple gun for upholstery projects
- Measuring tape for precise cuts
- Sandpaper for smooth edges
Your custom creation becomes the room’s focal point. It reflects your personal taste beautifully. This way of decorating feels truly rewarding.
Repaint Furniture or Install New Hardware
Refresh existing furniture with simple updates. A fresh coat of paint works miracles on tired pieces. Choose durable paints that withstand daily use.
Clean surfaces thoroughly before painting. Use primer for better adhesion. Apply two thin coats for even coverage.
New hardware instantly updates drawers and cabinets. Vintage-style knobs add character. Modern pulls create sleek contemporary style.
Mix metallic finishes for eclectic charm. This small change makes big visual impact. Your bedroom feels curated and intentional.
Follow these steps for professional results:
- Remove old hardware carefully
- Fill previous holes with wood filler
- Sand smooth before painting
- Measure twice before drilling new holes
| Project Type | Cost Level | Time Required | Skill Level |
|---|---|---|---|
| Upholstered Headboard | Low | 4-6 hours | Intermediate |
| Painted Headboard | Very Low | 2-3 hours | Beginner |
| Furniture Repainting | Low | 3-5 hours | Beginner |
| Hardware Replacement | Very Low | 1-2 hours | Beginner |
DIY projects save significant money compared to buying new. They allow designer-inspired results on your budget. Each piece becomes one-of-a-kind through your creativity.
These improvements add personal touch and accomplishment. Your space truly reflects who you are. Enjoy the process and the beautiful results!
Rearrange Furniture to Maximize Space and Style

Sometimes the best changes cost absolutely nothing. Rearranging your existing furniture can completely transform the feel of your personal area without spending a dime.
This simple process opens up your space and improves how light moves through the room. It creates a fresh look instantly.
Start by moving your bed to the longest wall. This clever placement maximizes floor area and improves traffic flow. Your room will instantly feel larger and more open.
Reposition nightstands, dressers, or chairs to better utilize natural light from windows. This brightens the entire area naturally. You might create cozy conversation spots in the process.
Smart furniture placement highlights your room’s best features. Draw attention to a beautiful view or a statement piece. This way of arranging makes everything feel intentional.
The right furniture arrangement can make a small room feel spacious and a large room feel intimate—it’s all about balance and flow.
Measure your room before moving anything. Use graph paper or planning apps to test layouts. This prevents heavy lifting and trial-and-error frustration.
Proper placement avoids blocking light sources. This reduces your need for extra lamps. Your space becomes brighter and more inviting naturally.
This update requires no tools or expenses. It’s the perfect first step for any budget refresh. You’ll see immediate results with zero financial investment.
Consider multi-functional arrangements. Use a dresser as a vanity or a bench for storage. This maximizes utility in your personal area.
Experiment with different configurations until you find what feels right. The most comfortable and stylish setup might surprise you. Trust your instincts about what works for daily use.
| Furniture Piece | Optimal Placement | Space Benefit | Style Impact |
|---|---|---|---|
| Bed | Longest wall, centered | Maximizes floor area | Creates focal point |
| Nightstands | Both sides of bed | Balanced accessibility | Symmetrical elegance |
| Dresser | Opposite bed or near closet | Efficient storage access | Defines functional zones |
| Chair or Bench | Foot of bed or corner | Creates seating area | Adds layered comfort |
A simple rearrange can make your personal area feel entirely new. This approach provides instant satisfaction without any cost. Enjoy your refreshed room today!
Incorporate Secondhand and Thrifted Decor Finds
Discovering unique treasures doesn’t require a big budget. Secondhand shopping offers incredible opportunities to find character-filled items that mass-produced stores simply can’t match.
Each piece tells a story and brings history into your space. This approach saves significant money while creating a truly personalized environment. You’ll enjoy the thrill of the hunt and the satisfaction of unique finds.
These shopping adventures turn ordinary weekends into treasure hunts. You never know what amazing items you might discover. The excitement of finding something special makes the process enjoyable.
Shop Flea Markets and Online Marketplaces
Explore local flea markets for hidden gems. These venues often feature vintage mirrors, lamps, and small furniture at affordable prices. Early mornings usually yield the best selections.
Online platforms like Facebook Marketplace offer convenient browsing from home. You can find quality pieces from local sellers. Always arrange to see items in person before purchasing.
Look for solid wood construction and interesting shapes. Items with good “bones” make excellent candidates for refurbishment. Avoid pieces with structural damage or unpleasant odors.
Bring these essential tools when shopping:
- Tape measure for size verification
- Small flashlight for inspecting details
- Cash for easier negotiations
- Fabric samples for color matching
Repurpose and Refresh Worn Items with Paint
Transform tired finds into stunning statement pieces. A fresh coat of paint works miracles on dated furniture. Choose colors that complement your existing design scheme.
Start by thoroughly cleaning each item. Remove old hardware and sand surfaces smooth. This preparation ensures professional-looking results.
Consider creative repurposing ideas. Turn an old ladder into a unique blanket rack. Use vintage crates as wall shelves for books and decor.
Follow these steps for successful refurbishment:
- Disassemble removable parts carefully
- Apply primer for better paint adhesion
- Use multiple thin coats instead of one thick layer
- Allow proper drying time between applications
Modernize pieces with updated hardware. New knobs or pulls can completely change a item’s look. Mix metallic finishes for eclectic charm.
One person’s discard becomes another’s treasure—upcycling reduces waste while creating beautiful, functional pieces for your home.
| Item Type | Refurbishment Potential | Average Cost | Time Investment |
|---|---|---|---|
| Wooden Dressers | High | $20-50 | 4-6 hours |
| Vintage Lamps | Medium | $10-30 | 1-2 hours |
| Decorative Mirrors | Low | $15-40 | 30 minutes |
| Small Tables | High | $25-60 | 3-5 hours |
Essential refurbishment tools include sandpaper, quality paint, brushes, and cleaning supplies. Having these on hand lets you tackle projects immediately. Your investment in tools pays off through multiple projects.
Mixing thrifted items with new decor creates balanced style. This approach blends vintage charm with contemporary freshness. Your space develops a curated, collected-over-time look.
Secondhand finds deliver high-end style at a fraction of the cost. They make smart choices for budget-conscious decorators. Your unique space will reflect both creativity and savings.
Enhance Lighting with String Lights and Wall Lamps
Good lighting completely changes how your room feels. It creates a warm, inviting atmosphere that makes you want to relax and unwind. The right illumination turns your space into a cozy retreat.
Strategic lighting choices enhance both function and mood. They highlight your favorite areas while providing practical benefits. This simple upgrade delivers impressive results.
Hang String Lights for Ambient Glow
String lights create magical, soft illumination throughout your space. They add warmth and charm without overwhelming brightness. This type of lighting feels both romantic and relaxing.
Drape them around your headboard for a dreamy effect. This placement creates a beautiful focal point. Alternatively, frame your window or artwork for added drama.
Canopy styles above your bed feel luxurious. They transform ordinary sleeping areas into special retreats. You’ll love the cozy atmosphere they create.
Choose LED options for energy efficiency. They last longer and use less electricity. This saves money over time while being environmentally friendly.
Installation requires minimal tools and effort:
- Adhesive hooks for damage-free hanging
- Extension cords for reaching outlets
- Command strips for temporary installations
- Small clips for securing wires neatly
Experiment with different arrangements until you find your perfect look. The soft glow makes evenings feel special. Your room becomes a welcoming haven.
Use Plug-In Sconces to Free Up Nightstand Space
Wall-mounted lamps solve common space problems beautifully. They eliminate clutter on your bedside tables. This creates a cleaner, more organized appearance.
Plug-in models require no electrical wiring. Simply mount them near existing outlets. They provide focused light for reading or relaxing.
Choose adjustable arms for customized direction. This lets you control where the light falls. It’s perfect for bedtime reading without disturbing partners.
Install them at the correct height for easy reach. Typically, place them 4-6 feet from the floor. This ensures comfortable operation from your bed.
Follow these steps for secure installation:
- Mark the desired placement with pencil
- Use wall anchors for solid mounting
- Conceal cords along baseboards or behind furniture
- Test the stability before regular use
These practical solutions combine style with function. They make small rooms feel more spacious. Your nightstand gains valuable surface area.
Lighting is the jewelry of the room—it adds sparkle, highlights beauty, and creates atmosphere without structural changes.
Combine different light sources for layered effects. Mix overhead lighting with string lights and sconces. This allows you to create various moods throughout the day.
Many affordable options exist online and in stores. Look for sales and discount retailers. Quality lighting doesn’t require a large investment.
Thematic choices match your personal style. Fairy lights create whimsical charm. Industrial sconces offer modern edge. Choose what reflects your personality.
Good lighting makes your space feel luxurious and intentional. It’s one of the most impactful changes you can make. Enjoy your newly illuminated retreat!
| Lighting Type | Best Placement | Cost Level | Installation Difficulty |
|---|---|---|---|
| String Lights | Headboard, windows, walls | Low | Easy |
| Plug-In Sconces | Beside bed, reading nooks | Medium | Moderate |
| LED Options | Any location | Variable | Easy |
| Thematic Lighting | Accent areas | Variable | Easy-Moderate |
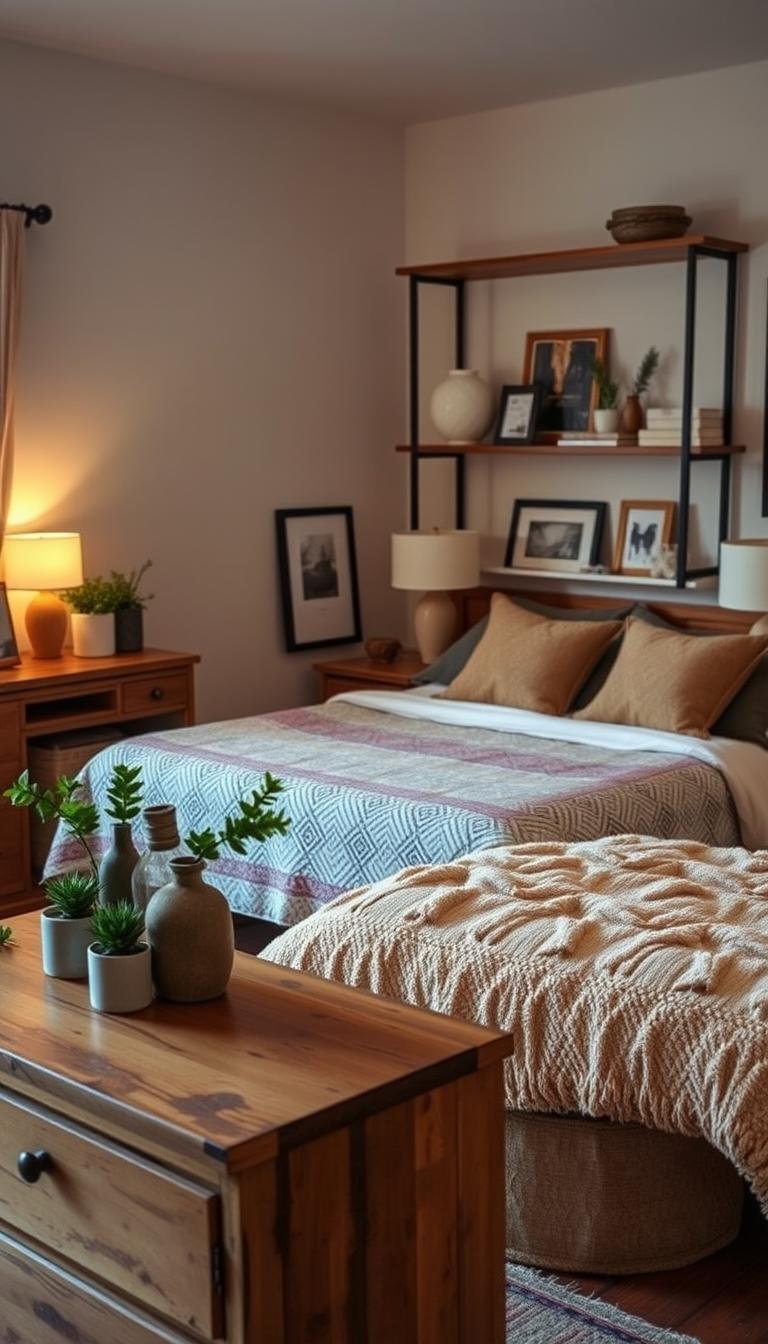
Add Greenery and Plants for a Fresh Touch
Living plants transform your personal space with natural beauty and vitality. They bring the outdoors inside, creating a serene atmosphere that feels both refreshing and calming.
Greenery adds organic texture and color to your design scheme. It softens hard surfaces and creates visual interest throughout the room. This natural touch makes your space feel complete.
Plants improve indoor air quality by filtering toxins. They release oxygen and maintain humidity levels. Your bedroom becomes a healthier environment for relaxation.
The psychological benefits are equally important. Greenery reduces stress and promotes mental well-being. It creates a peaceful retreat within your home.
Choose Low-Maintenance Houseplants
Select varieties that thrive with minimal attention. Snake plants tolerate low light and irregular watering. Their upright growth adds architectural interest.
Pothos vines trail beautifully from shelves or hanging planters. They grow quickly in various light conditions. These plants are perfect for beginners.
ZZ plants survive with very little care. Their glossy leaves reflect light beautifully. They handle neglect better than most options.
Place these easy-care plants where they’ll receive appropriate light:
- Nightstands for bedside greenery
- Shelves for elevated displays
- Windowsills for optimal sunlight
- Hanging planters for vertical interest
Group several plants together for a mini indoor garden effect. This creates a lush focal point that enhances tranquility. Your space feels more alive and inviting.
Incorporate Faux Plants for Low-Light Spaces
High-quality artificial plants offer realistic alternatives. They provide the same aesthetic benefits without maintenance. This solution works where live plants struggle.
Choose silk or latex varieties that look authentic. Avoid plastic-looking options that appear cheap. Touch leaves and stems to assess quality before purchasing.
Place faux plants in areas with poor natural light. Corners, bookshelves, and dark nooks become greener instantly. They add life where needed most.
Mix real and artificial plants throughout your space. This balances authenticity with practicality. You achieve a lush look regardless of lighting conditions.
Plants are the perfect finishing touch—they add movement, life, and harmony to any space, creating a connection to nature that soothes the soul.
Creative containers enhance your plant displays. Modern ceramic pots complement contemporary designs. Rustic baskets add warmth to traditional spaces.
Consider these decorative planter ideas:
- Matching sets for coordinated look
- Varied heights for visual dynamics
- Colorful pots for accent colors
- Textured planters for added interest
Hanging planters maximize vertical space. They draw the eye upward and create layered displays. Macramé hangers add bohemian charm.
| Plant Type | Light Requirements | Care Level | Best Placement |
|---|---|---|---|
| Snake Plant | Low to Bright | Very Easy | Nightstands, Corners |
| Pothos | Low to Medium | Easy | Shelves, Hanging |
| ZZ Plant | Low to Medium | Very Easy | Dark Areas, Floors |
| Faux Plants | Any Condition | None | Any Location |
Greenery provides affordable inspiration for your personal space. It’s an easy way to add color, texture, and vitality. Your transformed room will feel like a natural sanctuary.
Start with one or two plants and build your collection gradually. Each addition brings more life to your special place. Enjoy watching your green oasis develop over time.
Declutter and Style Surfaces for a Polished Look
Clear surfaces create a sense of calm and order in your personal space. This simple step makes your room feel more spacious and intentionally designed.
Start by removing everything from your nightstands and dressers. Only keep items that are useful or bring you joy. This approach prevents visual clutter and promotes relaxation.
Your surfaces should reflect your personality while maintaining function. Choose pieces that serve dual purposes whenever possible. This creates both beauty and practicality in your space.
Group Items in Threes for Designer Appeal
Arranging objects in odd numbers creates visual harmony. Groups of three work particularly well for balanced displays. This technique adds professional style to your surfaces.
Combine different heights and textures for interest. Try a tall lamp with a medium book and small vase. This variation creates movement and depth in your arrangement.
Consider these effective combinations:
- Candle, framed photo, and small plant
- Clock, jewelry dish, and decorative box
- Book stack, sculpture, and scented diffuser
Leave some empty space between groupings. This prevents surfaces from looking overcrowded. Your carefully chosen items will stand out more effectively.
Use Trays and Decorative Bowls for Organization
Containers corral small objects while adding style. They transform necessary items into intentional displays. This approach maintains order with aesthetic appeal.
Choose trays that complement your color scheme. Metallic finishes add glamour, while natural materials create warmth. Your selection should enhance your overall design.
Designate specific containers for different purposes:
- Small bowl for daily jewelry
- Tray for bedtime essentials
- Decorative box for miscellaneous items
These solutions keep surfaces tidy without hiding necessities. Everything has its designated place while contributing to your decor.
Clutter is not just physical stuff—it’s old ideas, toxic relationships, and bad habits. Clearing clutter makes room for new possibilities.
Look around your home for existing containers you can repurpose. A beautiful saucer can become a coaster and jewelry holder. This approach saves money and reduces waste.
Vary the heights of your organizational pieces. Stack books under a decorative object to create elevation. This adds dimension to your surface styling.
| Surface Type | Recommended Items | Styling Tip | Function Benefit |
|---|---|---|---|
| Nightstand | Lamp, book, water glass | Use small tray for essentials | Bedside convenience |
| Dresser Top | Jewelry box, perfume, photos | Group in triangular formation | Getting ready efficiency |
| Shelves | Books, plants, decorative objects | Vary horizontal and vertical items | Display and storage combination |
| Windowsill | Plants, candles, small sculptures | Create seasonal displays | Natural light enhancement |
Thematic styling expresses your personal taste. Coastal elements like shells and driftwood create beach vibes. Metallic accents add glamorous touches throughout your space.
A clutter-free environment reduces stress and improves sleep quality. Your mind can relax more easily in an organized space. This psychological benefit enhances your daily life.
Thoughtful surface styling completes your room’s transformation. It turns functional areas into beautiful displays. Your space will feel magazine-worthy and perfectly polished.
Final Tips to Pull Your Cute Bedroom Decor Ideas on Any Budget Together
Your dream room becomes reality through smart planning and creative choices. Focus on high-impact changes first, like fresh paint or new bedding. These updates deliver maximum visual reward for minimal investment.
For small spaces, use light colors and multifunctional furniture. Mirrors expand the sense of room and light beautifully. Vertical storage keeps floors clear and organized.
Renters should choose non-damaging options like adhesive hooks and removable wallpaper. Tension rods offer flexible storage without permanent changes. These solutions protect your security deposit.
Layer textures through rugs, throws, and pillows for cozy depth. Avoid overcrowding with too many pieces. Edit your selections for a polished, intentional look.
Remember that personal touches make the space uniquely yours. Incorporate items that reflect your personality and bring joy. Your room should feel like a true retreat.
Stay within your budget by prioritizing and compromising where needed. Focus on overall cohesion rather than perfection. Your beautiful, affordable sanctuary awaits!