Imagine transforming your personal retreat with a touch of classic charm. Decorative wall treatments instantly elevate a room’s look, creating an extra layer of visual interest and subtle dimension.
Originally, these features served as insulation and protection. Today, they are cherished for their decorative appeal and ability to infuse character into your space.
You can choose from versatile style options. These range from classic board-and-batten to contemporary geometric patterns. Your room’s size, architectural style, and layout are key factors to consider.
This guide will walk you through inspiring concepts. We’ll cover everything from subtle accents to bold full-wall treatments. Get ready to refresh your space with undeniable charm and create a stunning focal point.
Let’s begin the journey to a more character-filled bedroom you’ll love.
Why Wall Paneling is Your Secret Weapon for Bedroom Design
Think of your sleeping quarters as a blank canvas waiting for transformation. Decorative treatments offer a powerful way to elevate your personal sanctuary with remarkable results.
More Than Just Decoration: A Brief History
These architectural features have a rich heritage. Originally, they served practical purposes in grand homes and castles.
Early versions provided insulation against cold drafts. They also protected surfaces from moisture damage and everyday wear.
Over centuries, functional elements evolved into artistic statements. Craftsmen began incorporating intricate carvings and elegant profiles.
Today, we celebrate this blend of utility and beauty. Modern interpretations maintain this dual-purpose approach beautifully.
How Paneling Creates Dimension and Character
Strategic installation can dramatically alter your perception of space. Vertical lines guide eyes upward, creating illusions of greater height.
Horizontal arrangements make rooms feel cozy and intimate. This technique works wonderfully in smaller sleeping areas.
Textured surfaces play wonderfully with light and shadow. They add depth that flat paint simply cannot achieve.
Your choice of materials contributes significantly to the overall effect. Natural wood grains bring warmth, while painted finishes offer crisp modernity.
| Panel Style | Visual Effect | Best For Rooms That Need |
|---|---|---|
| Vertical Lines | Added height | More spacious feeling |
| Horizontal Lines | Cozy width | Warmer, intimate atmosphere |
| Geometric Patterns | Modern energy | Contemporary character |
| Raised Details | Elegant shadow play | Traditional sophistication |
Consider your existing decor when selecting treatments. The right choice should complement rather than compete with your current style.
Even simple installations create dramatic transformations. A single accent surface can become your room’s stunning focal point.
This design approach works across various aesthetics. From rustic charm to contemporary sleekness, there’s an option for every preference.
View these architectural elements as your secret upgrade weapon. They deliver exceptional impact without requiring complete room overhauls.
Ultimately, well-chosen treatments create personalized environments. They add that special touch making your space uniquely inviting.
Classic Board-and-Batten for a Timeless Feel
Board-and-batten paneling offers a timeless architectural detail that instantly elevates your bedroom’s character. This traditional treatment features vertical boards covered with narrower strips called battens, creating rhythmic patterns that add both structure and sophistication.
Defining the Craftsman and Farmhouse Style
This style naturally complements Craftsman and farmhouse aesthetics. These designs celebrate handcrafted details and natural materials.
The clean lines and vertical emphasis create cozy yet refined environments. Your space gains warmth and authenticity through this approach.
Many homeowners appreciate how this treatment bridges traditional and contemporary tastes. It works beautifully in both rustic retreats and modern minimalist spaces.
Pro Tip: Extend to the Ceiling for Maximum Impact
For truly dramatic results, consider running your treatment floor to ceiling. This technique creates impressive vertical lines that make rooms feel taller.
Full-height installations transform ordinary surfaces into stunning focal points. The continuous flow draws eyes upward, enhancing your space’s proportions.
This approach works particularly well in rooms with standard eight-foot ceilings. It adds architectural interest where none existed before.
| Installation Method | Skill Level Required | Time Investment | Best For |
|---|---|---|---|
| DIY Basic | Beginner | Weekend project | Single accent surface |
| DIY Advanced | Intermediate | 2-3 weekends | Full room installation |
| Professional | Expert | 3-5 days | Complex layouts/vaulted ceilings |
Color selection significantly influences your final look. Classic white remains popular for its crisp, clean appearance.
Softer muted tones like sage green or pale blue create calming environments. Darker hues make bold statements in contemporary settings.
Maintenance proves surprisingly simple with this option. Most designs require only occasional dusting and gentle cleaning.
The durability of quality materials ensures long-lasting beauty. Your investment continues enhancing your space for years to come.
Consider this style whether updating a master suite or guest room. It brings character and depth that flat surfaces cannot achieve.
Board-and-batten remains enduringly popular for good reason. It combines practicality with undeniable aesthetic appeal.
Elevate a Plain Wall with Vertical Wood Paneling
Your sleeping space can transform with vertical wood treatments. These installations bring instant texture and character to bland surfaces. They create a stunning focal point that draws the eye.
Vertical lines naturally guide vision upward. This clever trick adds perceived height to your room. Even standard ceilings feel more impressive with this approach.
Some homeowners worry about dated appearances. Dark stained wood can feel heavy or old-fashioned. Fortunately, simple updates solve this concern completely.
Modernizing the Look with a Fresh Coat of Paint
Paint offers the fastest modernization solution. A new color changes everything about your panels. Deep greens create rich, sophisticated environments.
Neutral tones work beautifully for calming retreats. Soft grays or warm beiges maintain wood’s texture while feeling fresh. Your space gains contemporary appeal instantly.
Proper preparation ensures professional results. Follow these essential steps for flawless finishes:
- Clean surfaces thoroughly to remove dust and grease
- Lightly sand to help primer adhere properly
- Apply stain-blocking primer to prevent bleed-through
- Choose high-quality paint for durability and smooth coverage
This affordable project delivers dramatic impact. You can complete it over a single weekend.
Creating a Stylish Two-Tone Design
Two-color schemes add incredible visual interest. Contrasting hues highlight architectural details beautifully. The technique works wonderfully in sleeping areas.
Consider pairing dark lower panels with light upper surfaces. Deep hunter green beneath bright white creates striking elegance. This approach adds dimension without overwhelming your space.
Mudrooms often showcase this design successfully. Bedrooms adapt the concept for sophisticated charm. Your personal sanctuary gains unique character through color play.
Experiment with combinations that reflect your style. Bold contrasts make contemporary statements. Subtle variations create serene, cohesive environments.
Vertical treatments remain incredibly versatile. They work with various aesthetics from traditional to modern. Your room gains texture, height, and undeniable charm.
This update requires minimal effort for maximum reward. Transform your plain surface into a stunning design feature today.
Incorporate Shiplap for Cozy Character

Shiplap brings a relaxed charm to your personal space. This classic treatment features overlapping boards that create subtle shadow lines. The result is a textured surface full of warmth and personality.
Originally used in coastal homes for weather protection, it now adds rustic elegance. The horizontal lines create a calming, expansive feeling in your room. You can enjoy both traditional appeal and modern versatility.
This option works beautifully in various settings. From beach cottages to urban apartments, it adapts wonderfully. Your space gains character without feeling overly themed.
Beyond the Farmhouse: Softening Modern Styles
Many associate this treatment with rustic farmhouse decor. Yet it beautifully softens contemporary and minimalist designs too. The natural texture adds warmth to sleek, modern spaces.
Clean lines and simple profiles complement various aesthetics. They provide visual interest without overwhelming your room’s design. Your space feels inviting yet maintains its modern edge.
Consider pairing with minimalist furniture and neutral tones. The combination creates balanced, harmonious environments. You achieve coziness without sacrificing sophistication.
“Shiplap introduces warmth and texture that makes sterile spaces feel lived-in and loved.”
This approach works particularly well in rooms with strong architectural lines. It adds softness to angular modern designs. Your bedroom becomes both stylish and comfortable.
Playing with Board Width for a Custom Look
Traditional installations typically use six-inch boards. Varying widths create completely different visual effects. Wider planks offer a contemporary, streamlined appearance.
Narrower options provide more detailed texture and pattern. Your choice significantly influences the room’s overall feel. Experiment to find what suits your space best.
Extra-wide boards make bold modern statements. They create cleaner lines with less visual busyness. This approach works wonderfully in spacious master suites.
| Board Width | Visual Impact | Recommended Room Size |
|---|---|---|
| 4-5 inches | Detailed texture | Small to medium rooms |
| 6 inches | Classic balance | All room sizes |
| 8+ inches | Modern simplicity | Medium to large rooms |
Consider your ceiling height when selecting widths. Larger rooms can handle broader boards beautifully. Smaller spaces might benefit from moderate sizing.
Installation proves surprisingly straightforward with modern options. Pre-made panels offer DIY-friendly solutions for quick projects. You can achieve professional-looking results over a weekend.
Color selection enhances the cozy atmosphere. Soft whites create airy, serene environments. Pastel tones add subtle personality without overwhelming.
Durability makes this practical for daily living. Smooth surfaces clean easily with simple dusting. Your beautiful treatment maintains its appeal for years.
Mix with other elements for layered sophistication. Accent colors or contrasting moldings add depth. Your room gains unique character through thoughtful combinations.
Use on single surfaces or throughout the space. Either approach creates significant visual impact. Your bedroom becomes a personalized retreat full of charm.
This versatile treatment transforms ordinary rooms into special spaces. It adds that inviting quality that makes your room truly yours.
Opt for Elegant Tongue-and-Groove Paneling
Discover the sophisticated charm of tongue-and-groove treatments for your personal sanctuary. This elegant option features interlocking planks that create a smooth, seamless finish across your surfaces.
The interlocking design offers exceptional durability and a clean aesthetic. Your space gains a polished look that suits various bedroom styles beautifully.
The Benefit of a Seamless, Interlocking Design
This construction method creates remarkably tight joints between planks. You enjoy a flawless surface that appears as one continuous piece.
The interlocking mechanism provides structural stability. Your installation remains secure against seasonal changes in temperature and humidity.
Cleaning becomes wonderfully straightforward with this smooth finish. Dust and debris have nowhere to hide between the tightly fitted components.
Using Vertical Lines to Create Height
Vertical installation guides eyes upward, creating illusions of greater ceiling height. This technique works magic in rooms with standard dimensions.
Your space feels more open and airy with this directional approach. Even compact bedrooms gain a sense of expanded volume.
Consider warm white paint for enhanced elegance and brightness. This color choice reflects light beautifully throughout your room.
The crisp, clean appearance adapts beautifully from dining spaces to sleeping areas. You achieve sophisticated character that feels both timeless and contemporary.
Horizontal installation offers an alternative for wider rooms. This orientation creates cozy, intimate environments perfect for relaxation.
Your decision depends on room size and desired visual effect. Vertical lines emphasize height, while horizontal arrangements promote warmth.
This versatile treatment complements both traditional and modern designs. You can pair it with molding or trim for added detail and character.
Pre-made panels simplify the DIY process significantly. Homeowners can achieve professional-looking results with basic tools and skills.
Consider full-wall applications or strategic accents. Either approach adds sophistication and airiness to your personal retreat.
The final result brings undeniable elegance to your space. You create a beautiful environment that feels both refined and inviting.
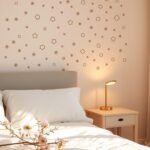
Create a Focal Point with Picture Frame Molding

Decorative frames work magic in drawing attention to your room’s best elements. They create visual interest that guides the eye exactly where you want it.
Pre-cut pieces make installation surprisingly straightforward. You can achieve professional-looking results with basic DIY skills and tools.
Highlighting Your Headboard and Artwork
Strategic framing makes your bed the undeniable star of the space. It creates a custom look that feels both intentional and elegant.
Consider sizing your frames to complement furniture proportions. Aligning with headboard dimensions creates harmonious balance.
Artwork gains new importance within decorative borders. Your favorite pieces become gallery-worthy features.
Try these placement techniques for maximum impact:
- Center frames directly behind your headboard
- Create symmetrical arrangements on either side
- Vary frame sizes for dynamic visual rhythm
- Extend framing to ceiling height for drama
Choosing Between a Seamless or Contrasting Paint Color
Your color decision significantly influences the final effect. Matching hues create subtle, sophisticated dimension.
Blending with your wall color produces seamless elegance. The frames add texture without overwhelming your space.
Contrasting colors make bold design statements. Dark frames against light surfaces create striking visual impact.
Consider these popular combinations:
- Crisp white molding on soft gray surfaces
- Deep navy frames against warm white
- Black accents for modern dramatic flair
- Muted greens for organic sophistication
This versatile treatment adapts to various interior styles. From traditional elegance to contemporary minimalism, it enhances any aesthetic.
Experiment with different frame shapes and layouts. Rectangular patterns offer classic appeal. Square grids provide modern geometric interest.
Combining with other treatments creates layered sophistication. Pair with wainscoting for multi-level dimension.
Your project adds custom, high-end detail easily. It transforms ordinary rooms into extraordinary spaces with character and depth.
Make a Statement with a Herringbone Accent Wall
Your personal retreat deserves a feature that commands attention. The herringbone pattern delivers dynamic energy through its distinctive zigzag arrangement. This classic design brings sophisticated movement to your space.
Angled strips create visual rhythm across your surface. The pattern works beautifully in both traditional and contemporary settings. Your room gains instant character with this striking treatment.
Installing Strips at an Angle for Dynamic Texture
Proper installation begins with careful planning. Measure your surface accurately before cutting any materials. This preparation ensures pattern consistency across the entire project.
Cut narrow wood strips at precise 45-degree angles. Consistent measurements maintain the pattern’s rhythmic flow. Gaps between pieces enhance definition and shadow play.
Follow these steps for successful installation:
- Create a level baseline along your surface’s bottom edge
- Use spacers to maintain even gaps between strips
- Work upward in small sections for better control
- Check alignment frequently with a level
Varying wood tones adds wonderful depth to the design. Light and dark variations create subtle contrast. Your pattern gains additional dimension through tonal differences.
Keeping Other Decor Simple to Let the Wall Shine
Your dramatic surface deserves to be the star. Choose neutral furnishings that complement rather than compete. Simple bedding and minimal accessories maintain visual balance.
Monochromatic color schemes work particularly well. They allow the pattern’s texture to take center stage. Your room feels cohesive yet exciting.
Consider these decor pairing suggestions:
- Solid-color bedding in soft neutral tones
- Minimal artwork or mirrors on adjacent surfaces
- Simple window treatments that don’t overwhelm
- Clean-lined furniture with subtle profiles
This approach works wonderfully in compact sleeping areas. The engaging pattern makes small spaces feel intentional. Your room gains personality without clutter.
| Wood Type | Finish Option | Recommended Room Style |
|---|---|---|
| Oak | Natural stain | Traditional warmth |
| Maple | White paint | Modern crispness |
| Walnut | Dark stain | Dramatic contemporary |
| Pine | Light wash | Cozy rustic |
Proper lighting enhances the pattern’s texture. Directional lights create interesting shadows across the angles. Your feature wall becomes even more engaging after dark.
This project offers satisfying DIY potential. With careful measurement and patience, you achieve professional results. Your bedroom transforms into a space with remarkable character.
The herringbone pattern brings sophisticated movement to your personal sanctuary. It creates a focal point that feels both timeless and contemporary.
Beaded-Board Wainscoting with a Bold Twist

Transform your space with a fresh take on classic beaded-board. This traditional choice gets a modern makeover through bold color and clever pairings.
You can elevate this timeless treatment beyond its usual appearance. A dramatic new hue brings contemporary edge to vintage charm.
Traditional Style Meets Modern Glam
Dark paint completely changes the personality of beaded-board. Deep black or charcoal gray creates sophisticated drama.
Your room gains an unexpected blend of old-world charm and current style. The familiar texture feels fresh and fashion-forward.
This approach works beautifully in various settings. From cozy cottages to urban apartments, it adds character.
Pairing Dark Paneling with Light Tiles and Metallic Accents
Balance dark surfaces with light elements for perfect harmony. Crisp white tiles or walls create striking contrast.
Polished brass hardware introduces warmth and luxury. Your space feels both edgy and elegant simultaneously.
Consider these complementary additions:
- Brass switch plates and outlet covers
- Metallic light fixtures with warm tones
- Mirrored furniture pieces for added reflection
- White bedding or window treatments
Installation typically covers the lower third of your surface. This classic height provides visual weight without overwhelming.
Durability makes this practical for daily living. The smooth surface cleans easily with simple dusting.
Mix vintage charm with contemporary decor for unique personality. Your room becomes a personalized retreat full of character.
This twist on tradition creates unforgettable style. You achieve sophisticated glamour with timeless appeal.
Use Shiplap to Highlight a Bedroom Feature
Your sleeping area gains incredible personality when you focus attention on its best elements. This horizontal treatment creates subtle definition that makes special features truly stand out.
Think about what makes your space unique. Maybe you have beautiful windows or an interesting architectural detail. Perhaps your bed itself deserves to be the star of the show.
Blending Seamlessly While Adding Subtle Detail
Painting your installation the same hue as surrounding surfaces creates magic. You maintain visual cohesion while introducing wonderful texture.
The identical color scheme produces sophisticated harmony. Your room feels intentionally designed rather than randomly decorated.
This approach works beautifully behind headboards or around windows. The treatment frames these elements without competing for attention.
You enjoy both subtle detail and clean aesthetics. The result feels both curated and comfortably effortless.
Drawing the Eye Upward for a Sense of Space
Horizontal lines naturally guide vision across your room. This movement creates feelings of expanded width and airiness.
Your space feels more open and inviting with this directional emphasis. Even compact areas gain perceived breathing room.
Consider these placement strategies for maximum impact:
- Install around windows to emphasize natural light sources
- Frame your bed to create a dedicated sleeping zone
- Highlight architectural niches or built-in shelving
- Use on ceiling surfaces for cozy overhead texture
Board width significantly influences your final effect. Narrow planks create busier patterns with more visual movement.
Wider options offer cleaner lines and contemporary simplicity. Your choice depends on desired personality and room proportions.
This treatment adapts wonderfully across various aesthetics. Coastal themes naturally embrace its relaxed charm.
Industrial spaces benefit from its raw texture and straightforward appeal. Even modern minimalist rooms gain warmth through this addition.
Combining with other materials creates personalized character. Metal accents introduce edgy contrast against natural wood.
Glass elements maintain airiness while adding reflective quality. Your feature becomes uniquely yours through thoughtful pairing.
DIY installation requires careful measurement around existing elements. Precise cuts ensure professional-looking results.
Small sleeping areas particularly benefit from this approach. The horizontal emphasis makes confined spaces feel intentionally designed.
You maximize perceived square footage through clever visual tricks. Your room gains both style and apparent size.
This technique adds functional beauty to your personal retreat. It highlights what you love most about your space while introducing wonderful texture.
DIY a Fretwork-Style Pattern for Sophistication

Bring artistic elegance to your personal space with a custom fretwork design. This creative approach adds geometric sophistication through simple materials and clever techniques.
You achieve high-end character without professional installation costs. The result feels both custom-made and wonderfully accessible.
Using Round Plaques and Molding for a Geometric Design
Begin with round wood plaques and half-round molding pieces. These affordable materials create intricate patterns when arranged thoughtfully.
Plan your layout before making any cuts or placements. Sketch your desired pattern directly onto the surface using light pencil marks.
Consider these popular geometric arrangements:
- Interlocking circles for continuous flow
- Diamond patterns with connecting lines
- Sunburst designs radiating from a central point
- Custom monograms or symbolic shapes
Measure carefully to maintain consistent spacing throughout. Use adhesive specifically designed for wood applications.
This method works beautifully for creating visual interest. Your room gains unique personality through personalized patterns.
Painting the Pattern to Recede for Subtle Texture
Choose the same hue for both your background and pattern pieces. This monochromatic approach creates sophisticated subtlety.
The design adds texture without overwhelming your space. Light plays across the raised elements throughout the day.
Deep blue creates a calming, elegant atmosphere. Neutral tones maintain serenity while adding dimension.
Follow these steps for seamless integration:
- Prime all pieces before installation
- Apply your chosen color to both surface and elements
- Use identical sheen for complete visual harmony
- Touch up any gaps after installation
This technique works particularly well in sleeping areas. The subtle pattern enhances relaxation without distraction.
Your project adds artistic flair through affordable materials. The final result feels both intentional and effortlessly elegant.
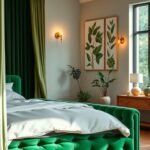
Experiment with Bold Color Combinations
Unleash your creativity through daring color choices that transform your space. Painting your surfaces with unexpected hues creates instant personality and modern flair.
Deep shades bring traditional elements into contemporary style. Your room gains dramatic character through this simple yet powerful approach.
Making Traditional Paneling Pop with Deep Hues
Rich teal or navy blue makes architectural details stand out beautifully. These colors create striking contrast against lighter surrounding surfaces.
Dark tones highlight grooves and profiles with wonderful definition. Your treatment gains new dimension through strategic color application.
Consider these popular combinations for maximum impact:
- Deep emerald green against soft white surfaces
- Charcoal gray paired with pale neutral tones
- Navy blue contrasting with warm beige backgrounds
- Burgundy red creating rich, sophisticated drama
Proper lighting enhances these bold choices significantly. Natural daylight reveals subtle undertones throughout the day.
Evening illumination creates cozy, intimate atmospheres. Your room transforms with changing light conditions.
Giving Your Design an Edgier, Dramatic Look
Contemporary spaces benefit from unexpected color pairings. Black surfaces create sophisticated modern statements.
High-gloss finishes add reflective quality and depth. Your installation catches light beautifully throughout the day.
This approach works wonderfully in various room sizes. Compact areas gain personality without feeling overwhelmed.
Larger spaces become more intimate and inviting. Your personal retreat feels both dramatic and comfortable.
| Color Combination | Room Atmosphere | Recommended Finish |
|---|---|---|
| Teal + White | Modern coastal | Semi-gloss |
| Navy + Light Gray | Sophisticated traditional | Satin |
| Black + Cream | Dramatic contemporary | High-gloss |
| Forest Green + Beige | Organic elegance | Eggshell |
Balance bold surfaces with neutral furnishings and decor. Simple bedding and minimal accessories maintain visual harmony.
This update remains wonderfully accessible for DIY enthusiasts. Painting requires basic skills and minimal investment.
Your project delivers exceptional impact for relatively little effort. Transform your space into a personalized statement of style.
Color becomes your most powerful design tool. It revitalizes traditional elements with contemporary energy.
Your bedroom gains unique character through daring choices. Create a space that truly reflects your personal aesthetic.
Craft Intricate Designs with Lattice and Trim

Discover how affordable materials can create stunning visual effects in your personal space. Lattice and decorative trim offer incredible versatility for do-it-yourself projects.
These materials mimic the appearance of traditional wood treatments. You achieve sophisticated looks without high material costs. Your room gains custom character through creative application.
Originally used in garden structures and exterior details, these elements now bring charm indoors. Their geometric patterns add rhythm and movement to flat surfaces.
This approach works beautifully in various room sizes. Even compact sleeping areas gain personality without feeling crowded.
Mimicking Wood Paneling with a DIY Approach
Create the illusion of custom wood installations using simple lattice panels. This method delivers high-end appearance with beginner-friendly techniques.
Measure your surface carefully before purchasing materials. Accurate dimensions ensure pattern consistency across the entire project.
Follow these steps for professional-looking results:
- Clean your surface thoroughly to remove dust
- Mark pattern guidelines using light pencil lines
- Cut lattice strips with a fine-tooth saw for clean edges
- Test fit pieces before applying adhesive
- Use construction adhesive and finishing nails for security
Painting everything the same color creates seamless integration. Your design appears as one continuous architectural feature.
Alternating Grids for a Charming Assortment of Textures
Combine straight and diagonal patterns for dynamic visual interest. This technique adds wonderful complexity to your surface treatment.
Vary lattice sizes within your design for custom character. Smaller grids create detailed texture, while larger openings feel more contemporary.
Consider these popular pattern combinations:
- Diagonal crosses within square frames
- Vertical and horizontal intersecting lines
- Sunburst patterns radiating from central points
- Geometric shapes repeated in rhythmic sequences
These arrangements work particularly well behind headboards or on accent surfaces. They create engaging focal points without overwhelming your space.
| Lattice Size | Visual Effect | Recommended Room Size | Installation Difficulty |
|---|---|---|---|
| 1/4 inch | Delicate detail | Small to medium rooms | Intermediate |
| 1/2 inch | Classic balance | All room sizes | Beginner |
| 1 inch | Modern simplicity | Medium to large rooms | Beginner |
| Mixed sizes | Custom character | Any room size | Intermediate |
Painting offers creative opportunities for personalization. Match your wall color for subtle texture that doesn’t compete with other elements.
Contrasting hues make bold design statements. Dark frames against light backgrounds create striking geometric patterns.
Consider combining with functional elements like floating shelves or mirror frames. This approach adds utility while enhancing visual appeal.
Small sleeping areas benefit greatly from this technique. The pattern adds personality without reducing perceived space.
This affordable method delivers exceptional design impact. You create a custom look that reflects your personal style perfectly.
Lattice and trim offer endless creative possibilities for your personal retreat. They transform ordinary surfaces into extraordinary design features.
Add 3D Dimension with Geometric Wood Boards
Elevate your personal sanctuary with dimensional patterns that create stunning visual depth. Geometric arrangements using narrow wood strips transform flat surfaces into captivating features.
These installations add remarkable texture without consuming physical space. Your room gains architectural character through clever pattern play.
Sketching Your Design Before Installation
Always begin with careful planning on paper. Sketching your pattern ensures proper proportions and visual balance.
Measure your surface accurately before cutting materials. Consider these popular geometric options:
- Diamond patterns for modern energy
- Hexagonal shapes for organic appeal
- Custom monograms for personalization
- Interlocking circles for continuous flow
Scale your pattern according to room dimensions. Smaller spaces benefit from moderate-sized repeats. Larger areas can handle bold, oversized statements.
Using a Glossy Finish to Make the Pattern Stand Out
High-gloss paint enhances geometric patterns beautifully. The reflective quality adds depth and dimension.
Light plays across glossy surfaces throughout the day. Your installation gains dynamic character as illumination changes.
Consider these finish options:
- Semi-gloss for subtle reflection
- High-gloss for dramatic shine
- Satin for balanced elegance
Monochromatic color schemes work particularly well. Matching your wall color creates sophisticated integration. The pattern adds texture without competing elements.
This approach replaces traditional artwork effectively. Your geometric feature becomes the room’s stunning focal point.
DIY installation requires quality adhesive and patience. Secure placement ensures long-lasting beauty without wall damage.
Geometric wood boards transform ordinary surfaces into extraordinary design statements. They add remarkable depth and character to your personal retreat.
Combine Paneling with Mirrors for Visual Depth
Reflective surfaces and architectural details create magical transformations in your personal sanctuary. This powerful combination doubles both light and perceived space while adding sophisticated character.
Mirrors amplify every design element they reflect. When paired with textured surfaces, they create endless visual intrigue. Your room gains dynamic energy that changes throughout the day.
Installing Molding Over Mirrors to Boost Character
Frame existing mirrors with decorative trim for instant architectural appeal. This technique transforms basic reflective surfaces into custom design features.
Choose molding profiles that complement your room’s style. Traditional homes suit ornate crown details. Contemporary spaces prefer clean, simple lines.
Follow these steps for professional results:
- Measure mirror perimeter accurately
- Select molding width proportional to mirror size
- Paint molding before installation for cleaner finish
- Use construction adhesive and finishing nails
The framed reflection becomes art itself. Your mirror gains importance beyond its functional purpose.
Creating the Illusion of a Larger, Brighter Space
Strategic mirror placement maximizes light reflection. Position opposite windows to bounce natural illumination throughout your room.
Custom-cut mirrors fit perfectly within panel frames. This integrated approach creates cohesive visual interest.
Consider these placement strategies:
- Behind bedside tables to reflect ambient lighting
- On closet doors to expand perceived dimensions
- Within wainscoting patterns for subtle reflection
- As headboard alternatives for dramatic impact
Small bedrooms benefit tremendously from this approach. The combination makes compact spaces feel airy and expansive.
Choose mirror styles that enhance your overall aesthetic. Antique finishes add vintage charm. Clean modern glass maintains contemporary simplicity.
“Mirrors don’t just show us ourselves—they show our spaces new dimensions we never knew existed.”
This dual-purpose solution serves both decoration and function. You gain practical daily use while enjoying enhanced aesthetics.
DIY integration offers satisfying project potential. With careful measurement, you achieve custom-looking results affordably.
The mirror-and-panel combination delivers exceptional value. It transforms ordinary rooms into extraordinary spaces full of light and character.
Integrate Warm Wood Paneling as a Headboard
Your bed becomes the room’s centerpiece when framed by natural wood elements. This approach combines function with beautiful design in your personal space.
Letting Natural Materials and Texture Bring Warmth
Natural wood variations create organic beauty that manufactured materials cannot replicate. Each grain pattern tells a unique story behind your sleeping area.
The texture adds cozy dimension to your room’s design. Unlike flat surfaces, wood brings tactile interest that invites touch and appreciation.
Consider these popular wood options for your project:
- Reclaimed barn wood for rustic character
- Walnut for rich, dark elegance
- Maple for light, contemporary appeal
- Pine for affordable warmth
Juxtaposing Styles for an Elevated, Modern Rustic Look
Pair natural wood with minimalist elements for balanced sophistication. Clean-lined sconces and simple bedding let the material shine.
Black-and-white photography creates striking contrast against warm tones. This combination feels both earthy and refined simultaneously.
“The beauty of wood lies in its ability to bridge traditional craftsmanship with contemporary aesthetics.”
Consider these style combinations:
| Wood Style | Modern Pairing | Final Effect |
|---|---|---|
| Rustic reclaimed | Metallic lighting | Industrial charm |
| Smooth walnut | Minimalist frames | Urban sophistication |
| Whitewashed pine | Neutral textiles | Coastal serenity |
Your custom creation serves as both functional support and decorative feature. Many homeowners build storage niches or integrate reading lights directly into the design.
Proper maintenance ensures long-lasting beauty. Apply quality sealant to protect against moisture and everyday wear. Regular dusting keeps the surface looking its best.
This DIY project offers satisfying customization potential. You control the exact dimensions, finish, and overall appearance.
Ultimately, a wood headboard personalizes your space with natural warmth. It creates an inviting atmosphere that makes your room truly feel like home.
Your Journey to a Deeper, More Character-Filled Bedroom
You’ve explored countless ways to transform your personal retreat. Each option brings unique charm and personality to your space.
Remember to consider your budget and skill level. Start with a small accent project if you’re new to DIY. Simple paint updates or trim additions make big impacts.
Blend different treatments for custom results. Combine textures with mirrors or bold colors. Your room becomes a true reflection of your style.
These projects work in any size space. They add visual interest without overwhelming your decor. Even modest changes create remarkable transformations.
Share your creations online for inspiration. Connect with others who love home improvement. Your journey toward a more inviting bedroom starts today.
Take that first step toward your dream space. Pick one idea that speaks to you and begin. Your perfect retreat awaits just beyond that first brushstroke or hammer tap.
Happy decorating! May your room become everything you’ve imagined.