Welcome to your personal transformation journey! Your sleeping area deserves to be a special retreat. You don’t need professional help to create a beautiful space.
Small changes make a huge difference. A fresh coat of paint or new decor can work wonders. Your room can become more inviting and functional.
This guide covers many aspects of room redesign. We focus on budget-friendly approaches that everyone can try. Real examples show amazing before-and-after results.
Imagine your ideal personal sanctuary. Our tips will help you achieve that vision. There is great satisfaction in completing projects yourself.
Get ready to explore inspiring room transformations that prove what’s possible. Let’s begin creating the space you’ve always wanted!
Why a DIY Bedroom Makeover is Your Next Best Project
Your sleeping environment plays a crucial role in your overall wellbeing. A refreshed personal sanctuary can significantly improve your daily mood and mental health. Studies show that people sleep better in spaces they find visually appealing and personally meaningful.
The beauty of refreshing your retreat lies in its flexibility. You might choose a complete room renovation or simply update your decor arrangement. Both approaches can create dramatic results without draining your savings.
Professional interior design services often charge thousands of dollars for similar transformations. The do-it-yourself approach lets you achieve comparable results at a fraction of the cost. This financial efficiency makes personalizing your space accessible to everyone.
Many people postpone updates due to perceived complexity or time constraints. However, most projects can be completed over weekends. The satisfaction of creating something with your own hands outweighs these temporary inconveniences.
Real homeowners have transformed dull rooms into dream spaces with modest budgets. One family spent under $500 creating their ideal retreat using thrifted finds and creative paint techniques. Their sleep quality improved immediately in the renewed environment.
Personalized spaces directly contribute to better rest and daily happiness. When your surroundings reflect your personality, you feel more comfortable and relaxed. This emotional connection transforms ordinary rooms into true sanctuaries.
Even minor updates can increase your property’s value without major investment. Potential buyers appreciate well-designed, inviting spaces. Your personal project becomes an investment in your future.
View this transformation as an investment in your daily comfort and joy. The pride of completing projects yourself creates lasting satisfaction. Your renewed space will reward you every day with improved relaxation and peace.
First Step to Any Makeover: The Essential Declutter
Before selecting paint colors or shopping for decor, tackle the most transformative step. Clearing out clutter reveals your room’s true potential. This process creates mental clarity alongside physical space.
Professional organizers recommend the keep/donate/toss method. Create three boxes or bags for sorting. Be honest about what you truly use and love.
Clothing often accumulates in sleeping areas. Ask yourself when you last wore each item. Seasonal pieces can be stored elsewhere to maximize daily space.
Sentimental items deserve special consideration. Designate one memory box for keepsakes. Photograph larger items you can’t keep but want to remember.
Many people report immediate mood improvements after decluttering. The visual calm makes redesign decisions easier. You’ll see layout possibilities you missed before.
| Room Size | Clutter Level | Estimated Time |
|---|---|---|
| Small (under 120 sq ft) | Light | 2-3 hours |
| Medium (120-200 sq ft) | Moderate | 4-6 hours |
| Large (over 200 sq ft) | Heavy | 8-10 hours |
Maintain your clutter-free environment with simple systems. Use under-bed storage for out-of-season clothes. Install floating shelves for frequently used items.
Common challenges include decision fatigue and sentimental attachment. Work in 45-minute sessions with breaks. Ask a friend to help with difficult choices.
This foundational step makes every subsequent project more effective. Painting, rearranging, and decorating become simpler. Your renewed space will feel truly yours from the start.
The before-and-after difference often surprises people. One homeowner described her experience:
“I couldn’t believe how much larger my room felt after decluttering. The transformation cost nothing but time, yet completely changed the way I experience my space.”
Approach this process as preparation for your beautiful new retreat. The cleared area becomes a blank canvas. Your creative vision can now take shape without obstacles.
Planning Your Space: The Power of a Mood Board
Visual planning transforms your creative vision into reality. A mood board organizes your thoughts and ideas in one place. This tool helps you see how elements work together before spending money.
Digital boards offer flexibility and easy updates. They help maintain design cohesion throughout your project. You can experiment with different combinations without commitment.
How to Create a Free Digital Mood Board
Begin with inspiration gathering from various sources. Pinterest, Instagram, and design blogs offer endless ideas. Save images that reflect your desired aesthetic.
Free online tools make the process simple and enjoyable. Canva provides templates specifically for interior design. Adobe Spark offers user-friendly drag-and-drop features.
Follow these steps to build your visual plan:
- Collect images representing your preferred color palette
- Add texture samples and fabric swatches
- Include furniture pieces and layout ideas
- Arrange elements until you achieve harmony
Many beginners find success with these platforms:
- Pinterest boards for quick visual collections
- Canva’s mood board templates for structured layouts
- Milanote for collaborative planning
Using Your Mood Board to Stay on Budget
Your visual plan becomes a financial roadmap. It prevents impulse purchases that don’t fit your overall style. You can identify affordable alternatives before shopping.
Test combinations virtually to avoid costly mistakes. That expensive rug might clash with your wall color. Your board reveals these issues before purchase.
Establish spending limits for each category. The board helps prioritize essential items first. You can phase non-essential purchases for later.
| Budget Category | Mood Board Function | Cost Savings Strategy |
|---|---|---|
| Furniture | Tests scale and proportion | Identifies thrift store alternatives |
| Textiles | Coordinates patterns | Finds similar fabrics at discount prices |
| Wall Treatment | Visualizes color impact | Prevents paint color mistakes |
| Accessories | Balances decorative elements | Highlights DIY opportunities |
Sarah from Ohio shared her experience:
“My mood board saved me from buying curtains that would have clashed. I found perfect alternatives at half the price because I knew exactly what to look for.”
Adapt your board as projects evolve and new ideas emerge. The digital format allows easy updates and revisions. Your plan grows with your vision while maintaining financial control.
Translate concepts into practical decisions using your visual guide. Take screenshots to stores for color matching. Share with friends who might help source items.
This planning tool brings confidence to your transformation journey. You move forward with clear direction and purpose. The result reflects your personal style while respecting your budget.
The Foundation of Style: Choosing Your Color Palette

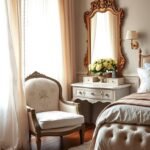
Your color selection forms the emotional core of your personal sanctuary. The right hues transform ordinary spaces into extraordinary retreats. They create atmosphere before you add a single piece of furniture.
See what an enormous difference a coat of white paint can make?! White reflects light and makes rooms feel larger. It provides a clean canvas for your decorative elements.
Different color families create distinct psychological effects. Warm tones like reds and oranges feel cozy and energizing. Cool blues and greens promote calmness and relaxation.
Consider your room’s size and lighting when selecting shades. Dark colors work well in large, well-lit spaces. Lighter tones help smaller rooms feel more spacious.
The 60-30-10 rule creates balanced color schemes. Use your dominant shade for 60% of the space. Your secondary color covers 30%, with 10% for accents.
Always test paint colors in your actual room. Lighting changes how colors appear throughout the day. Sample patches show true color under your specific conditions.
Current trends favor soothing, nature-inspired palettes. The new pretty, pastel palette is everything!! Soft greens and muted blues create serene environments. These shades work with various decor styles.
Classic combinations remain timeless for good reason. Navy and white always looks crisp and sophisticated. Gray and yellow combinations feel both modern and cheerful.
| Color Family | Psychological Effect | Best For Rooms With |
|---|---|---|
| Warm Tones (Reds, Oranges) | Energy, warmth, comfort | North-facing windows, limited natural light |
| Cool Tones (Blues, Greens) | Calm, relaxation, tranquility | South-facing windows, abundant sunlight |
| Neutrals (Greys, Beiges) | Balance, sophistication, flexibility | Any lighting condition, small spaces |
| Jewel Tones (Deep Purples, Emeralds) | Drama, luxury, depth | High ceilings, architectural details |
Incorporate accent colors through textiles and accessories. Throw pillows and artwork add pops of color without commitment. Area rugs anchor the space while introducing pattern.
Many homeowners achieve dramatic transformations through color alone. One couple transformed their dark room with light gray walls and navy accents. Their space now feels both larger and more inviting.
Avoid these common color selection mistakes. Don’t choose colors from tiny paint chips alone. Never finalize colors under store lighting conditions.
Find inspiration through various online resources. Pinterest offers endless color combination ideas. Color palette generators help create harmonious schemes.
“We almost chose a yellow that would have been too bright. Testing samples saved us from a costly mistake. The soft butter yellow we selected looks perfect at all hours.”
Your color choices should reflect your personal taste while creating the desired mood. Trust your instincts while following basic design principles. The result will be a space that truly feels like home.
Transformative Power of Paint: More Than Just Walls
A simple can of paint holds magic beyond basic wall coverage. This versatile medium transforms entire spaces with color and creativity. Your personal retreat gains new life through strategic painting projects.
Paint creates focal points and defines areas within a room. It unifies mismatched pieces into cohesive collections. The right application techniques yield professional results.
Many homeowners discover paint’s power through accent features. These special elements draw attention to room strengths. They add depth and personality without structural changes.
Furniture painting represents another brilliant transformation method. Outdated pieces become custom treasures with proper techniques. This approach saves money while expressing personal style.
Creating a Stunning Accent Wall Behind the Bed
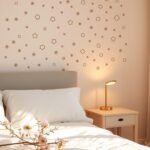
Your sleeping area deserves a beautiful backdrop. An accent wall behind your bed creates instant drama. This feature becomes the room’s natural focal point.
Color blocking offers a modern approach to accent walls. Choose two complementary colors for geometric designs. Use painter’s tape for sharp, clean lines.
Patterned walls add visual interest through repeated designs. Stencils create professional-looking patterns without artistic skill. Many companies offer reusable stencil kits.
Textured finishes provide depth and dimension. Sponging techniques create soft, organic patterns. Rag rolling produces subtle, elegant variations.
Consider these popular accent wall options:
- Bold solid colors contrasting with other walls
- Geometric patterns using multiple hues
- Subtle textured finishes for added depth
- Mural designs for artistic expression
Proper preparation ensures flawless results. Clean walls thoroughly before painting. Fill any holes or imperfections with spackle.
Use high-quality painter’s tape for crisp edges. Remove tape before paint fully dries. This prevents peeling and maintains clean lines.
Give Old Furniture a Brand New Look with Paint
Painting existing pieces saves significant money compared to replacement. Your current furniture gains fresh personality through color. This approach reduces waste while creating custom pieces.
Different materials require specific paint types. Wood accepts most paints with proper preparation. Metal needs rust-inhibiting primers first.
Laminate surfaces require special bonding primers. These create surfaces that accept paint properly. Without proper priming, paint peels quickly.
Follow these steps for professional furniture painting:
- Clean surfaces thoroughly with degreaser
- Sand smooth surfaces to create paint adhesion
- Apply appropriate primer for your material
- Paint with smooth, even brush strokes
- Add protective topcoat for durability
Color selection creates harmony throughout your space. Choose furniture colors that complement wall hues. Consider lighter or darker shades of your main color.
Before-and-after examples show remarkable transformations. One dresser changed from dark brown to soft blue. The piece now looks modern and expensive.
Proper finishing protects your work for years. Polyurethane topcoats guard against scratches and wear. Water-based options dry clear without yellowing.
| Material Type | Recommended Primer | Best Paint Type | Finish Options |
|---|---|---|---|
| Solid Wood | Oil-based primer | Latex or acrylic | Matte, satin, gloss |
| Laminate | Bonding primer | Acrylic enamel | Satin, semi-gloss |
| Metal | Rust-inhibiting primer | Oil-based enamel | Semi-gloss, gloss |
| Wicker | All-purpose primer | Spray paint | Matte, satin |
Cost comparisons reveal significant savings. Painting a dresser costs approximately $50-$75. Replacement often exceeds $300-$500.
Cohesive design themes emerge through coordinated painting. All furniture pieces share common color elements. The room feels intentionally designed rather than assembled.
Jennifer from Texas shares her experience:
“I transformed my grandmother’s outdated dresser with white paint and new hardware. It looks brand new and holds special meaning. The project cost less than dinner for two.”
Surface preparation remains the most crucial step. Rushing this phase compromises final results. Proper cleaning and priming ensure paint adherence.
Your painted pieces become conversation starters. They reflect personal style and creative expression. The satisfaction of transformation lasts for years.
16 Incredible Bedroom Makeover Ideas You Can DIY

Ready to transform your space with creative projects? These hands-on approaches bring personality and function to your room. Each project offers unique benefits for different skill levels and budgets.
From simple swaps to weekend builds, these methods deliver impressive results. You can tackle them one at a time or combine several for a complete refresh.
Swap Out Bedding for an Instant Refresh
New bedding transforms your sleeping area instantly. Choose fabrics that match your desired atmosphere. Cotton and linen work well for most climates.
Layer textures for visual interest. Add a quilt or throw blanket at the foot of your bed. Mix patterns carefully to avoid overwhelming the space.
Color coordination creates harmony. Select sheets that complement your wall color. Pillow shams can introduce accent colors beautifully.
Install Modern Window Treatments & Curtains
Window coverings affect both light and privacy. Sheer curtains soften sunlight while maintaining brightness. Blackout options improve sleep quality dramatically.
Install curtain rods several inches above the window frame. This trick creates the illusion of taller windows. Extend rods beyond the frame width for maximum light when open.
Choose hardware that matches your room’s style. Modern spaces suit simple metal rods. Traditional rooms look great with decorative finials.
Build or Create a Statement Headboard
A custom headboard becomes your bed’s focal point. Upholstered versions add comfort and style. Use plywood, foam, and fabric for a professional look.
Reclaimed wood offers character and warmth. Sand and seal pieces for a finished appearance. Iron pipe fittings create industrial-style frames.
Paint an existing headboard for quick transformation. Metallic finishes add glamour. Chalk paint creates vintage charm with minimal preparation.
Add Architectural Interest with DIY Moulding
Wall moulding adds character to plain spaces. Chair rail height divides walls visually. Picture frame moulding creates elegant panel effects.
Measure carefully before cutting pieces. Use a mitre box for clean corners. Paint moulding the same color as walls for subtle elegance.
This project requires basic tools but delivers high impact. Many homeowners complete it in a weekend. The result looks custom and expensive.
Layer Lighting with Lamps and New Fixtures
Good lighting combines multiple sources. Overhead fixtures provide general illumination. Table lamps offer task lighting for reading.
Install dimmer switches for mood control. They allow bright light for cleaning and soft light for relaxing. Smart bulbs offer color temperature adjustment.
Place lights strategically throughout the room. Three-point lighting eliminates shadows effectively. Consider plug-in sconces for rental-friendly options.
Define the Space with a Cozy Area Rug
Rugs anchor furniture arrangements beautifully. Choose sizes that fit under bed frames. Leave equal floor space showing on all sides.
Natural fibers like wool wear well over time. Synthetic options offer stain resistance for busy households. Low-pile rugs work best under rolling chairs.
Layer rugs for texture and color depth. Place a small patterned rug over larger neutral ones. This technique adds visual interest affordably.
Maximize Awkward Spaces with Functional Shelving
Custom shelving solves storage challenges perfectly. Floating shelves utilize empty wall space efficiently. Corner units make use of often-wasted areas.
Measure your specific space before building. Adjust standard plans to fit your unique dimensions. Paint shelves to match or contrast with walls.
Use shelving for both display and organization. Books, plants, and decorative items create personal displays. Baskets hide clutter while maintaining accessibility.
Incorporate Plants for an Earthy, Inviting Feel
Living plants improve air quality naturally. They add life and color to any room arrangement. Choose varieties that thrive in indoor conditions.
Low-light plants survive in north-facing rooms. Snake plants and pothos tolerate irregular watering. Group plants together to create a mini indoor garden.
Use decorative pots that complement your style. Terra cotta offers rustic charm. Glazed ceramic pots provide colorful accents.
| Project | Difficulty | Time Estimate | Budget Range |
|---|---|---|---|
| Bedding Refresh | Beginner | 1 hour | $100-$300 |
| Window Treatments | Intermediate | 2-3 hours | $50-$200 |
| Statement Headboard | Intermediate | 4-6 hours | $75-$250 |
| DIY Moulding | Intermediate | Weekend | $100-$350 |
| Lighting Layers | Beginner | 2-4 hours | $80-$400 |
| Area Rug | Beginner | 30 minutes | $50-$500 |
| Functional Shelving | Intermediate | 4-8 hours | $60-$300 |
| Plant Incorporation | Beginner | 1 hour | $30-$150 |
Sarah from Chicago transformed her space using these methods:
“The moulding project made the biggest impact for the least money. My plain walls now have character and depth. Friends assume I hired a professional.”
Source materials from local hardware stores and online retailers. Many projects require basic tools most homeowners already own. YouTube tutorials provide visual guidance for each technique.
Start with one project that matches your skill level. Each completed task builds confidence for the next. Your room will evolve into a personalized retreat gradually.
Lighting Makeover: Setting the Right Mood
Proper illumination transforms your space both functionally and emotionally. The right lighting creates atmosphere while serving practical needs. It affects how you experience your room at different times.
Three lighting types work together for optimal results. Ambient lighting provides overall illumination for the space. Task lighting focuses on specific activities like reading.
Accent lighting highlights architectural features or artwork. Layering these types creates depth and flexibility. You can adjust lighting based on your current needs.
Light fixture prices can be surprisingly high. Many beautiful options exceed reasonable budgets. Fortunately, creative solutions offer affordable alternatives.
One homeowner expressed this common frustration perfectly:
“Have you taken a look at light fixture prices lately? Good grief – they are so not budget friendly! The re-do of this chandelier is another easy-peasy project that anyone can do.”
Upcycling an Old Fixture with Spray Paint
Transform outdated fixtures with simple spray paint techniques. This approach saves significant money while creating custom pieces. You can achieve professional-looking results with basic supplies.
Begin by selecting the right paint for your project. Metallic finishes update brass or bronze fixtures beautifully. Matte black creates a modern, sophisticated look.
Follow these steps for successful fixture transformation:
- Remove the fixture carefully and clean it thoroughly
- Protect glass parts and electrical components with tape
- Apply light, even coats in a well-ventilated area
- Allow proper drying time between coats
- Reinstall when completely dry and cured
Consider updating a ceiling fan with this method. Paint the blades and body for a coordinated look. New blades are also available for replacement.
Safety remains paramount when working with electrical components. Always turn off power at the circuit breaker. Consider consulting an electrician if unsure.
The Impact of Pendant Sconces for a Modern Touch
Pendant sconces offer stylish lighting without complex wiring. These fixtures combine wall-mounted convenience with hanging design. They provide both ambient and task lighting beautifully.
Many models feature plug-in designs for easy installation. You can place them anywhere near electrical outlets. Cord covers help manage visible wires attractively.
As one designer noted about their versatility:
“The pendant sconces are so cool and add a modern touch that is *chef’s kiss* perfect for the room.”
Place sconces beside your bed for reading light. This arrangement frees up nightstand space effectively. Adjustable arms offer customized lighting direction.
Consider these placement strategies for optimal function:
- Mount reading lights 60-70 inches above the floor
- Position dressing lights at eye level beside mirrors
- Place ambient lights in corners for soft illumination
Bulb selection significantly affects mood and function. Warm white bulbs create cozy, relaxing atmospheres. Cool white options provide better visibility for tasks.
LED bulbs offer energy efficiency and long life. Dimmable versions allow adjustable brightness levels. Smart bulbs enable color temperature changes.
Always prioritize safety with any electrical project. Hire professionals for complex wiring situations. Your safety outweighs any potential savings.
Lighting transformations demonstrate remarkable before-and-after impact. One bedroom gained sophistication through updated fixtures. The space now feels both functional and inviting.
Textile Tricks: Curtains, Rugs, and Bedding Harmony

Fabric elements bring warmth and personality to your space. They work together to create a cohesive look. The right textiles make your room feel complete and inviting.
Window treatments like curtains or roman shades add style and function. They control light and privacy beautifully. Earthy elements like palm patterns create a natural feel.
Choose fabrics based on your needs and seasons. Light cotton works well for summer months. Heavier materials like velvet provide winter warmth.
Consider maintenance when selecting materials. Machine-washable options simplify cleaning. Dry-clean-only fabrics require special care.
Proper curtain hanging creates a professional appearance. Hang rods higher than the window frame. This trick makes ceilings seem taller.
Fullness matters for a luxurious look. Use curtain widths 1.5-2 times the window span. This creates beautiful folds when closed.
Rug placement follows specific rules. Size should allow furniture legs to rest on it. Leave equal floor space around all edges.
Layering bedding adds visual interest and comfort. Start with fitted and flat sheets. Add a quilt or coverlet for warmth.
Finish with decorative pillows and throws. Mix patterns carefully to avoid chaos. Combine large and small prints for balance.
Texture mixing creates depth without overwhelming. Pair smooth cotton with nubby linen. Add faux fur or knitted elements for coziness.
Coordinate textiles with your wall color and furniture. Choose complementary hues for harmony. Contrasting colors make elements pop.
Budget-friendly sourcing saves money without sacrificing style. Discount stores offer quality options. Online retailers provide wide selections.
Maintenance varies by material type. Natural fibers like wool need special care. Synthetic materials often resist stains better.
One homeowner achieved amazing results:
“The new roman shades and palm print accents transformed my space. The textiles created the earthy, inviting feel I wanted without breaking my budget.”
Your fabric choices should reflect personal style while providing comfort. They complete your space with warmth and character.
Wall Decor on a Dime: Art and Mirror Solutions
Your walls are the final canvas for your personal retreat. Thoughtful decor ties everything together beautifully. This finishing touch makes your space feel complete and intentional.
You don’t need expensive pieces to create stunning visual impact. Creative solutions achieve high-end looks for less. Your budget-friendly approach can look like professional design work.
Thrifting Frames for Custom Artwork
Thrift stores offer amazing frame selections at unbelievable prices. You can find quality pieces for just a few dollars. The hunt becomes part of the creative adventure.
Look for solid construction when selecting frames. Check corners for tight joints and stability. Avoid warped wood or damaged molding that can’t be repaired.
Size matters more than style when thrifting. You can always update the finish later. Focus on finding frames that fit your desired arrangement.
Mix and match styles for eclectic charm. Uniform frames create a more formal gallery look. Both approaches work beautifully depending on your aesthetic.
Transform thrifted finds with simple updates:
- Sand and paint wooden frames for a unified look
- Replace damaged glass with new cut pieces
- Update backing boards for better protection
- Add new hanging hardware for security
One designer shared their success story:
“I found six beautiful frames for under twenty dollars total. After painting them all matte black, they looked like a custom set. The transformation was incredible for the price.”
Using Downloadable Prints for Affordable Gallery Walls
Digital artwork offers endless possibilities without high costs. You can find beautiful prints for instant download. This approach lets you change art seasonally if desired.
Etsy provides amazing downloadable options from independent artists. Many sellers offer multiple size options for the same design. You can print pieces to fit your specific frames perfectly.
Consider these popular sources for quality prints:
- Etsy for unique artist creations
- Society6 for trendy designs
- Digital museums for classic art reproductions
- Free stock photo sites for nature photography
Print quality affects the final result significantly. Use heavy matte paper for artistic pieces. Glossy paper works well for photographic images.
Professional printing services ensure color accuracy. Many office supply stores offer same-day service. Online printers provide museum-quality results shipped to your door.
As one homeowner discovered:
“There’s no need to spend a fortune on framed artwork! I purchased two downloadable prints from Etsy to fill frames that flank either side of my dresser mirror. The entire wall arrangement cost less than fifty dollars.”
Gallery walls create dramatic focal points in any room. Proper spacing ensures a balanced appearance. Use consistent spacing between frames for a cohesive look.
Follow these steps for perfect gallery arrangement:
- Lay out your arrangement on the floor first
- Use paper templates to test wall placement
- Maintain 2-3 inches between frames for visual breathing room
- Start from the center and work outward for balance
- Use a level to ensure straight hanging
Mirrors serve both decorative and functional purposes. They reflect light and make spaces feel larger. Strategic placement enhances natural light distribution.
Consider these alternative wall decor ideas:
- Wall shelves for displaying small objects
- Textile hangings for softness and texture
- Wall decals for temporary rental solutions
- Floating shelves with curated collections
Proper hanging hardware prevents damage to your walls. Use appropriate anchors for drywall installations. Picture hanging systems allow for easy adjustments later.
| Project Element | Thrift Store Cost | New Retail Cost | Potential Savings |
|---|---|---|---|
| Large Frame (24×36) | $5-$10 | $40-$80 | 80-85% |
| Medium Frame (16×20) | $3-$7 | $25-$50 | 80-85% |
| Small Frame (8×10) | $2-$4 | $15-$30 | 80-85% |
| Downloadable Art Print | $5-$15 | $30-$100+ | 70-90% |
| Total Gallery Wall (5 pieces) | $30-$60 | $200-$500+ | 80-85% |
Many homeowners achieve remarkable transformations with these methods. One couple created an entire gallery wall for under seventy-five dollars. Their space now reflects their personal style perfectly.
Your wall decor should tell your unique story. Mix personal photos with found artwork for meaning. The result becomes a reflection of your personality and taste.
Furniture Hacks: Rearranging, Repurposing, and Painting

Your existing pieces hold incredible potential for transformation. Clever furniture updates create dramatic changes without major purchases. These techniques maximize both function and style in your space.
Start with strategic arrangement for better flow. Position your bed as the focal point on the longest wall. Leave adequate walking space on each side for comfortable movement.
Nightstands should sit within easy reach from your sleeping position. Typically 24-28 inches tall works best with standard bed heights. Matching pieces create symmetry and visual balance.
Creative repurposing gives old items new life. An unused dresser becomes a stylish media console. Bookshelves can function as room dividers in open spaces.
Painting techniques vary by material type. Wood accepts most paints with proper preparation. Sand smooth surfaces first for better adhesion.
Use bonding primer for laminate pieces. This prevents peeling and ensures durability. Metal furniture needs rust-inhibiting primer for protection.
Scale matters when selecting pieces. Large rooms handle substantial furniture gracefully. Smaller spaces benefit from leggy, open designs that don’t overwhelm.
Hardware updates offer instant transformation. New knobs and pulls refresh dated pieces beautifully. Mix metals for contemporary eclectic style.
Identify quality secondhand furniture worth saving. Solid wood construction indicates good bones. Avoid particleboard with water damage or swelling.
Multi-functional solutions maximize small spaces. Storage ottomans provide seating and organization. Murphy beds create flexibility in tight rooms.
Safety considerations protect your home and family. Anchor tall pieces to wall studs for stability. Ensure drawers slide smoothly without tipping risk.
Real transformations show remarkable potential. One homeowner updated a dreary dresser with white paint and new hardware. The piece now looks custom and expensive.
“The dresser, mirror, and nightstands got a brand new look for very little money! Fresh paint and updated hardware completely transformed my bedroom suite.”
Project timelines vary by complexity. Simple painting projects might take a weekend. Complete furniture rearrangements often finish in one day.
If you simply must add or replace furniture, save money by thinking outside of the box. Consider unconventional sources and creative solutions. Your perfect piece might be waiting at a thrift store.
Choose nightstands, dressers, and other furniture that complements your space. Measure carefully before purchasing anything new. Proper proportion creates harmony throughout your room.
These approaches save significant money while expressing personal style. Your transformed pieces become conversation starters. They reflect creativity and smart resourcefulness.
Smart Shopping: Finding Deals at Discount and Thrift Stores
Your treasure hunt for stylish decor begins with smart shopping strategies. Secondhand stores offer amazing finds at unbelievable prices. The thrill of discovery makes each visit exciting.
Many people overlook these resources for home updates. They assume everything will be worn or outdated. With careful selection, you can find true gems.
One shopper shared their success story:
“When it comes to a budget makeover of any kind, discount and thrift stores are your best friend! Outdoor furniture to the rescue! By purchasing outdoor armchairs and cushions, at a discount store, I was able to save hundreds!”
These stores constantly receive new inventory. Regular visits increase your chances of finding perfect pieces. You might discover exactly what you need.
Outdoor Furniture for Indoor Seating Solutions
Patio pieces work beautifully inside your home. They often feature durable construction and weather-resistant finishes. These qualities make them perfect for high-use areas.
Consider an outdoor armchair for your reading nook. The sturdy frame handles daily use gracefully. Add comfortable cushions for extra coziness.
Wicker chairs bring texture and casual charm indoors. Their lightweight design makes rearranging simple. Neutral tones blend with various color schemes.
Metal bistro sets function as perfect occasional seating. Use them when extra guests visit your space. They tuck away neatly when not needed.
Evaluate each piece carefully before purchasing. Check for stability and structural integrity. Avoid items with rust or significant damage.
Clean outdoor furniture thoroughly before bringing it inside. Use mild soap and water for basic cleaning. Disinfect surfaces to ensure hygiene.
Mix these pieces with your existing decor for balance. The combination creates interesting visual contrast. Your space gains personality through eclectic styling.
Mastering the Thrift Store Hunt
Successful thrifting requires specific strategies. Visit stores in affluent neighborhoods for better selection. These locations often receive higher-quality donations.
Timing matters when shopping secondhand. Mid-week mornings often bring fresh inventory. Avoid crowded weekends for easier browsing.
Look beyond surface appearance when evaluating items. Solid wood construction indicates good quality. Particleboard pieces may not withstand refurbishing.
Check drawers and doors for smooth operation. Sticky mechanisms might indicate underlying issues. Loose joints often signal poor construction.
Consider these popular store chains for your searches:
- Goodwill for consistent inventory and organized sections
- Salvation Army for furniture and household items
- Local consignment shops for curated selections
- Habitat for Humanity ReStore for building materials
Negotiation works at many independent thrift stores. Politely ask about best prices on larger items. Cash payments sometimes secure additional discounts.
Cleaning and Refurbishing Techniques
Proper cleaning makes secondhand items feel new again. Wood furniture benefits from thorough wiping with wood cleaner. Fabric items may need professional cleaning.
Upholstered pieces require special attention. Steam cleaning removes odors and stains effectively. Replace worn cushions for improved comfort.
Paint transforms dated furniture beautifully. Light colors make pieces look fresh and modern. Dark hues create sophistication and drama.
New hardware updates cabinets and dressers instantly. Choose knobs that match your room’s style. Mixed metals add contemporary flair.
Safety considerations protect your household. Check electrical items for certification marks. Avoid upholstery with strong chemical odors.
Mattresses and pillows generally shouldn’t be purchased secondhand. These items may harbor allergens or pests. Invest in new bedding for health reasons.
Your efforts reward you with unique, affordable pieces. Each find tells its own story within your space. The satisfaction comes from both savings and creativity.
Putting It All Together: Assembling Your Cozy Retreat

The final assembly brings your vision to life beautifully. This stage transforms individual projects into a harmonious whole. Your personal sanctuary emerges through careful arrangement.
Begin with the largest elements first. Position your bed as the focal point. Arrange nightstands and lighting around this central feature.
Layer textiles for comfort and style. Add bedding, then rugs, then window treatments. This creates depth and warmth throughout the space.
Plants and wall art complete the transformation. They add life and personality to your room. These final touches make the space uniquely yours.
Step back frequently to assess your progress. View the room from different angles. Make adjustments until everything feels balanced.
Personal elements create emotional connection. Display photos, collections, or meaningful objects. These items tell your story and make the room special.
Evaluate lighting at different times of day. Adjust lamp positions for optimal illumination. Ensure reading spots have adequate task lighting.
Maintenance preserves your beautiful new look. Establish simple cleaning routines for different surfaces. Regular care keeps everything fresh and inviting.
Seasonal changes refresh without major effort. Swap lightweight bedding for warmer options in winter. Change accent pillows or throws for quick updates.
Organization systems prevent clutter recurrence. Use the storage solutions you created during decluttering. Return items to their designated homes daily.
Final touches elevate your space from finished to exceptional. Add scented candles or essential oil diffusers. Soft music completes the relaxing atmosphere.
Celebrate your achievement with genuine pride. You created this beautiful retreat with your own hands. Enjoy the comfort and peace it brings every day.
“Seeing everything come together was magical. Each piece I worked on separately now creates a cohesive, inviting space that truly feels like me.”
Your completed room reflects your personal journey. It showcases your creativity and dedication. This special space will reward you with daily comfort and joy.
Your DIY Bedroom Makeover Journey Starts Now
Begin your transformation today with confidence and creativity. You have all the tools and inspiration needed to create a space that reflects your unique style.
Start with small, manageable projects to build momentum. Simple changes like new bedding or a fresh coat of paint make a big impact. Tackle one area at a time for steady progress.
Remember that patience and thoughtful choices lead to the best results. Your personal sanctuary will evolve beautifully over time. Document your journey with photos to celebrate each achievement.
Share your success to inspire others on their own decorating adventures. The pride of creating something yourself brings lasting satisfaction. Your renewed retreat awaits—begin crafting the space you deserve!