Your attic might seem like just a dusty storage area right now. But look closer! This unique space holds incredible potential to become your favorite room in the home.
Imagine waking up under vaulted ceilings with natural light streaming through charming windows. Your top floor offers a secluded retreat perfect for relaxation and creativity.
We’ve gathered inspiring ideas from top designers to help you reimagine this area. These solutions turn challenging angles and nooks into functional, beautiful features.
From modern minimalist looks to cozy rustic vibes, you’ll discover how to create a personal sanctuary. Get ready to see your upper level in a whole new light!
Why Your Attic is the Perfect Bedroom Retreat
Your home’s top floor could become the most peaceful sanctuary you’ve ever experienced. Many people overlook this area, seeing only storage potential. Yet it offers unique architectural features that create an ideal sleeping space.
Vaulted ceilings instantly make any room feel grand and spacious. They draw your eyes upward, creating an airy atmosphere. This vertical dimension transforms what might feel cramped into a luxurious retreat.
Those charming angled windows bring beautiful natural light throughout the day. They often offer delightful treetop views that ground floor rooms can’t match. Waking up to sunlight filtering through these windows feels truly magical.
The secluded location provides exceptional privacy and quiet. You’re separated from the main household activities below. This creates a personal haven where you can truly unwind and recharge.
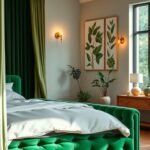
With the right design approach, this area becomes incredibly cozy and inviting. The angled walls and unique shape add wonderful character you won’t find elsewhere. Your sleeping area becomes a unique feature of your home rather than just another room.
Converting this upper level is also environmentally smart. You gain living space without expanding your home’s footprint. This sustainable approach adds value while respecting your property’s existing structure.
Professionals note that well-executed conversions significantly increase property value. The table below shows key benefits compared to standard bedrooms:
| Feature | Attic Conversion | Standard Bedroom |
|---|---|---|
| Ceiling Height | Vaulted, dramatic | Standard flat ceiling |
| Natural Light | Angled windows, skylights | Standard vertical windows |
| Privacy Level | Highly secluded | Same level as other rooms |
| Architectural Interest | Unique angles and shapes | Standard rectangular space |
| Property Value Increase | 15-20% potential gain | Minimal impact |
We’ll share practical ideas to help you transform this overlooked area into your dream attic bedroom. From layout solutions to decor choices, you’ll discover how to maximize every inch. Get ready to unlock the incredible potential waiting above you!
First Steps: Understanding Attic Bedroom Challenges
Before you start picking paint colors or furniture, let’s address some practical considerations. Every conversion project comes with unique hurdles. Understanding these early helps you plan effectively and avoid surprises.
You’ll want to consider three main areas: height regulations, climate control, and lighting conditions. Each requires thoughtful solutions to create a comfortable living environment.
Don’t worry – these challenges have proven fixes. With proper planning, your upper floor becomes a wonderful retreat.
Navigating Ceiling Height and Building Codes
Your local building department requires minimum ceiling heights for habitable rooms. Most codes mandate at least 7 feet clearance. This ensures comfortable movement and safety.
Many existing structures fall short of this requirement. You might need structural modifications to meet regulations. Common solutions include:
- Raising the roof structure (most extensive)
- Lowering the floor level (complex but effective)
- Creating designated zones with sufficient clearance
Always consult with licensed contractors before starting work. They understand local codes and can suggest the best approach for your situation.
Solving Temperature Control and Insulation
Upper floors experience greater temperature swings than other areas. You might notice 10-15°F differences between seasons. Proper insulation creates a consistent comfortable environment.
Consider these climate control solutions:
- Spray foam insulation in rafters and walls
- Additional HVAC ductwork or mini-split systems
- Energy-efficient windows with proper sealing
- Radiant floor heating for cold climates
Investing in quality insulation pays off through energy savings and comfort. Your sleeping area will stay cozy year-round.
Working With Limited Light and Awkward Angles
Natural illumination often challenges upper floor conversions. Standard windows might not provide sufficient daylight. The unique architecture also creates interesting but challenging angles.
Light enhancement strategies include:
- Installing skylights along the roof plane
- Adding dormer windows to expand wall space
- Using light tubes to bring sunshine into dark corners
- Strategic mirror placement to bounce available light
Those sloping walls actually offer creative opportunities. You can build custom storage under low eaves. Furniture with lower profiles works perfectly in these areas.
| Common Challenge | Practical Solution | Estimated Cost Range |
|---|---|---|
| Insufficient ceiling height | Dormer addition | $15,000-$40,000 |
| Temperature extremes | Spray foam insulation | $3,000-$7,000 |
| Limited natural light | Skylight installation | $2,000-$5,000 each |
| Awkward corner spaces | Custom built-in furniture | $1,500-$4,000 |
| Limited access points | Staircase modification | $5,000-$15,000 |
Remember that every project is unique. Costs vary based on your home’s structure and local labor rates. Always get multiple quotes from qualified professionals.
These initial considerations ensure your project starts on solid footing. Once addressed, you can focus on creating a beautiful and functional personal sanctuary.
Your Guide to 25 Attic Bedroom Ideas That Maximize Awkward Spaces
Ready to transform that upper level into something truly special? This comprehensive guide shows you how to create a stunning personal retreat. We’ve organized twenty-five brilliant concepts into five key categories.
Each category addresses specific aspects of your conversion project. You’ll find layout strategies, lighting techniques, and storage solutions. We also cover style approaches and comfort enhancements.
These practical ideas work for any budget and commitment level. Some require full renovations while others are simple weekend projects. Every suggestion helps you make the most of your unique space.
The magic happens when you view challenges as opportunities. Those sloping walls become perfect for custom storage nooks. Awkward corners transform into cozy reading spots.
“The best rooms have something to say about the people who live in them.”
You’ll discover how to place your bed for maximum impact and comfort. Learn lighting techniques that make small areas feel expansive. Find storage solutions that turn every inch into functional spaces.
Your attic bedroom can reflect any style you love. From minimalist Scandinavian to cozy bohemian, we cover various aesthetics. Each design approach maximizes your room’s unique character.
This guide helps you create a bedroom that feels both spacious and intimate. You’ll learn color tricks that expand visual space. Discover furniture choices that fit perfectly under eaves.
Remember that creativity transforms limitations into advantages. Your upper level offers possibilities no other room can match. With these ideas, you’ll create a retreat that enhances your entire home.
Let’s explore how to turn architectural challenges into your attic bedroom’s greatest strengths. The following sections provide detailed, step-by-step guidance for each concept.
1. Opt for a Central Bed Placement

Let’s begin with the heart of your sleeping area. Positioning your bed in the center makes perfect sense. You’ll enjoy the highest ceiling clearance right where you need it most.
This smart layout uses the peak height for maximum comfort. You can sit up without bumping your head. Moving around becomes effortless and natural.
Always ensure at least 7.5 feet of clearance above your sleeping zone. This measurement allows comfortable movement and proper air circulation. Your room will feel more open and inviting.
Remember that beds can be surprisingly heavy. A standard queen model often weighs 800-1000 pounds. This weight requires proper structural support beneath your floor.
Always consult a qualified structural engineer before finalizing your plan. They’ll assess your joists and recommend necessary reinforcements. Safety should always come first in any conversion project.
This central placement creates a beautiful focal point in your sleeping area. Your bed becomes the natural centerpiece of the entire design. Everything else can radiate outward from this central position.
This approach works best in spaces with adequate peak height. Measure carefully before committing to this layout. You’ll want sufficient walking space on all sides.
Think of this as your foundation for other solutions. Once your bed is perfectly positioned, you can build around it. The remaining space will naturally organize itself.
Custom furniture pieces can fill those lower eaves beautifully. Nightstands, benches, or storage units fit perfectly under sloped ceilings. You’ll maximize every inch of available room.
This simple yet effective idea transforms your entire upper level. You’ll create a functional and gorgeous sleeping retreat. Your attic bedroom will become your favorite place to unwind.
2. Create a Cozy Alcove Bed Nook
Those sloped ceiling areas might seem challenging at first glance. But they offer incredible potential for creating intimate sleeping spaces. Tucking your bed into these low zones transforms awkward angles into charming features.
This clever approach turns every inch into functional space. You’ll gain more open floor area for other activities. Your sleeping nook becomes a delightful retreat within your larger room.
Always maintain at least three feet of clearance above your mattress. This height prevents that closed-in feeling while keeping things wonderfully cozy. You’ll enjoy the perfect balance of enclosure and comfort.
Proper ventilation is absolutely essential for these enclosed areas. Install wall vents to ensure continuous air circulation. This prevents moisture buildup and protects against mold growth.
Your alcove design can include custom touches that enhance its charm. Consider adding:
- Soft curtains for privacy and added warmth
- Built-in shelves for books and personal items
- Subtle LED lighting for evening reading
- Plush fabrics that amplify the comfortable atmosphere
This solution adds wonderful character to your sleeping quarters. The enclosed feeling creates a sense of security and peace. Many people find they sleep better in these intimate spaces.
“There is nothing like staying at home for real comfort.”
Measuring carefully ensures your nook fits perfectly. Note the exact dimensions before selecting your bed frame. Consider custom-built options for irregular shaped areas.
This approach makes excellent use of existing architecture. You’re working with your home’s natural features rather than against them. The result feels organic and intentionally designed.
Your alcove becomes a personal sanctuary within your larger sleeping area. It’s the perfect spot for morning coffee or evening reading. This functional feature enhances your entire upper level experience.
3. Design Multi-Functional Zones
Imagine turning your upper floor into a versatile personal retreat. Creating distinct zones transforms one room into multiple functional areas. This smart approach makes your sleeping quarters work harder for you.
Think about dividing your space into sleeping, dressing, working, and relaxing sections. Each zone serves a specific purpose while maintaining overall harmony. This design strategy maximizes every square foot beautifully.
Proper spacing ensures comfortable movement between zones. Maintain these minimum clearances:
- 30 inches for walkways
- 36 inches for work areas
- 24 inches around furniture pieces
Sound management creates peaceful transitions between activities. Acoustic panels with NRC ratings of 0.7+ reduce noise reflection. They help maintain privacy between your different functional zones.
Consider a 300 square foot layout with three main sections. Your sleeping zone occupies the highest ceiling area. A compact work station fits perfectly under sloping eaves. A cozy reading nook completes your personal sanctuary.
“Good design is making something intelligible and memorable. Great design is making something memorable and meaningful.”
Visual cues help define each zone effectively. Area rugs anchor different functional spaces beautifully. Track lighting directs attention where you need it most.
This approach works particularly well in compact upper levels. You gain multiple rooms within one efficient footprint. Your entire home benefits from this smart space planning.
Always consider ceiling height when positioning zones. Place activities requiring standing height where clearance is greatest. Lower areas work perfectly for seated functions.
Select furniture that complements each zone’s purpose. A comfortable chair defines your reading corner. A compact desk creates an efficient work station. Your bed remains the centerpiece of your sleeping area.
This zoning technique actually makes your room feel more spacious. Defined areas create visual interest and depth. You’ll appreciate how organized your upper level feels.
These practical solutions transform challenging layouts into functional living spaces. Your personalized zones create a retreat that serves all your needs perfectly.
4. Integrate Custom Under-Eaves Storage
Those slanted ceiling areas offer incredible storage potential you might not have considered. Custom cabinetry built along your roof lines transforms awkward angles into highly functional spaces. This smart approach maximizes every inch of your unique room.
Follow the natural pitch angles for maximum efficiency. Cabinets should typically measure 16-24 inches deep. This depth provides ample storage while maintaining comfortable walking space.
Always maintain 1-2 inch ventilation gaps behind your storage pieces. This crucial step prevents moisture buildup and protects against mold. Your belongings stay fresh and protected year-round.
Consider professional junk removal services before installation begins. Clearing your entire area creates a clean slate for your new storage solutions. You’ll be amazed how much space you actually have available.
This approach adds tremendous functionality without sacrificing aesthetics. Custom built-ins blend seamlessly with your existing architecture. Your storage becomes an integral part of your overall design.
“Have nothing in your house that you do not know to be useful, or believe to be beautiful.”
These custom storage solutions work perfectly for seasonal items. Think holiday decorations, winter clothing, or extra bedding. Everything stays organized yet easily accessible when needed.
Cost considerations vary based on materials and complexity. Simple DIY options might cost $500-$1,500 using stock cabinets. Professional custom built-ins typically range from $2,000-$5,000.
For DIY enthusiasts, start with precise measurements and quality materials. Pre-fabricated units can be modified to fit your specific space. Always prioritize safety when working with power tools.
This organizational solution enhances your entire home’s functionality. You gain valuable storage without expanding your footprint. Everything feels more organized and intentional.
Well-executed custom storage can increase your property value significantly. Potential buyers appreciate smart space utilization. Your investment pays dividends in both daily living and future resale.
| Storage Type | Average Cost | Installation Time | Best For |
|---|---|---|---|
| DIY Modified Cabinets | $500-$1,500 | 2-3 days | Budget-friendly projects |
| Professional Built-ins | $2,000-$5,000 | 5-7 days | High-end finishes |
| Modular Systems | $800-$2,000 | 3-4 days | Flexible configurations |
| Custom Drawer Units | $1,200-$3,000 | 4-6 days | Small item organization |
Your under-eaves storage becomes a highlight of your personal retreat. These clever solutions transform challenging architecture into your greatest asset. You’ll wonder how you ever lived without this organized space.
5. Plan an Open Concept Attic Suite

Picture transforming your spacious upper level into a complete private sanctuary. An open concept layout creates a luxurious retreat with multiple functional zones. This approach turns your entire floor into a cohesive living environment.
Your suite can include a sleeping zone, sitting area, and even an ensuite bathroom. This configuration offers hotel-like comfort right in your own house. You’ll enjoy complete privacy and convenience.
Plumbing installation requires careful professional planning. Waste pipes need a consistent 1/4″ per foot slope for proper drainage. Alignment with existing plumbing stacks minimizes renovation complexity.
Structural reinforcement becomes essential for heavy bathroom fixtures. A standard soaking tub can weigh over 700 pounds when filled. Your floor joists must handle this significant weight safely.
“The essence of interior design will always be about people and how they live.”
Consider these layout suggestions for your open concept suite:
- Position your bed under the highest ceiling point
- Create a cozy sitting nook near natural light sources
- Place the bathroom area near existing plumbing lines
- Use area rugs to define different functional zones
This design solution significantly increases your property’s value. Ensuite bathrooms particularly appeal to potential buyers. Your investment returns both daily enjoyment and future resale benefits.
Professional consultation ensures proper execution of this ambitious project. Licensed plumbers verify pipe slopes and connections. Structural engineers confirm floor reinforcement requirements.
Your completed suite becomes the ultimate personal retreat. You’ll enjoy morning coffee in your sitting area before getting ready in your private bathroom. Everything flows together in one harmonious space.
Accessibility considerations remain important throughout your planning. Ensure clear pathways between all functional areas. Your suite should feel both luxurious and practical for daily use.
This open concept approach transforms how you experience your upper level. You gain multiple rooms within one beautifully designed environment. Your entire home benefits from this smart utilization of available square footage.
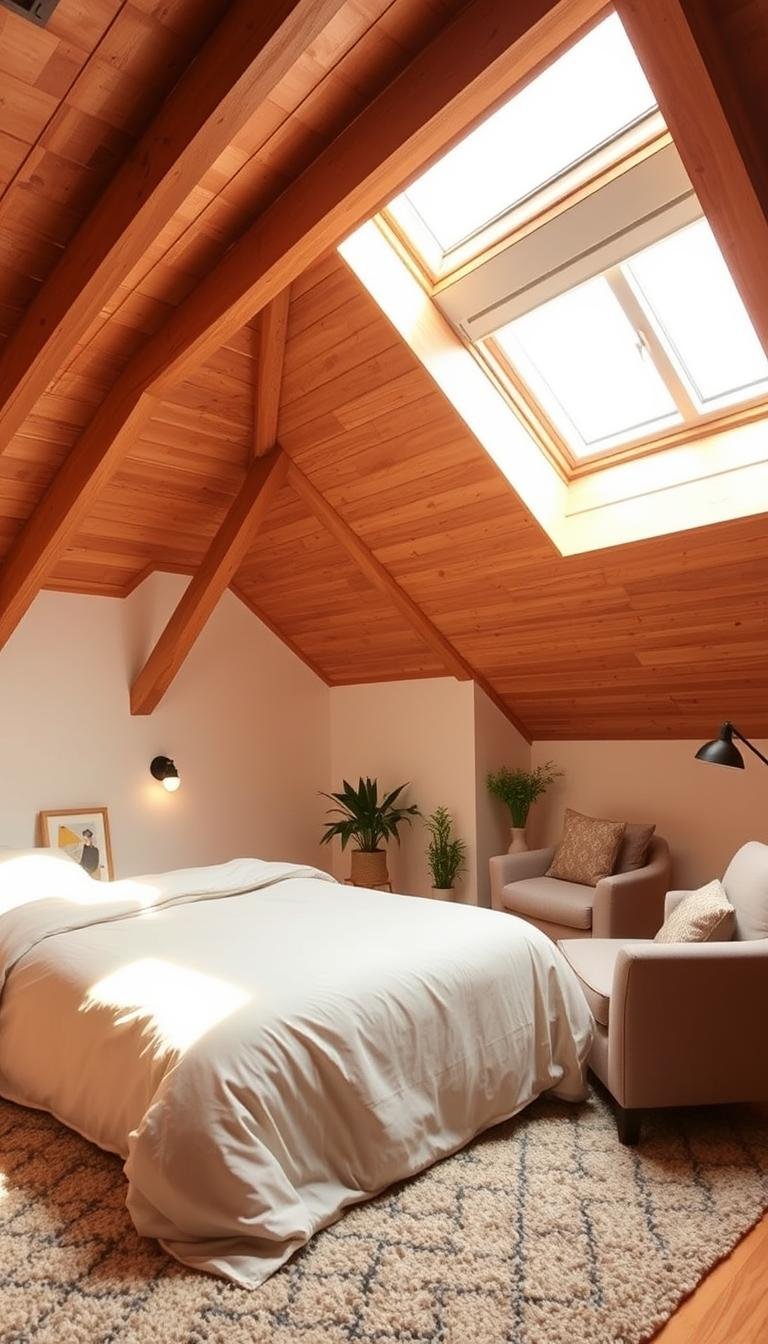
6. Install Strategic Skylights
Picture sunlight streaming directly into your personal retreat from above. Skylights transform your upper level with beautiful overhead illumination. They create a bright, airy atmosphere that feels both spacious and inviting.
Strategic placement makes all the difference in maximizing natural light. South-facing installations capture 30% more sunshine throughout the day. This orientation provides the brightest possible environment for your living area.
Consider low-emissivity glass with SHGC ratings below 0.3 for heat control. This special coating reduces unwanted solar heat gain during warmer months. Your room stays comfortable without sacrificing beautiful daylight.
Solar-powered venting models offer excellent climate control benefits. They can lower interior temperatures by up to 10°F through natural airflow. These energy-efficient solutions keep your space pleasant year-round.
Professional installation ensures perfect waterproofing and weather sealing. Experienced contractors understand proper flashing techniques and roofing integration. This protects your investment and prevents future leaks.
Costs typically range from $1,000 to $8,000 per window depending on features. Basic fixed models start at the lower end of this spectrum. Motorized venting systems with smart controls represent the premium option.
“Light is the first of painters. There is no object so foul that intense light will not make it beautiful.”
Even light distribution creates the most comfortable environment. Position multiple smaller units rather than one large opening. This approach eliminates dark corners and shadowy areas.
Your ceiling gains visual height through this clever design solution. The added dimension makes the entire area feel more expansive. You’ll appreciate how open and airy your personal sanctuary becomes.
Choose sizes that complement your existing architecture proportions. Standard dimensions typically range from 2×2 feet to 4×4 feet. Consider operable units for additional ventilation benefits.
This lighting transformation enhances your entire home experience. You gain beautiful daylight without sacrificing privacy or wall space. Your upper level becomes a bright, welcoming retreat.
7. Expand with Dormer Windows
Adding dormer windows transforms your upper floor into a brighter, more spacious retreat. These architectural extensions create vertical wall space where sloped ceilings previously limited your options. You gain valuable square footage while dramatically improving both light and ventilation.
Each dormer typically adds 15-25 square feet of usable floor area with full-height walls. This expansion provides the necessary clearance for comfortable movement and furniture placement. Your previously cramped corners become functional living zones.
Professional installation ensures proper integration with your existing roof structure. Experienced contractors use specialized flashing techniques to prevent water damage. This waterproofing protection safeguards your investment for years to come.
“Architecture should speak of its time and place, but yearn for timelessness.”
These window solutions significantly enhance natural light penetration. Dormers capture sunlight from angles that standard roof windows cannot reach. Your entire room feels brighter and more inviting throughout the day.
Building permits and architectural plans are essential for this project. Local regulations govern size, placement, and structural requirements. Proper documentation ensures your renovation meets all safety standards.
Consider these benefits when planning your dormer installation:
- Increased headroom in previously unusable areas
- Enhanced cross-ventilation for better air circulation
- Additional wall space for furniture arrangement
- Improved exterior curb appeal and property value
Cost considerations vary based on size and complexity. Basic dormer installations typically range from $15,000 to $25,000. This investment returns both immediate enjoyment and long-term property value increase.
Your expanded space accommodates furniture that previously wouldn’t fit. Dressers, bookshelves, and seating arrangements now have proper vertical clearance. The entire room becomes more functional and comfortable.
| Dormer Type | Average Cost | Space Added | Installation Time |
|---|---|---|---|
| Gable Front | $12,000-$18,000 | 15-20 sq ft | 2-3 weeks |
| Shed Style | $15,000-$22,000 | 18-25 sq ft | 3-4 weeks |
| Arched Top | $18,000-$28,000 | 20-30 sq ft | 4-5 weeks |
| Custom Design | $20,000-$35,000 | 25-35 sq ft | 5-6 weeks |
This design solution particularly benefits areas with low ceiling height. The vertical extension creates comfortable standing room throughout your space. You’ll appreciate the dramatic improvement in daily functionality.
Properly installed dormers blend seamlessly with your home’s existing architecture. They enhance both interior comfort and exterior appearance. Your upper level becomes a true highlight of your entire property.
8. Layer Your Artificial Lighting
Proper lighting transforms your upper floor from a dark storage area into a bright, welcoming retreat. Layered illumination creates depth and functionality throughout your personal space. This approach ensures every corner feels inviting and usable.
Combining different light sources addresses various needs within your room. Ambient lighting provides overall illumination for general activities. Task lighting focuses on specific work areas like reading nooks or dressing zones.
Accent lighting highlights architectural features or artwork. This combination creates visual interest and practical solutions for daily living. Your entire environment becomes more adaptable to different moods and activities.
For sloped ceilings, choose specially designed recessed light housings. These fixtures accommodate angled surfaces while maintaining proper insulation clearance. Always consult an electrician for safe installation in these unique spaces.
Calculate your ambient light needs using this simple formula: multiply your square footage by 20. This gives the total lumens required for comfortable general illumination. A 200-square-foot area needs approximately 4,000 lumens.
“Lighting creates the mood and the atmosphere of the space, and brings the interior to life.”
Consider these energy-efficient options for your lighting design:
- LED bulbs lasting 25,000+ hours with minimal heat output
- Dimmable switches for adjustable ambiance control
- Motion sensors for closets and storage areas
- Smart systems that adjust throughout the day
Your lighting plan should define different functional zones within the room. Brighter areas work well for dressing and reading tasks. Softer illumination creates relaxing spaces for unwinding and sleeping.
Always prioritize professional electrical work for safety and compliance. Licensed electricians ensure proper wiring and load calculations. This protects your investment and prevents potential hazards.
| Lighting Type | Best Application | Recommended Lumens |
|---|---|---|
| Recessed Lights | General ambient illumination | 600-800 per fixture |
| Wall Sconces | Bedside reading and accent | 400-600 per fixture |
| Floor Lamps | Task lighting and corner fill | 800-1,200 per lamp |
| Task Lighting | Desk work and detailed tasks | 1,000-1,600 per area |
| LED Strips | Under-eaves accent lighting | 300-500 per linear foot |
Experiment with different lighting combinations to find what works best for your space. Adjustable systems allow you to modify the atmosphere as needed. Your beautifully lit retreat will become your favorite place to spend time.
9. Use Mirrors to Reflect Light and Space

Mirrors work magic in any room, especially your special upper floor retreat. They bounce natural illumination around, making everything feel brighter and more open. This simple trick transforms how you experience your personal sanctuary.
Strategic placement makes all the difference. Position mirrors directly opposite windows at perfect 90-degree angles. This alignment captures maximum daylight and sends it deeper into your space.
Each square foot of mirror effectively doubles the perceived light in your room. That means even on cloudy days, your area feels sunnier and more inviting. You’ll notice an immediate difference in atmosphere.
Consider lightweight acrylic panels for larger installations. These modern solutions weigh significantly less than traditional glass. They’re easier to mount securely on various wall surfaces.
“The right mirror can transform not just a room, but how you feel in it.”
Beyond pure functionality, mirrors add beautiful decorative elements. Choose frames that complement your overall design style. Or go frameless for a sleek, contemporary look that emphasizes spaciousness.
This cost-effective solution delivers impressive results without major renovations. You can implement this idea over a weekend. The visual impact far exceeds the relatively small investment required.
Size matters when selecting your reflective pieces. Larger mirrors create more dramatic effects. Smaller ones work perfectly in cozy nooks and corners.
The illusion of depth makes your entire area feel more expansive. Mirrors trick the eye into perceiving additional space beyond the actual walls. This psychological effect enhances comfort and relaxation.
Even small angled areas benefit from well-placed mirrors. They brighten dark corners and make awkward spaces feel intentional. Every part of your room becomes more functional and attractive.
Your overall perception of the area improves dramatically. The enhanced light and apparent space create a more luxurious environment. You’ll enjoy spending time in your beautifully illuminated retreat.
| Mirror Type | Best Placement | Light Enhancement | Average Cost |
|---|---|---|---|
| Large Wall Mirror | Opposite main windows | Doubles natural light | $150-$400 |
| Acrylic Panel | Sloped ceiling areas | Brightens dark corners | $100-$300 |
| Decorative Framed | Above dresser or desk | Adds ambient reflection | $80-$250 |
| Corner Mirror | Angled wall sections | Expands tight spaces | $70-$200 |
Experiment with different placements to find what works best for your unique layout. Move mirrors around until you achieve the perfect light distribution. Your efforts will create a brighter, more spacious feeling retreat.
10. Add Ambient LED Strip Lighting
Transform your special upper floor with versatile LED strips that create magical ambiance. These flexible lighting solutions add warmth and highlight architectural features beautifully. You can install them along beams, under furniture, or around room perimeters.
Choose color temperatures that match your desired atmosphere. Warm white tones (2700-3000K) create cozy relaxation zones. Cooler temperatures (4000-5000K) work perfectly for task areas where you need brighter illumination.
Proper power planning ensures reliable performance. LED strips typically require 2-5 watts per linear foot. Longer runs need adequate transformers to maintain consistent brightness throughout your installation.
Strategic placement maximizes both function and style. Consider these popular locations:
- Along exposed ceiling beams for dramatic effect
- Under bed frames or floating shelves for subtle glow
- Around eaves and angled walls to highlight unique architecture
- Behind headboards or furniture for soft backlighting
“Lighting is the jewelry of the room; it can make or break the space.”
Energy efficiency makes LED solutions particularly appealing. They use up to 75% less power than traditional bulbs. You’ll enjoy beautiful illumination without worrying about high electricity bills.
Hidden mounting creates clean, professional results. Use aluminum channels for diffused light and protection. These channels also help with heat dissipation, extending your LED lifespan.
Customization options let you create exactly the mood you want. Choose from color-changing RGB strips or single-color versions. Smart controls allow adjustment from your phone or voice commands.
Cost-effectiveness makes this upgrade accessible for most budgets. Quality LED strips range from $20-$50 per 16-foot roll. Professional installation adds $150-$300 if you prefer expert help.
Modern designs integrate seamlessly with various styles. The slim profile remains virtually invisible when not illuminated. Your room maintains clean lines while gaining functional beauty.
| LED Strip Type | Best Use | Color Temperature | Power Consumption |
|---|---|---|---|
| Warm White | Relaxation areas | 2700-3000K | 2-4W per foot |
| Cool White | Task zones | 4000-5000K | 3-5W per foot |
| RGB Color | Mood lighting | Adjustable | 4-6W per foot |
| High Output | Primary lighting | 5000-6500K | 5-8W per foot |
Experiment with different placements before final installation. Use temporary tape to test effects at various times of day. You’ll discover perfect positions that enhance your unique space.
This lighting solution adds both practicality and personality. Your upper level becomes more functional and inviting. Enjoy creating the perfect atmosphere in your personal retreat.
11. Build Custom Wardrobes into Slopes
Those slanted walls offer fantastic storage opportunities when approached creatively. Custom built-ins transform challenging angles into highly functional organizational areas. This smart approach makes every inch work beautifully for your needs.
Follow the natural roof lines for maximum efficiency. Wardrobes should measure 18-24 inches deep at full height areas. Reduce to 12-15 inches where ceilings slope downward.
Proper ventilation prevents moisture buildup and protects your belongings. Include louvered doors or ventilation gaps at the top and bottom. This airflow keeps everything fresh and prevents mold growth.
Consider these organizational features for your custom solution:
- Drawers for folded clothing and accessories
- Hanging space for dresses and longer items
- Adjustable shelving for flexible storage options
- Specialized compartments for shoes and accessories
Material choices affect both durability and aesthetics. Plywood with veneer offers excellent stability for sloping installations. MDF works well for painted finishes that match your existing decor.
“Good storage isn’t about having space. It’s about making space work for you.”
Professional installation ensures perfect fit and finish. Experienced carpenters understand how to work with unique angles. They create seamless integration with your existing architecture.
For DIY enthusiasts, start with precise measurements of all angles. Create cardboard templates before cutting expensive materials. This precaution saves both time and resources.
Costs typically range from $1,500 to $4,000 depending on size and materials. This investment adds both immediate functionality and long-term property value. Your organized space becomes a highlight of your personal retreat.
These custom pieces create a clean, integrated look throughout your room. Everything feels intentional and beautifully designed. You’ll appreciate how organized your upper level becomes.
| Wardrobe Feature | Recommended Depth | Best For | Installation Consideration |
|---|---|---|---|
| Full-height section | 18-24 inches | Hanging clothing | Maximum ceiling clearance |
| Sloping section | 12-15 inches | Shoes, accessories | Follows roof angle exactly |
| Drawer units | 16-20 inches | Folded items | Requires full extension slides |
| Open shelving | 10-12 inches | Books, decor | Easy access visibility |
Your custom storage solution enhances daily living while maintaining beautiful aesthetics. Everything has its place, yet remains easily accessible. This organizational approach transforms how you experience your entire home.
12. Choose a Bed with Integrated Storage
Smart bed designs with built-in compartments offer brilliant space optimization for compact rooms. These innovative furniture pieces transform your sleeping area into a highly functional space.
You gain hidden storage right where you need it most. This approach eliminates the need for additional dressers or cabinets.
Two main types dominate the market. Drawer models feature side compartments that slide out smoothly. Hydraulic lift beds reveal spacious compartments beneath the mattress.
The storage capacity is genuinely impressive. These solutions provide 30-50 cubic feet of organized space. That equals the capacity of three or four standard dressers.
“Good design is when functionality meets simplicity in the most elegant way.”
Weight considerations are important for upper floor installations. Storage beds typically weigh 50-100 pounds more than standard frames. Ensure your floor can support this additional weight safely.
When upgrading your sleeping setup, consider proper mattress disposal. Many retailers offer removal services with new purchases. This keeps your project organized from start to finish.
Various styles suit different aesthetic preferences. Platform beds with hidden drawers maintain clean, modern lines. Upholstered models add softness and texture to your room.
These space-saving solutions work perfectly for compact areas. You maximize vertical space while maintaining clean sight lines. Everything feels organized and intentional.
Costs vary based on materials and mechanisms. Basic drawer models start around $500. Hydraulic systems with premium finishes can reach $2,000.
Installation typically requires two people and basic tools. Follow manufacturer instructions carefully for optimal performance. Professional assembly is available for complex systems.
This approach supports clutter-free living beautifully. Seasonal clothing, extra bedding, and personal items stay organized yet accessible. Your entire space feels more peaceful and functional.
| Bed Type | Storage Capacity | Weight Increase | Ideal For | Price Range |
|---|---|---|---|---|
| Drawer Platform | 30-40 cubic feet | 50-70 pounds | Frequent access items | $500-$1,200 |
| Hydraulic Lift | 40-50 cubic feet | 80-100 pounds | Seasonal storage | $900-$2,000 |
| Hybrid System | 35-45 cubic feet | 70-90 pounds | Mixed storage needs | $700-$1,600 |
| Custom Built-in | 50+ cubic feet | 100+ pounds | Maximum organization | $1,500-$3,000 |
Your sleeping area becomes a model of efficiency and style. These smart solutions make every square foot work beautifully. Enjoy the organized tranquility of your personalized retreat.
13. Utilize Stair Storage Integration

Transform your access point into a functional storage feature with smart design. Your staircase becomes more than just a pathway—it becomes valuable organizational space that doesn’t use any bedroom area.
This clever approach adds significant storage capacity right where you need it most. Each step can become a hidden compartment for various items.
Safety remains the top priority when designing stair storage. Maintain a minimum 10-inch tread depth for comfortable and secure footing. This ensures normal staircase functionality while incorporating storage solutions.
Durability requirements are equally important. Each step should support at least 300 pounds of weight capacity. This accommodates regular use while storing your belongings securely.
Consider these practical design options for your staircase:
- Pull-out drawers that slide smoothly on quality runners
- Lift-top compartments with hydraulic assists for easy access
- Front-opening cabinets perfect for deeper storage needs
- Custom-sized compartments for specific item categories
“The staircase is not just a connection between floors—it’s an opportunity for innovation and smart space utilization.”
Always ensure compliance with local building codes and safety regulations. Professional consultation guarantees your storage staircase meets all requirements. This protects both your investment and your family’s safety.
The storage volume achievable might surprise you. A typical staircase offers 15-25 cubic feet of additional organized space. That’s equivalent to a small dresser or storage cabinet.
Installation works for both new construction and existing staircases. Retrofitting requires careful measurement and professional craftsmanship. New builds allow for complete integration from the initial design phase.
This storage solution connects beautifully to your overall attic access. Everything flows together in a cohesive organizational system. Your entire home benefits from this efficient use of available area.
Aesthetic integration creates a seamless look throughout your room. Choose materials and finishes that match your existing decor. The storage becomes virtually invisible when not in use.
These clever furniture pieces demonstrate how smart thinking transforms ordinary features into extraordinary solutions. Your staircase becomes a highlight of your organizational system.
| Storage Type | Best For | Capacity Per Step | Installation Complexity |
|---|---|---|---|
| Pull-out Drawers | Frequent access items | 2-3 cubic feet | Medium |
| Lift-top Compartments | Seasonal storage | 3-4 cubic feet | High |
| Front-opening Cabinets | Bulky items | 4-5 cubic feet | Medium-High |
| Custom Dividers | Specific collections | Varies | High |
This innovative approach makes every square foot work efficiently for your needs. You gain valuable storage without compromising safety or aesthetics. Your attic bedroom access becomes both functional and beautifully integrated.
14. Install Wall-Mounted Furniture
Floating furniture opens up your floor area dramatically. These clever solutions attach directly to your vertical surfaces. You gain functional surfaces without sacrificing precious walking space.
Consider a 36-inch floating desk for your room. It provides ample workspace while maintaining an airy feel. This approach works perfectly in compact areas.
Secure installation is absolutely essential for safety. Always locate and attach to wall studs using proper blocking. This ensures your mounted pieces remain stable and secure.
Fold-down tables offer brilliant multi-functional flexibility. Look for mechanisms rated for 1,000-2,000 cycles. This durability guarantees years of reliable performance.
“Simplicity is the ultimate sophistication when it comes to small space living.”
Wall-mounted nightstands provide bedside convenience without floor clutter. They keep essentials within reach while maintaining clean sight lines. Your sleeping area feels more spacious and organized.
Installation requires basic tools and careful measurement. Use a stud finder to locate solid framing points. Follow manufacturer instructions for optimal results.
These space-saving design choices complement modern aesthetics beautifully. They create a minimalist look that feels both intentional and stylish. Your entire space benefits from this streamlined approach.
Consider these popular wall-mounted options:
- Floating desks for work or creative projects
- Fold-down tables for dining or occasional use
- Wall-mounted nightstands for bedside functionality
- Vertical shelving units for books and decorative items
The freedom of open floor space enhances your daily experience. Movement becomes easier and more comfortable. Your attic bedroom feels significantly more expansive.
This approach demonstrates how smart thinking transforms limitations into advantages. You gain functionality without compromising style or comfort. Your personalized retreat becomes both beautiful and highly practical.
15. Select Multi-Purpose Furniture Pieces
Multi-functional furniture transforms your compact area into a versatile living space. These clever pieces serve multiple purposes while maintaining a clean, organized look.
Consider a daybed that converts from comfortable seating to a full sleeping surface. This brilliant design maximizes your available area beautifully.
Storage ottomans provide hidden organization and extra seating. They work perfectly at the foot of your bed or as occasional tables.
Look for commercial-grade mechanisms rated for 5,000+ transformations. This durability ensures years of reliable performance in your daily routine.
“The best furniture doesn’t just fill space—it fulfills needs.”
Weight considerations are important for upper floor installations. Multi-purpose items typically weigh 20-40% more than standard versions.
Ensure your floor structure can support this additional weight safely. Consult a professional if you have any concerns about load capacity.
These smart solutions help create a clutter-free environment in your personal retreat. Everything has its place yet remains easily accessible when needed.
Consider these versatile options for different zones:
- Convertible desks that fold away when not in use
- Nesting tables that provide flexible surface options
- Storage benches that organize while offering seating
- Modular shelving that adapts to your changing needs
The space efficiency achieved through these choices is remarkable. You gain functionality without sacrificing style or comfort in your special area.
Cost versus value analysis shows excellent long-term benefits. Quality multi-functional furniture typically costs 15-30% more than standard pieces.
This investment pays off through years of versatile use and space optimization. Your entire home benefits from this efficient approach.
| Furniture Type | Primary Function | Secondary Function | Weight Increase | Price Premium |
|---|---|---|---|---|
| Convertible Daybed | Sleeping | Seating | 25-35% | 20-30% |
| Storage Ottoman | Seating | Organization | 20-30% | 15-25% |
| Folding Desk | Work Surface | Wall Storage | 30-40% | 25-35% |
| Modular Shelving | Storage | Room Division | 15-25% | 20-30% |
Your selection process should focus on both quality and functionality. Test mechanisms thoroughly before making your final decision.
These versatile pieces make your entire area more adaptable to different activities. You’ll appreciate how efficiently everything works together.
16. Celebrate Exposed Beams for Character
Those beautiful wooden beams overhead can become the star feature of your special retreat. Instead of hiding them, celebrate these natural architectural elements. They add wonderful character and visual interest to your unique space.
Start with proper preparation to ensure a flawless finish. Use a TSP solution to thoroughly clean years of dust and grime. Follow with careful sanding using 80-120 grit paper for a smooth surface ready for treatment.
Choose finishes that enhance the natural beauty of the wood. Stains highlight the grain patterns and warm tones beautifully. Paint offers a modern look that can brighten your entire room.
Safety should always come first in your design plans. Consider fire-retardant treatments for added protection. These specialized coatings reduce flammability while maintaining aesthetic appeal.
“The details are not the details. They make the design.”
These structural features work with various style approaches beautifully. Rustic designs embrace the natural wood texture completely. Industrial schemes might feature darker stains or metallic accents.
Maintenance remains simple for these beautiful elements. Dust regularly with a soft cloth attachment on your vacuum. Occasionally wipe with a wood-friendly cleaner to maintain their luster.
The architectural appeal creates a sense of history and craftsmanship. Your attic bedroom gains unique personality through these exposed elements. They tell a story about your home‘s construction and character.
Cost savings come from not covering these natural beauties. You avoid expensive drywall installation and finishing work. Those resources can enhance other aspects of your personal retreat.
Your decorative items can complement these stunning features beautifully. Textiles, lighting, and artwork can highlight the beams’ natural appeal. Everything works together to create a cohesive design story.
Embrace the structure rather than fighting against it. These beams represent your space’s unique architecture and history. They become a defining feature of your personalized sanctuary.
17. Embrace a Scandinavian Minimalist Style
Scandinavian design brings a breath of fresh air to your special upper floor retreat. This approach focuses on clean lines, natural materials, and functional beauty. It creates an airy, spacious feel that works perfectly in compact areas.
Start with light walls that reflect plenty of natural illumination. Choose white paint with an LRV of 85+ for maximum brightness. This high light-reflective value makes your entire space feel more open and inviting.
Light-toned wood flooring enhances the bright, airy atmosphere beautifully. Engineered planks in 5-7 inch widths handle temperature changes exceptionally well. They remain stable through seasonal fluctuations in your upper level.
Keep furnishings minimal and purposeful to maintain that uncluttered look. Select only essential items that serve clear functions in your personal retreat. This thoughtful approach prevents visual chaos and promotes tranquility.
“Simplicity is the ultimate sophistication when it comes to creating peaceful spaces.”
The calming effect of this style transforms your sleeping area into a true sanctuary. Clean surfaces and organized spaces reduce mental clutter. You’ll find it easier to relax and recharge in this peaceful environment.
Consider these material combinations for your Scandinavian-inspired room:
- White walls with subtle gray undertones
- Light oak or ash wood flooring
- Natural textiles like linen and wool
- Minimal metallic accents in brushed finishes
This approach makes your attic bedroom appear significantly more spacious. The light color palette and clean lines create visual expansion. Everything feels intentionally designed and beautifully balanced.
Energy efficiency comes naturally with this bright, reflective scheme. Less artificial lighting is needed during daylight hours. Your home becomes more sustainable while maintaining perfect comfort.
Modern upper floor conversions often embrace this Scandinavian sensibility. It turns architectural challenges into design advantages. Your personal retreat becomes both stylish and highly functional.
18. Curate a Vintage Attic Retreat
Step back in time to create a charming vintage-inspired sanctuary in your upper level. This approach brings nostalgic warmth and character to your personal retreat.
Antique furniture pieces anchor your vintage design beautifully. Look for solid wood dressers, wrought iron beds, and classic vanities. These items add authentic charm you can’t find in modern stores.
Vintage-inspired wallpaper creates instant atmosphere in your special room. Choose moisture-resistant vinyl options specifically designed for upper levels. This smart choice handles humidity fluctuations while maintaining that classic look.
Weight considerations are important when selecting antique pieces. They typically weigh 100-200 pounds more than contemporary furniture. Ensure your floor structure can support this additional load safely.
“The past is never dead. It’s not even past.”
Balance vintage charm with modern comforts for the perfect blend. Update antique pieces with quality mattresses and supportive bedding. This combination gives you historical character with contemporary comfort.
Source vintage items from reputable dealers and estate sales. Check structural integrity before purchasing older pieces. Minor repairs can often restore beautiful furniture to its former glory.
Humidity management protects both your health and your vintage treasures. Maintain 40-50% relative humidity levels year-round. Use dehumidifiers during humid months and humidifiers in dry seasons.
This design approach adds unique character to your entire home. Your personal space becomes a timeless retreat that tells a story. The warmth and history create an exceptionally cozy atmosphere.
Timeless design ensures your vintage attic bedroom remains stylish for years. Quality antique pieces actually appreciate in value over time. Your investment brings both daily enjoyment and long-term value.
| Vintage Furniture Type | Average Weight | Best For | Maintenance Needs |
|---|---|---|---|
| Solid Wood Dresser | 180-250 lbs | Clothing storage | Annual polishing |
| Wrought Iron Bed | 120-180 lbs | Sleeping area | Rust prevention |
| Classic Vanity | 150-220 lbs | Dressing zone | Surface protection |
| Antique Armchair | 80-120 lbs | Reading nook | Upholstery care |
| Vintage Trunk | 60-100 lbs | Storage solution | Hardware maintenance |
Your vintage retreat becomes a cherished escape within your house. The combination of historical charm and modern functionality creates a truly special environment. Enjoy creating a space that feels both timeless and perfectly yours.
19. Design a Modern Industrial Loft Vibe
Channel urban sophistication right in your own home with an industrial-inspired retreat. This edgy design celebrates raw materials and structural honesty. Exposed brick walls, metal fixtures, and neutral tones create a contemporary loft feel.
Start by revealing any original brick or stone surfaces in your room. These natural textures add instant character and historical charm. Always seal masonry with breathable sealants to control dust and moisture.
Metal features define the industrial look beautifully. Think steel bed frames, iron pipe shelving, and brushed nickel lighting. Ensure all metal items have proper electrical grounding for safety.
Your color palette should stay primarily neutral with bold accents. Concrete gray walls provide the perfect backdrop. Pops of vibrant yellow or deep blue add energy to the space.
“Industrial design isn’t about hiding imperfections—it’s about celebrating authenticity and raw beauty.”
This style works particularly well in contemporary conversions. The urban loft vibe feels both sophisticated and comfortable. Your personal retreat becomes a conversation piece.
Consider these industrial elements for your attic bedroom:
- Exposed ductwork and structural beams
- Factory-style windows with metal frames
- Concrete-look flooring or area rugs
- Vintage industrial lighting fixtures
DIY options exist for many industrial features. Pipe shelving can be assembled with basic tools. Professional help is recommended for electrical and masonry work.
The resulting atmosphere feels both edgy and inviting. Raw materials create visual interest throughout your space. Your entire home gains a unique, contemporary character.
20. Create a Relaxed Bohemian Sanctuary
Transform your upper floor into a free-spirited haven that celebrates personal expression. This eclectic approach combines global influences with comfortable layers for a truly unique retreat.
Bohemian style embraces rich textures and vibrant patterns from around the world. Think embroidered textiles, hand-woven rugs, and artistic wall hangings. These elements create visual interest while maintaining a relaxed atmosphere.
Low-profile furniture keeps your space feeling open and airy. Choose pieces that sit closer to the floor for that casual boho vibe. This approach works beautifully under sloped ceilings.
Plants bring life and freshness to your personal sanctuary. They improve air quality while adding natural beauty. Consider easy-care varieties like pothos, snake plants, or peace lilies.
“The home should be the treasure chest of living.”
Humidity control protects your beautiful textiles and prevents mold growth. Maintain 40-60% relative humidity for fabric health. Use humidifiers or dehumidifiers as needed for seasonal adjustments.
Layer rugs, curtains, and pillows for maximum comfort and style. Mix patterns confidently by keeping colors within the same family. This creates cohesion despite the eclectic mix.
Your bohemian retreat should reflect your personal journey and tastes. Display collected items from travels or handmade treasures. This personalized approach makes the space truly yours.
The resulting atmosphere feels both cozy and creatively inspiring. Soft lighting and natural materials enhance the welcoming vibe. Your attic bedroom becomes a favorite escape within your home.
This design philosophy celebrates imperfections and individuality. Nothing needs to match perfectly—the charm comes from thoughtful curation. Enjoy creating a space that tells your unique story.
21. Choose a Low-Profile Bed Frame

Discover how a low-profile bed can transform your sleeping area. These smart designs create an illusion of more headroom in rooms with sloped ceilings. You’ll gain both visual space and practical comfort.
Platform beds work perfectly for this approach. Their clean lines and minimal structure keep everything feeling open. You’ll appreciate how much more spacious your room appears.
Simple frames without tall headboards maximize your available height. This clever solution makes even compact areas feel generous. Your entire space benefits from this thoughtful choice.
Consider pairing your low bed with other streamlined furniture. This consistency creates a harmonious look throughout your room. Everything works together to enhance the sense of openness.
“Good design is as little design as possible.”
Movement becomes easier with these space-saving solutions. You can navigate around your bed without ducking or crouching. This practical advantage enhances daily comfort significantly.
Various styles suit different aesthetic preferences. Modern platform models offer sleek sophistication. Minimalist frames provide understated elegance.
The modern aesthetic these pieces create feels both intentional and stylish. Your sleeping area gains contemporary appeal while maintaining perfect functionality.
Cost-effectiveness makes this upgrade accessible for most budgets. Quality low-profile frames typically range from $300 to $800. This investment delivers excellent value through improved space perception.
Your overall room perception improves dramatically with this approach. The enhanced visual space creates a more luxurious environment. You’ll enjoy spending time in your beautifully appointed retreat.
| Bed Frame Type | Height Range | Best For | Style Match | Price Range |
|---|---|---|---|---|
| Platform Bed | 10-14 inches | Modern aesthetics | Contemporary | $400-$800 |
| Minimalist Frame | 8-12 inches | Small spaces | Scandinavian | $300-$600 |
| Storage Platform | 12-16 inches | Organization needs | Transitional | $500-$900 |
| Floating Design | 6-10 inches | Maximal openness | Modern | $600-$1,000 |
Experiment with different frame styles to find your perfect match. Consider both aesthetics and functionality when making your selection. Your chosen piece will become the foundation of your comfortable retreat.
22. Paint Walls and Ceilings the Same Light Color
One simple trick can completely transform how your upper floor feels. Painting everything the same light color creates a magical seamless effect. This approach makes your entire space appear larger and more open.
The visual continuity fools the eye into perceiving more height. There are no hard lines separating walls from ceiling. Your room gains a unified, expansive feeling that’s both calming and impressive.
Choose paint with high Light Reflective Value for best results. LRV 85+ products reflect maximum natural and artificial light. Your attic bedroom will feel brighter throughout the day.
Soft whites work beautifully for this seamless design. Pale blues and grays also create that airy, spacious look. These neutral tones provide the perfect backdrop for your personal style.
“Color is a power which directly influences the soul.”
Sloped ceilings particularly benefit from this approach. The continuous color flow minimizes awkward angles. Everything feels intentional and beautifully integrated.
Preparation makes all the difference for professional results. Clean surfaces thoroughly and use quality primer. This ensures your paint adheres properly and lasts longer.
Cutting-in technique creates sharp lines where needed. Use angled brushes for precision around windows and trim. Take your time for that flawless finished look.
This solution is remarkably cost-effective. A few gallons of paint can transform your entire space. The visual impact far exceeds the modest investment required.
The resulting atmosphere feels both serene and expansive. Your personal retreat becomes a bright, welcoming sanctuary. You’ll love spending time in your beautifully transformed room.
| Paint Type | LRV Range | Best For | Coverage per Gallon |
|---|---|---|---|
| Matte Finish | 85-92 | Hiding imperfections | 350-400 sq ft |
| Eggshell Finish | 83-90 | Moderate durability | 300-350 sq ft |
| Satin Finish | 82-88 | Easy cleaning | 280-320 sq ft |
| Semi-Gloss | 80-86 | High moisture areas | 250-300 sq ft |
This unified color scheme works with any design style. From modern minimalist to cozy traditional, everything looks cohesive. Your attic bedroom becomes a harmonious retreat.
Experiment with sample pots before committing. Test colors at different times of day. You’ll find the perfect shade that makes your space feel just right.
23. Select Low and Horizontal Furniture
Choosing the right furniture can completely change how your special upper area feels. Low-profile pieces create an open, airy atmosphere that makes everything seem more spacious.
Horizontal designs work particularly well in compact areas. They draw the eye across the room rather than upward. This clever trick enhances the perception of width and depth.
Long dressers and low bookshelves maximize your available wall space beautifully. They provide ample storage without overwhelming your visual field. Your attic bedroom maintains that comfortable, open feeling.
These smart solutions create perfect balance in smaller areas. The horizontal lines complement sloped ceilings wonderfully. Everything feels intentionally designed and harmoniously proportioned.
“Good design is obvious. Great design is transparent.”
Avoid tall, bulky items that compete with your ceiling height. Instead, choose pieces that sit closer to the floor. This approach preserves precious vertical clearance.
The resulting look feels both modern and highly functional. Clean lines and low profiles create a contemporary aesthetic. Your entire space benefits from this thoughtful approach.
Scale considerations ensure everything works together perfectly. Measure carefully before selecting any new furniture. This prevents overcrowding and maintains comfortable pathways.
Your home gains a streamlined, organized feeling through these choices. The uncluttered environment promotes relaxation and tranquility. You’ll appreciate how peaceful your retreat becomes.
Modern design principles emphasize this horizontal orientation. It creates visual continuity throughout your personal sanctuary. Everything feels connected and beautifully balanced.
24. Get Creative with Corner Nooks
Don’t overlook those quirky corner areas in your special upper floor. These often-forgotten spots hold incredible potential for creating charming functional zones. With some imagination, you can turn every inch into something wonderful.
Corner nooks make perfect reading retreats or compact workstations. Tuck a small desk into an angled area for a private office spot. Add comfortable seating for a cozy reading escape away from the main activity areas.
Low-profile furniture works beautifully in these compact spaces. Floor pillows, beanbags, or small stools fit perfectly without overwhelming the area. They maintain an open feel while providing comfortable seating options.
The atmosphere becomes wonderfully intimate and inviting. Soft lighting and personal touches create a sense of privacy and comfort. You’ll find yourself drawn to these special little retreats throughout your day.
“Every nook has a story waiting to be told through creative design.”
Consider these clever uses for your corner areas:
- Reading nook with built-in shelving
- Compact desk for writing or laptop work
- Display area for collections or artwork
- Mini meditation or yoga space
- Pet bed or feeding station
DIY options make these projects accessible for any budget. Repurpose old furniture or build simple shelves yourself. Personalize each nook to reflect your unique style and needs.
These creative solutions add wonderful character to your personal retreat. Each customized corner tells its own story and serves a specific purpose. Your entire space gains depth and personality through these thoughtful touches.
The multi-functional approach maximizes your available square footage beautifully. You gain dedicated areas for different activities without sacrificing openness. Everything feels intentionally designed and perfectly utilized.
Experiment with different arrangements before finalizing your design. Try various furniture configurations to find what works best. Your efforts will create a space that feels both highly functional and personally meaningful.
25. Design a Smart, Custom Closet Solution
Transform those tricky sloped areas into highly organized storage zones with custom closet systems. Your unique space deserves tailored solutions that maximize every inch.
Custom designs work perfectly with angled ceilings and irregular walls. They turn challenging areas into functional storage that looks built-in and intentional.
Vary rod heights to accommodate different clothing types. Shorter sections work for shirts and blouses. Longer areas handle dresses and coats beautifully.
Adjustable shelving provides flexibility for folded items and accessories. You can reconfigure as your storage needs change over time.
“Organization isn’t about perfection. It’s about efficiency, reducing stress and clutter, saving time and money, and improving your overall quality of life.”
This approach creates a clutter-free environment where everything has its place. You’ll enjoy knowing exactly where to find each item when needed.
Measure carefully before designing your system. Note ceiling heights at multiple points along each wall. Account for any obstructions like vents or electrical boxes.
Aesthetic integration makes your storage blend seamlessly with the room. Choose finishes that match your existing decor for a cohesive look.
Professional organizers can help design the perfect system for your needs. They understand how to maximize awkward spaces effectively.
Your entire home benefits from this organized approach. The efficiency gained upstairs improves your daily routine throughout the house.
| Closet Feature | Recommended Height | Best For | Space Required |
|---|---|---|---|
| Double Hang Rods | 36-42 inches | Shirts, blouses | 24-inch depth |
| Single Hang Rod | 66-72 inches | Dresses, coats | 24-inch depth |
| Adjustable Shelves | 12-16 inches | Folded items | 12-16 inch depth |
| Accessory Drawers | 6-8 inches | Jewelry, belts | 16-20 inch depth |
| Shoe Storage | 8-12 inches | Footwear | 12-16 inch depth |
Enjoy creating a personalized storage solution that makes your space work perfectly for you. The organization and efficiency will transform how you experience your entire room.
Bringing Your Dream Attic Bedroom to Life
You now have all the inspiration and practical guidance to turn your upper floor into a beautiful, functional retreat. Start with a solid plan and professional assessment to ensure structural soundness and code compliance.
Remember those smart design solutions like light colors and multi-purpose furniture. They truly maximize your unique space while creating a cozy atmosphere.
Working with qualified contractors makes your project smoother and safer. Their expertise helps navigate challenges while adding value to your home.
Your vision can become reality—transforming unused area into a personalized sanctuary. Take that first step today toward creating the perfect room you’ll love for years.